Quick Start
Get up and running with Lenify's blueprint-driven development in minutes! This guide will walk you through creating your first project using our revolutionary AI-powered platform.
Welcome to Lenify
Lenify is the world's first 100% Software Blueprint-driven AI development platform that transforms how you build applications. Our AI generates complete project blueprints and provides intelligent, context-aware assistance throughout your development lifecycle.
What You'll Learn
In this quick start guide, you'll:
- Set up your Lenify account and workspace
- Download and install the desktop application
- Sign in and configure your subscription
- Access your dashboard and workspace
- Configure your LLM API key for code generation
- Create your first project with AI blueprint generation
- Generate, review, and manage your project blueprint
- Explore the blueprint-driven IDE interface
- Experience task-driven development with AI assistance
- Use chat-driven development and automated bug detection
- Master source control integration and live web preview
This guide takes approximately 15-20 minutes to complete. Experience the power of blueprint-driven development that revolutionizes how you build applications.
Step 1: Account Setup
Create Your Account
-
Visit Lenify: Go to lenify.ai
-
Sign Up: Click "Sign Up" and fill out the registration form:
- First Name and Last Name
- Email address
- Password (minimum 8 characters)
- Confirm Password
-
Email Verification: After registration, you'll be redirected to an activation pending page. Check your email for a verification link and click to confirm your account.
-
Account Activation: Once verified, you can sign in and access your dashboard
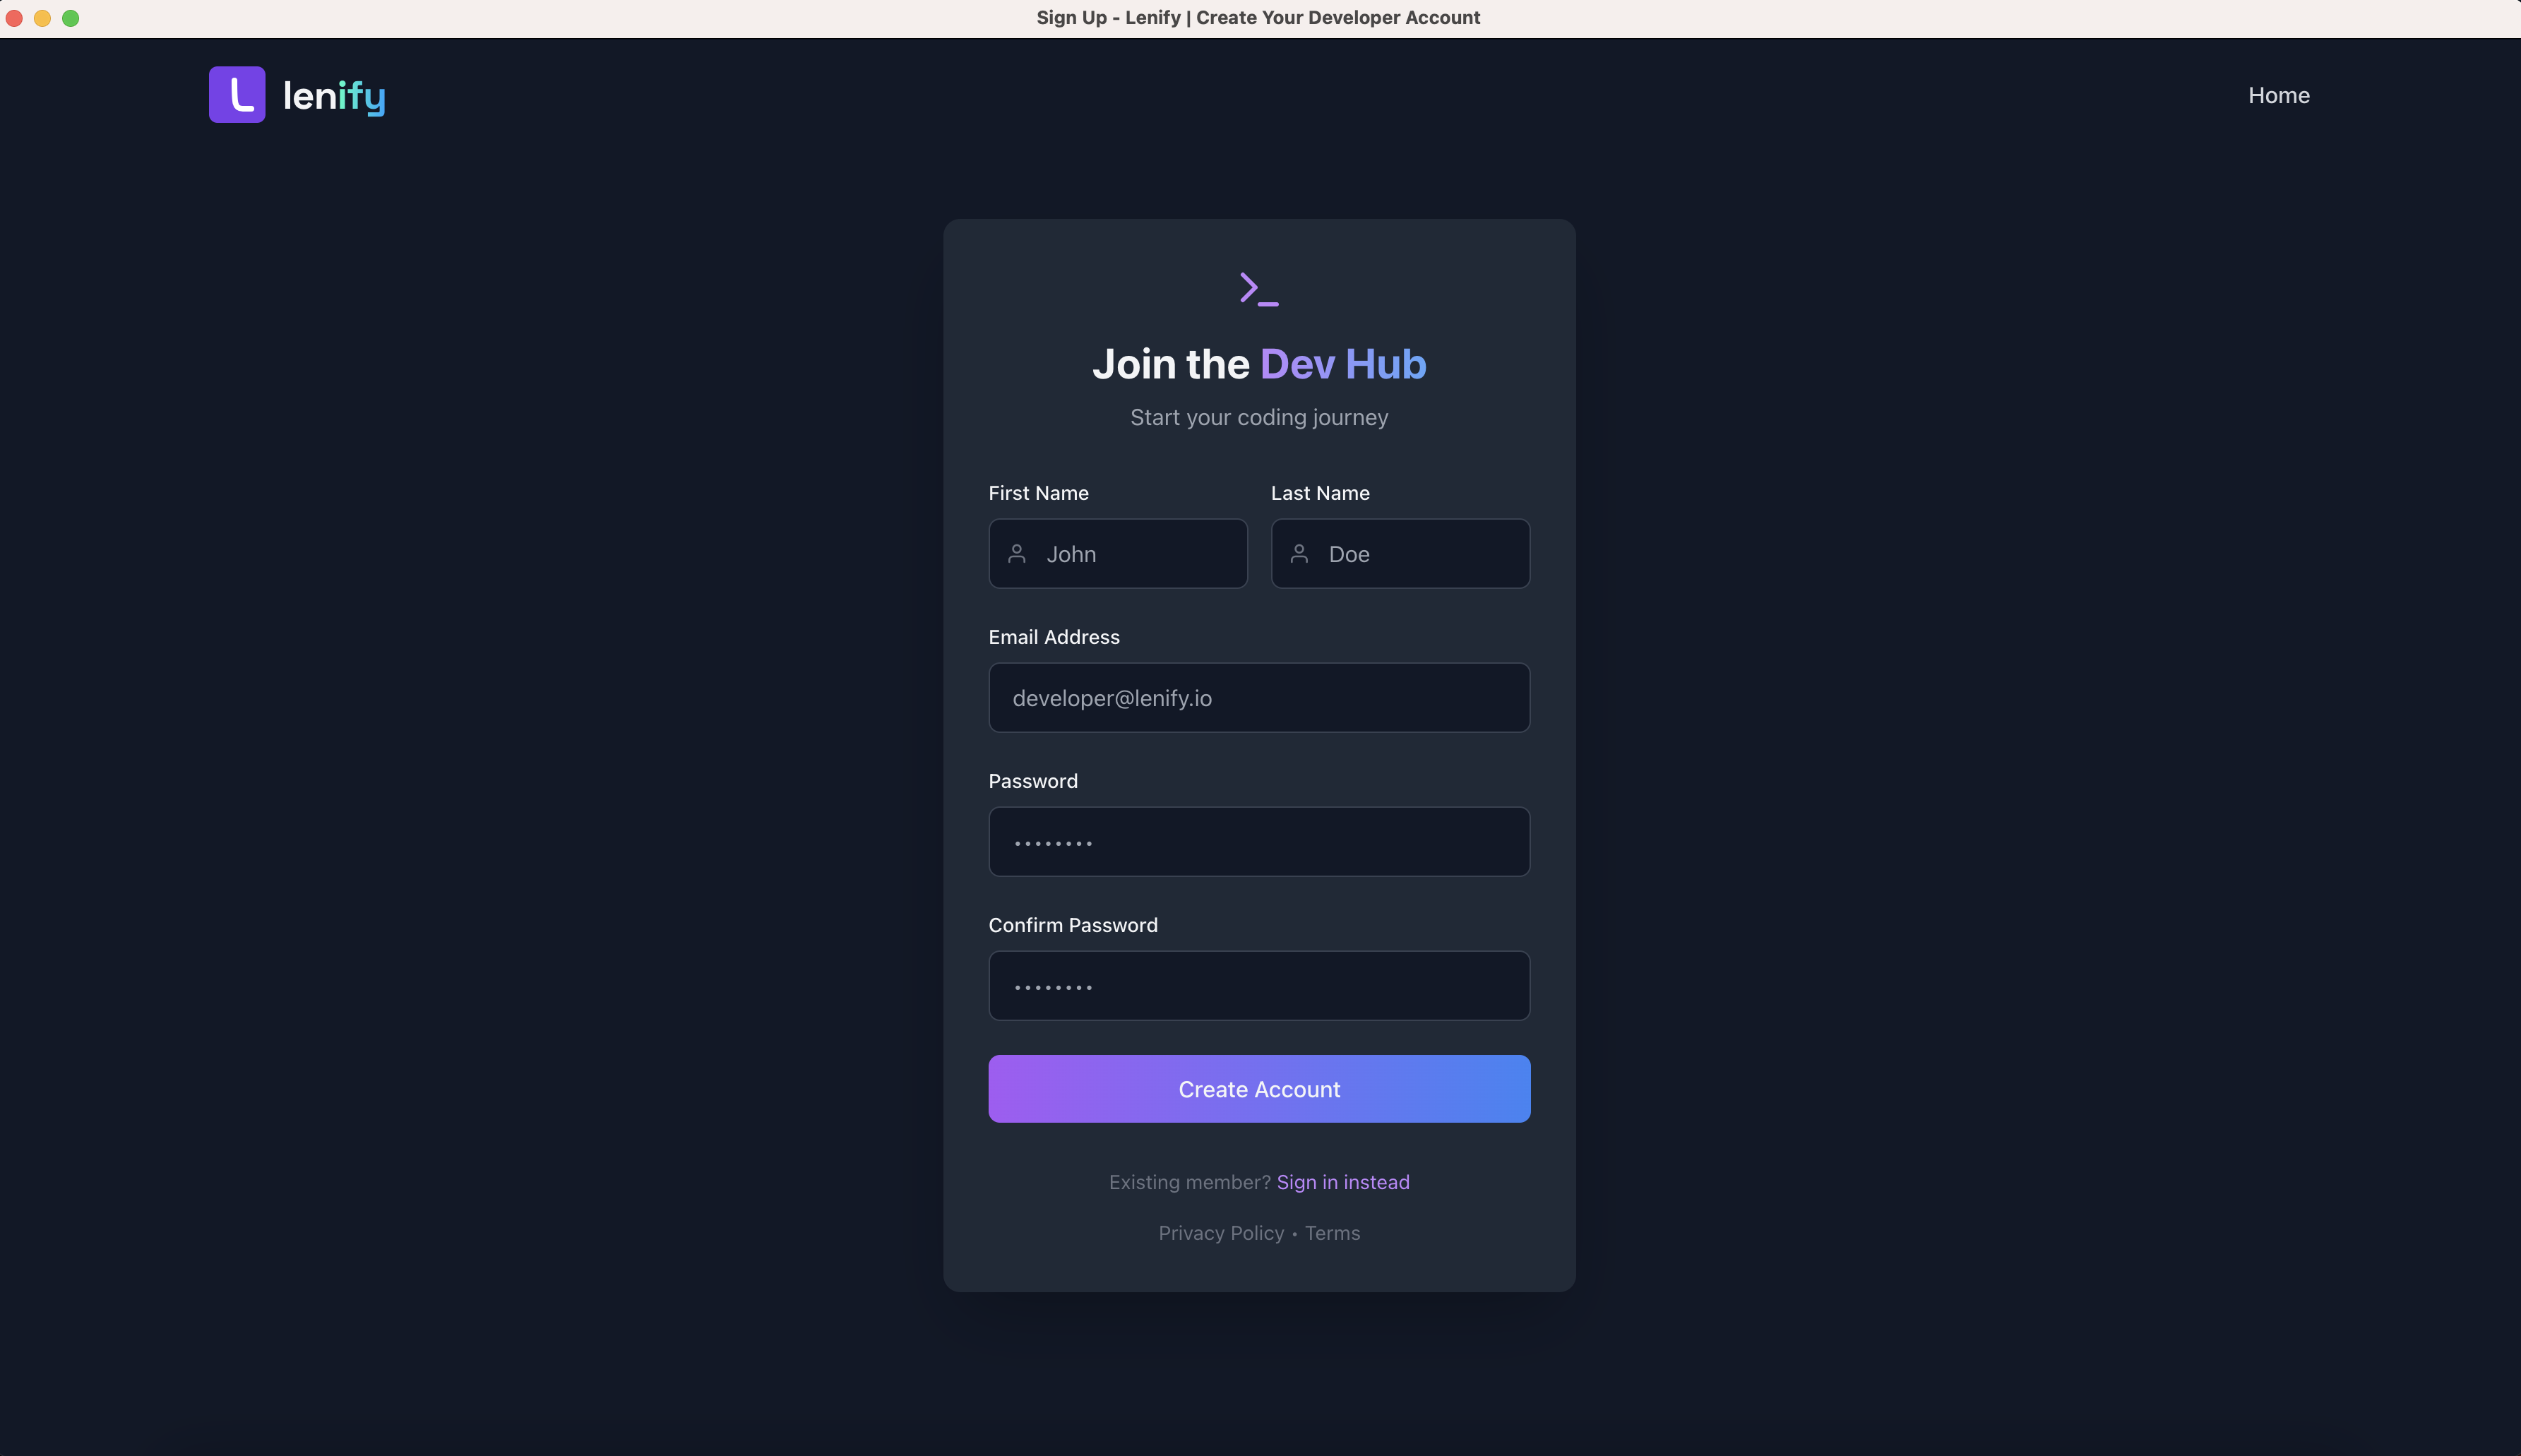 The Lenify sign-up form with a clean, developer-focused interface featuring real-time validation, loading states, and secure password requirements
Step 2: Download and Installation
Desktop Application
Lenify offers native desktop applications for all major operating systems, providing the best performance and integration with your development workflow.
Download Options
-
Windows (64-bit)
- Download the
.exeinstaller from lenify.ai/download - Supports Windows 10 and Windows 11
- Includes auto-updater for seamless version management
- Download the
-
macOS (Intel & Apple Silicon)
- Download the
.dmgpackage from lenify.ai/download - Universal binary supporting both Intel and M1/M2 Macs
- Requires macOS 11.0 (Big Sur) or later
- Download the
-
Linux (Debian/Ubuntu)
- Download the
.debpackage for Debian-based distributions - Requires Ubuntu 18.04+ and other modern distributions
- Download the
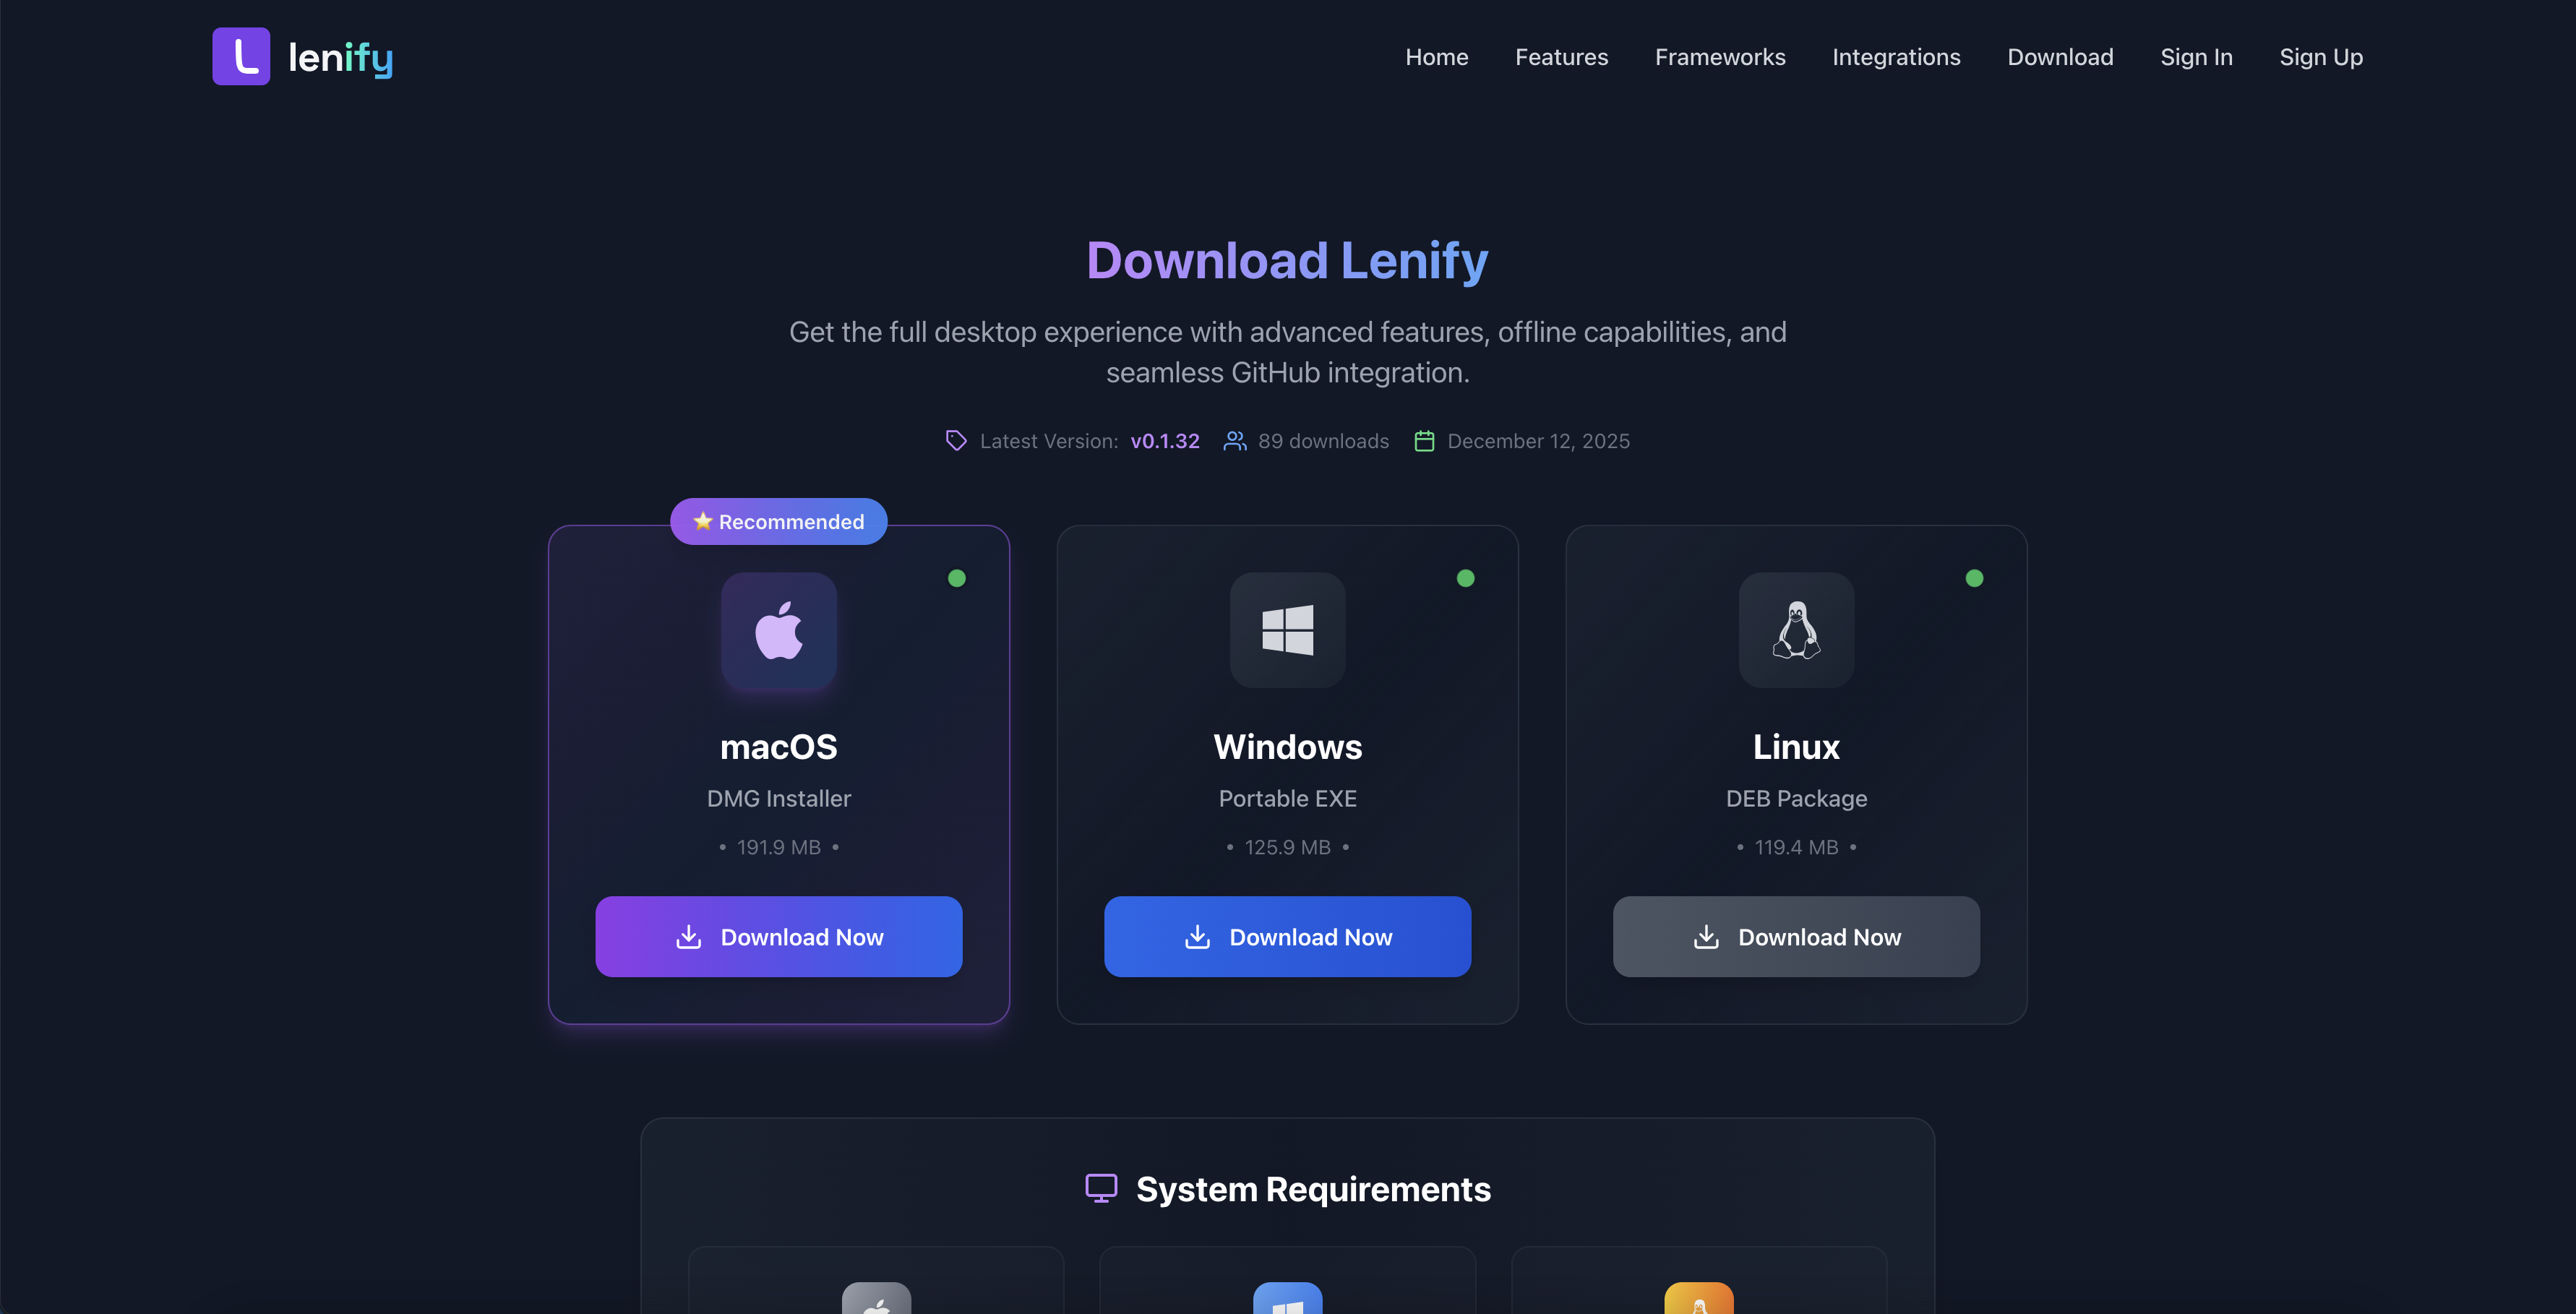 Download page with platform-specific installers for Windows, macOS, and Linux with automatic platform detection and system requirements
Installation Process
Windows:
- Run the downloaded
.exeinstaller - Follow the installation wizard
- Launch Lenify from Start Menu or Desktop shortcut
- Sign in with your account credentials
macOS:
- Open the downloaded
.dmgfile - Drag Lenify to your Applications folder
- Launch from Applications or Spotlight search
- Allow security permissions if prompted
- Sign in with your account credentials
Linux:
- Install the
.debpackage:sudo dpkg -i lenify-*.deb - Launch from application menu or terminal
- Sign in with your account credentials
System Requirements
Minimum Requirements
- RAM: 4GB (8GB recommended)
- Storage: 2GB free space
- Network: Stable internet connection for AI features
- Graphics: Hardware acceleration support
Recommended Specifications
- RAM: 16GB or higher
- Storage: SSD with 10GB+ free space
- CPU: Multi-core processor (4+ cores)
- Network: High-speed broadband connection
Step 3: Authentication and Subscription Setup
Sign In to Your Account
After installing the Lenify desktop application, you'll need to authenticate to access the platform.
Desktop Application Sign-In
-
Launch Lenify: Open the Lenify application from your desktop or applications folder
-
Sign-In Interface: You'll see a clean authentication screen with:
- Email address field
- Password field
- "Forgot Password?" link
-
Enter Credentials: Use the same email and password from your account registration
-
Account Activation: If your account isn't activated yet, you'll be redirected to check your email for the activation link
-
Authentication: The system will validate your credentials and redirect you to the dashboard
 Clean and secure sign-in interface with email and password authentication
Web Browser Access
Alternatively, you can access Lenify through your web browser:
- Visit: lenify.ai
- Sign In: Click "Sign In" and enter your credentials
- Browser Compatibility: Supports Chrome, Firefox, Safari, and Edge
- Session Management: Automatic session persistence across browser sessions
Account Activation Process
If your account hasn't been activated:
- Check Email: Look for the activation email in your inbox (check spam folder too)
- Activation Link: Click the link in the email to activate your account
- Link Expiry: Activation links expire after 24 hours
- Resend Option: If needed, you can request a new activation email from the activation pending page
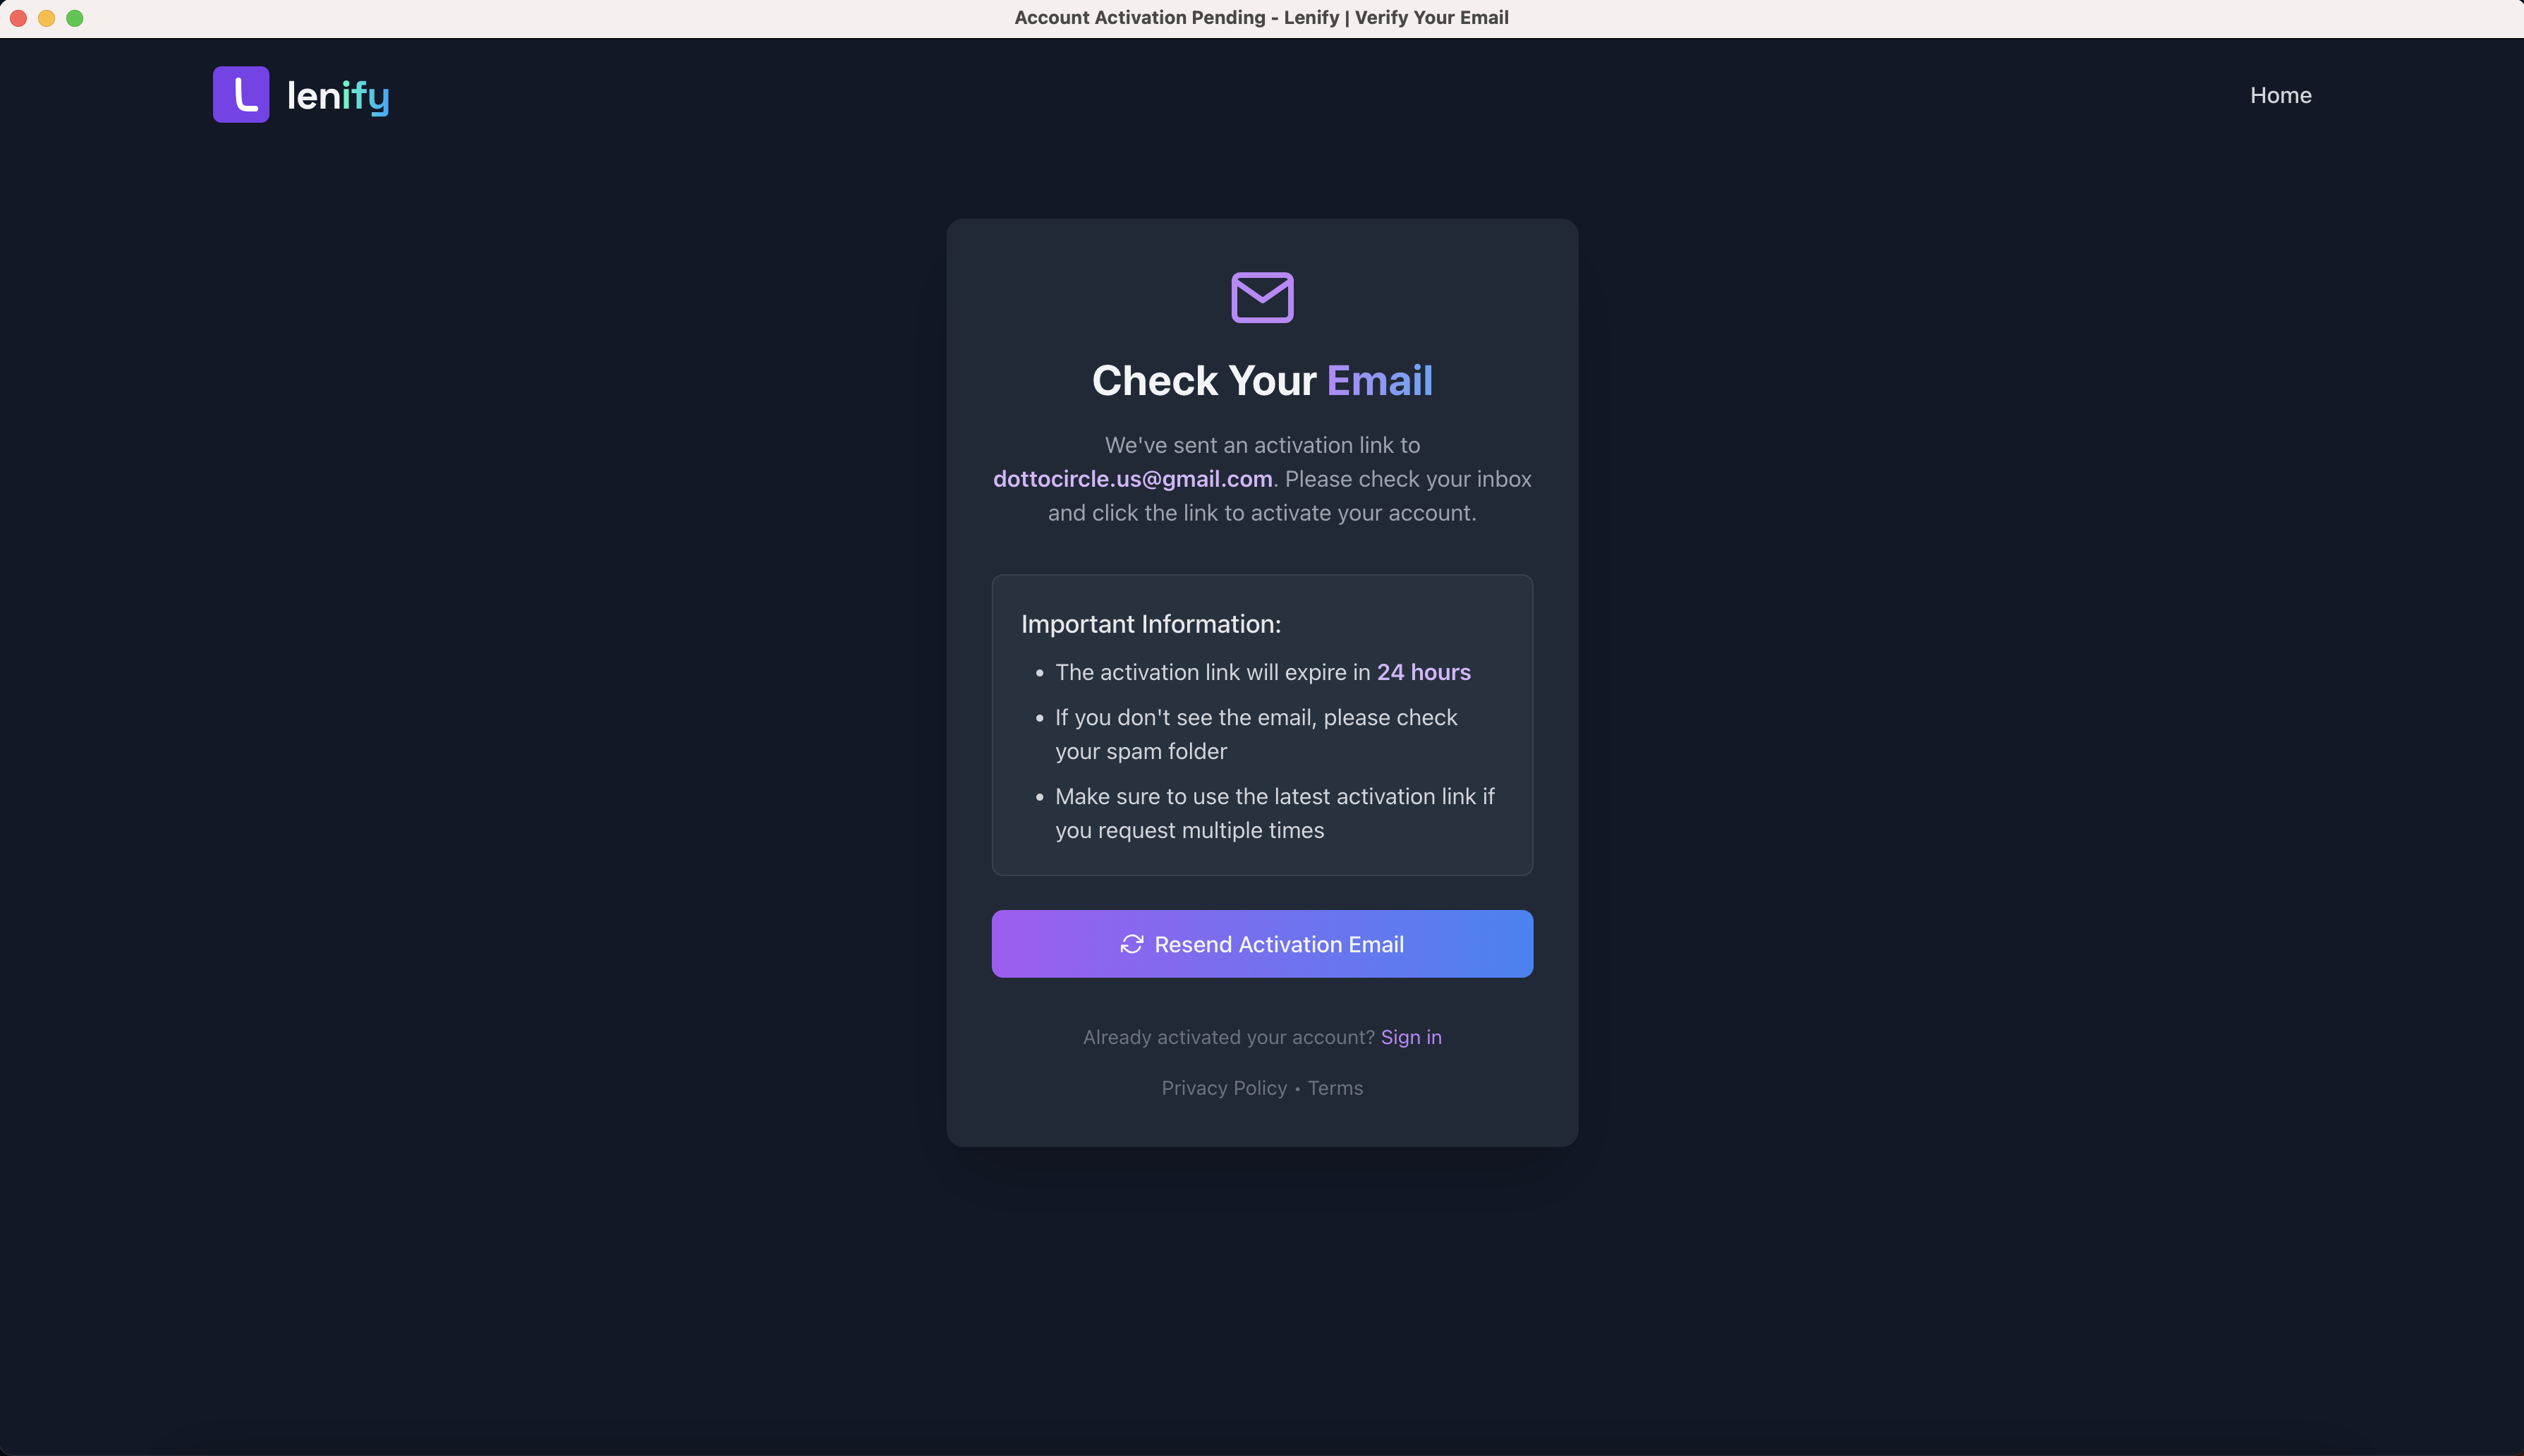 Account activation interface showing activation pending status with email verification instructions
Choose Your Subscription Plan
After successful sign-in, you'll be prompted to select a subscription plan that fits your development needs.
Available Plans
1. Starter Plan ($10/month or $96/year)
- 1 Project and 1 User
- AI-powered project blueprints and code generation
- Automated error detection and fixing
- Web preview and GitHub integration
- 1GB Storage and 100 AI Credits/month
- Community support
2. Pro Plan ($20/month or $192/year) - Most Popular
- 5 Projects and 5 Users
- All Starter features plus:
- Priority AI processing
- Advanced debugging tools
- 10GB Storage and 1,000 AI Credits/month
- Priority support and team collaboration
3. Enterprise Plan ($30/month or $288/year)
- Unlimited Projects and Unlimited Teams
- All Pro features plus:
- Advanced AI features and analytics
- Custom integrations and dedicated support
- Custom Storage and Unlimited AI Credits
- 24/7 dedicated support
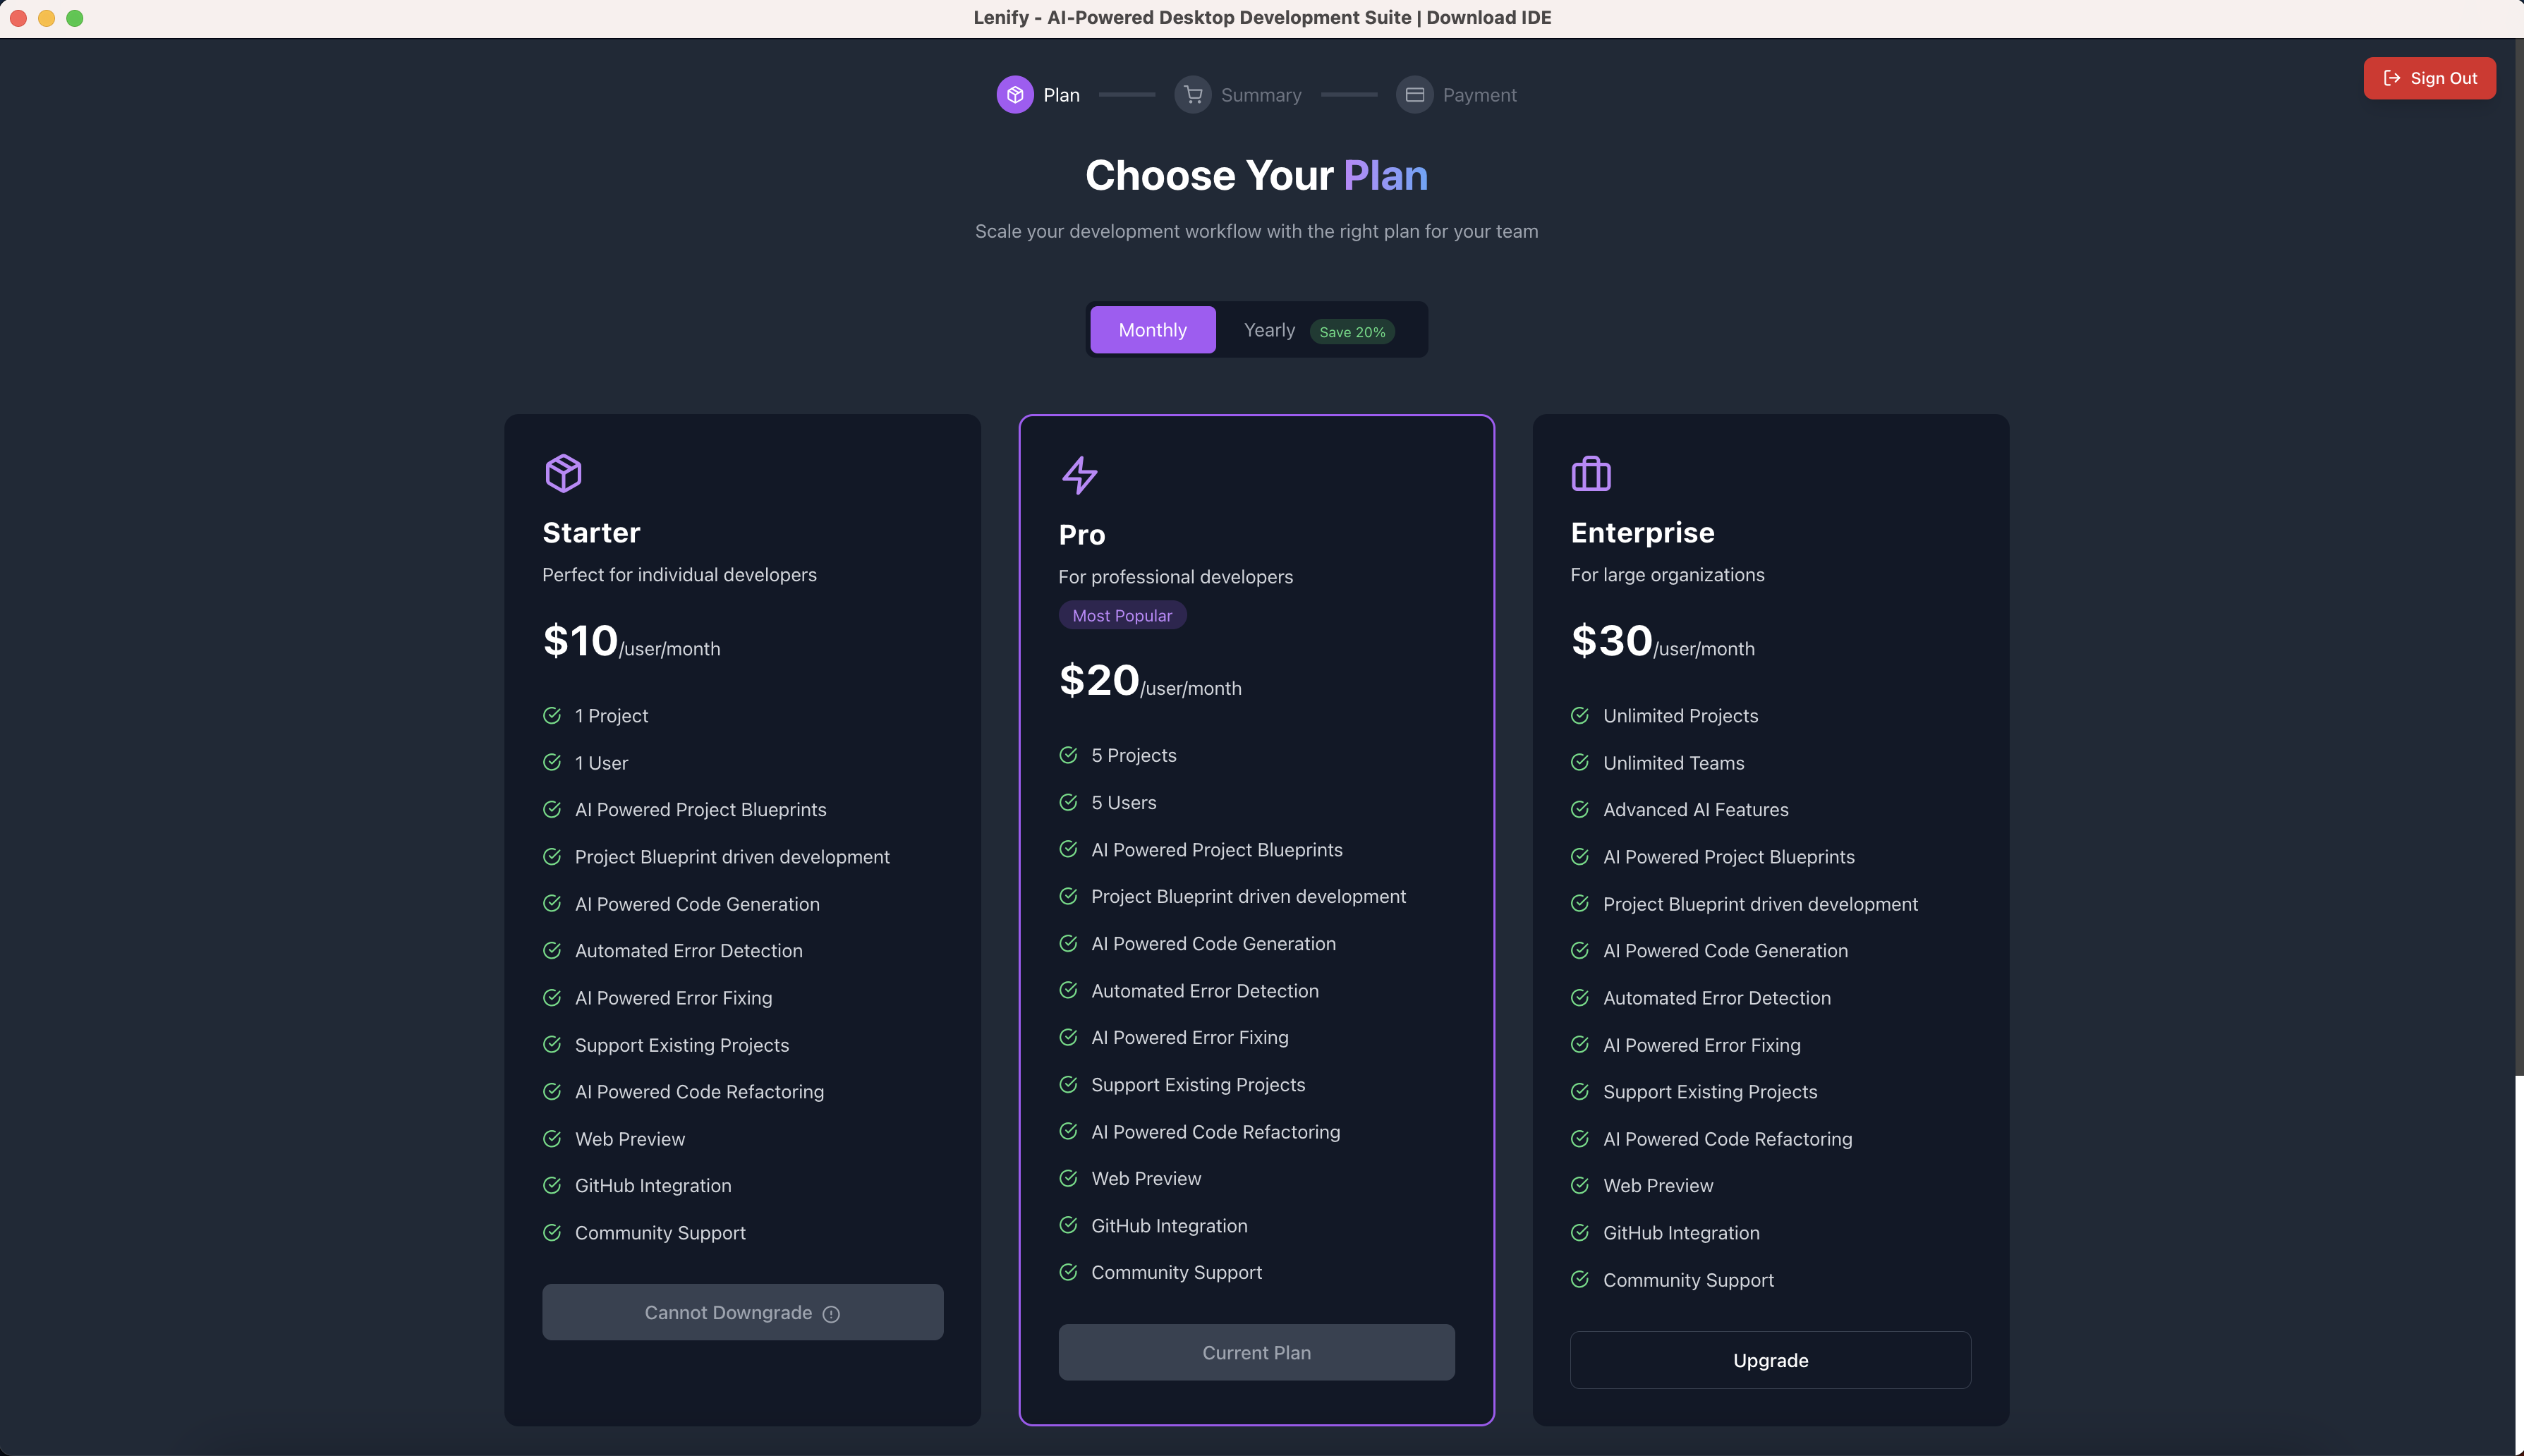 Flexible subscription plans with monthly or yearly billing options (20% savings on yearly plans)
Billing Options
Monthly vs Yearly:
- Monthly Billing: Pay month-to-month with full flexibility
- Yearly Billing: Save 20% with annual commitment
- Plan Changes: Upgrade, downgrade, or cancel anytime
Payment Methods:
- Credit/debit cards (Visa, MasterCard, American Express)
- Secure processing through Stripe integration
- Automatic invoice generation and email delivery
Subscription Management
Once you select a plan:
- Payment Setup: Add your payment method securely
- Plan Activation: Your subscription activates immediately
- Access Dashboard: Full access to Lenify's development platform
- Usage Tracking: Monitor your plan usage in real-time
Key Features:
- Secure Processing: PCI-compliant payment handling via Stripe
- Flexible Billing: Change plans or cancel anytime from your dashboard
- Usage Monitoring: Real-time tracking of projects, storage, and AI credits
- Team Management: Add team members and manage permissions (Pro/Enterprise)
Ready to Start Building!
Once authentication and subscription are complete, you'll have:
✅ Authenticated Access - Secure access to your Lenify workspace
✅ Active Subscription - Full access to AI features based on your plan
✅ Dashboard Access - Project management and team collaboration tools
✅ Development Ready - Ready to create your first blueprint-driven project
Your account is now configured and ready for blueprint-driven development. Let's access your dashboard and create your first project!
Step 4: Access Your Dashboard
Dashboard Overview
After signing in, you'll land on your personalized dashboard with:
- Project Management: View and manage all your projects
- Organization & Team Management: Create and manage development teams
- Billing & Subscription: Manage your subscription and billing details
- Usage Analytics: Track your development activity and resource usage
- Settings & Profile: Configure your account preferences
 The main Lenify dashboard showing projects, organizations, and development analytics
Dashboard Features
- Projects Tab: Browse your project portfolio in grid or list view, with search and filtering capabilities to quickly find specific projects
- Organizations Tab: Manage development teams, assign member roles (admin, developer, viewer), and collaborate on shared projects
- Billing Tab: Monitor subscription usage, manage payment methods, view invoices, and track resource consumption across your projects
- Settings Tab: Configure profile information, set development preferences, manage API keys, and customize your workspace environment
Step 5: Configure LLM API Key
Set Up Your Anthropic API Key
Before you can start generating project blueprints and using AI-powered code generation, you need to configure your Anthropic API key. Lenify currently supports Anthropic's Claude models, with support for OpenAI, Google Gemini, Grok, and DeepSeek coming in future updates.
Why You Need an API Key
Lenify uses your API key to:
- Generate comprehensive project blueprints
- Provide AI-powered code generation in the IDE
- Enable automated error detection and fixing
- Power the AI assistant for development guidance
Without an API key, the Blueprint and Open IDE features will be disabled. You won't be able to create new projects or access AI-powered development tools.
Getting Your Anthropic API Key
- Visit Anthropic Console: Go to console.anthropic.com
- Sign Up or Sign In: Create an account or log in to your existing Anthropic account
- Navigate to API Keys: Find the API Keys section in your console
- Create New Key: Click "Create Key" and give it a descriptive name (e.g., "Lenify Development")
- Copy the Key: Copy your API key (starts with
sk-ant-api03-...) - Store Securely: Save the key as you won't be able to see it again
 Generate your Anthropic API key from the console for secure access to Claude models
Configure API Key in Lenify
Method 1: API Key Warning Banner (Recommended for New Users)
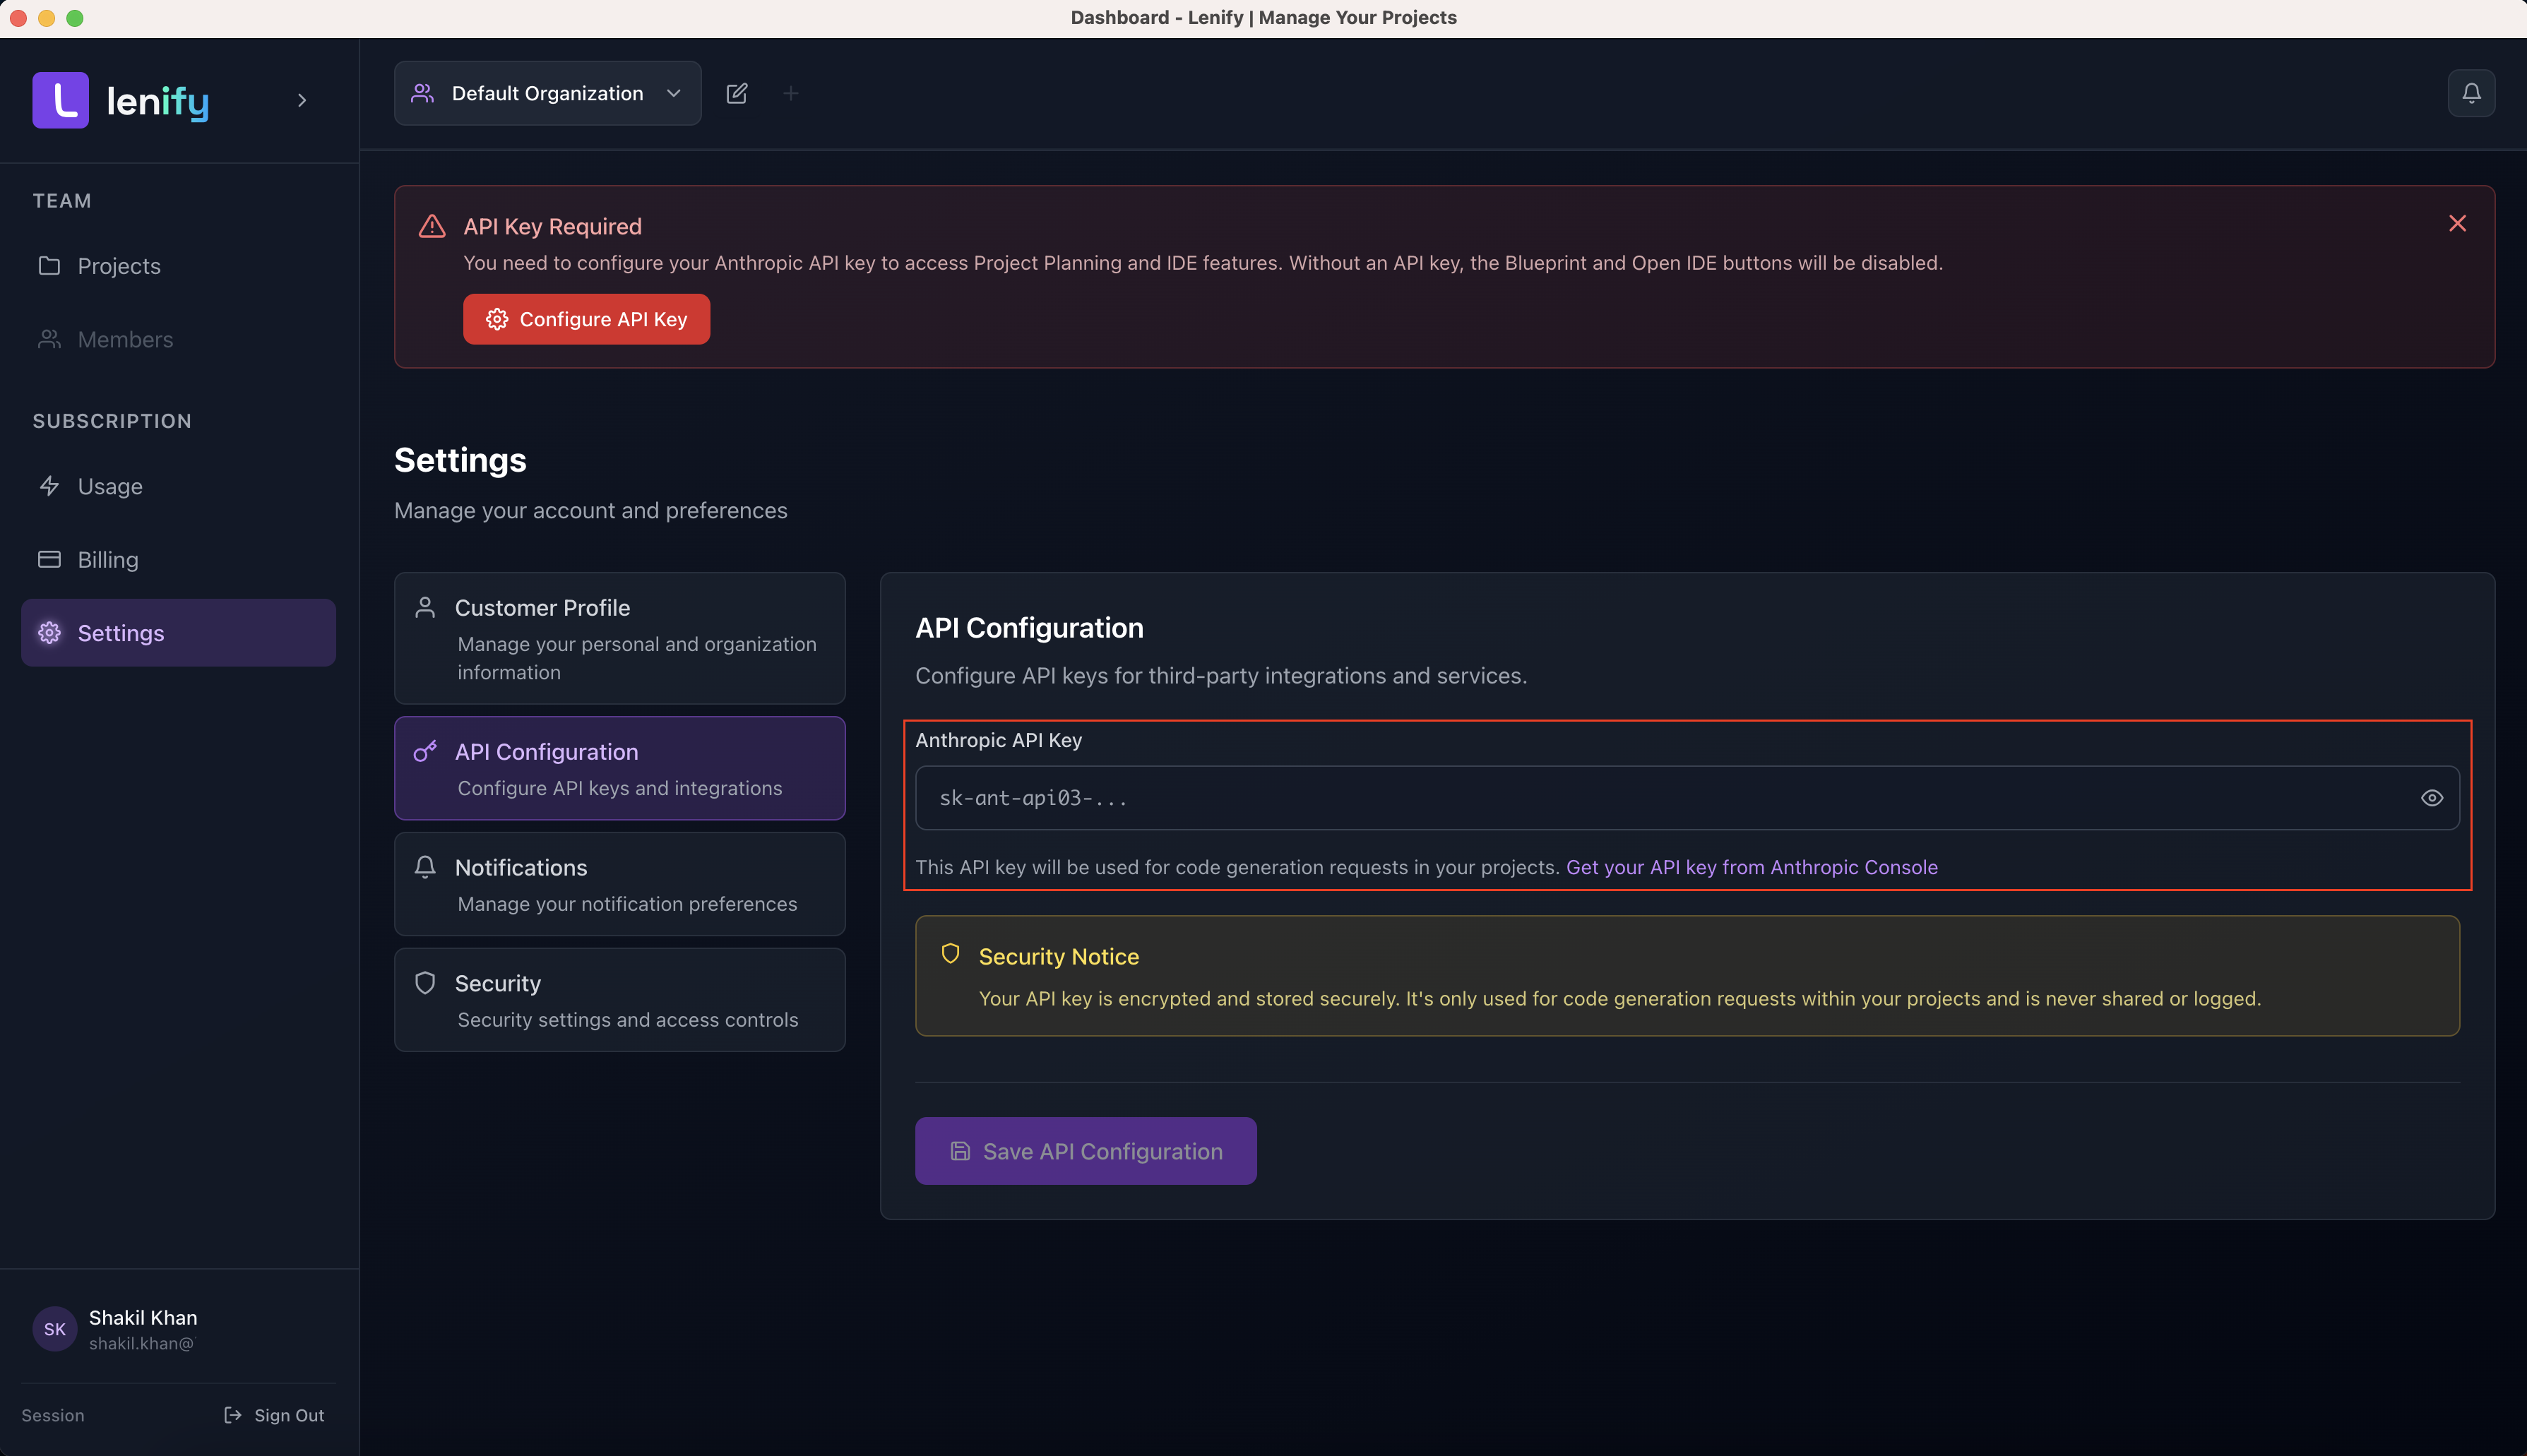
When you first access your dashboard without an API key, you'll see a prominent warning banner:
- Notice the Banner: Red warning banner at the top stating "API Key Required"
- Click Configure: Click the "Configure API Key" button in the banner
- Settings Navigation: This will automatically take you to the API Configuration section
Method 2: Manual Navigation to Settings
- Open Settings: Click your profile icon in the top-right corner and select "Settings"
- API Configuration Tab: Navigate to the "API Configuration" section in the left sidebar
- Configure Key: Follow the setup process described below
API Key Configuration Interface
For New API Key Setup:
- API Key Input: You'll see a password-masked input field for your Anthropic API key
- Show/Hide Toggle: Use the eye icon to toggle visibility of your key while typing
- Enter Key: Paste your API key (format:
sk-ant-api03-...) - Save Configuration: Click "Save API Configuration" to securely store your key
For Existing API Key Updates:
If you already have an API key configured:
- Secure Status: You'll see a green "API Key Configured" indicator
- Update Option: Click "Update Key" to change your existing key
- New Key Entry: Enter your new API key and save
- Replacement: The new key will securely replace the old one
Security Features
Lenify ensures your API key security through:
- Encryption: Keys are encrypted before storage in our secure database
- No Display: For security, we never display your full API key after saving
- Secure Transmission: All API communications use HTTPS encryption
- No Logging: Your API key is never logged or exposed in system logs
- Limited Access: Keys are only used for authenticated AI requests within your projects
Your API key is encrypted and stored securely. It's only used for code generation requests within your projects and is never shared or logged.
API Key Validation
Lenify validates your API key by:
- Format Check: Ensures the key follows Anthropic's format (
sk-ant-api03-...) - Authentication Test: Verifies the key works with Anthropic's API
- Permission Verification: Confirms the key has the necessary permissions
Common Issues:
- Invalid Format: Make sure you copied the complete key starting with
sk-ant-api03- - Expired Key: Check if your key is still active in the Anthropic Console
- Insufficient Credits: Ensure your Anthropic account has available credits
Future AI Model Support
While Lenify currently supports Anthropic's Claude models exclusively, we're actively working on expanding AI model support:
Coming Soon:
- OpenAI GPT Models - GPT-4, GPT-3.5-turbo, and future releases
- Google Gemini - Gemini Pro and Gemini Ultra models
- Grok (xAI) - Elon Musk's AI assistant platform
- DeepSeek - Advanced reasoning and coding models
Multi-Model Benefits:
- Choose the best model for specific tasks
- Compare outputs across different AI systems
- Fallback options if one service is unavailable
- Cost optimization based on model pricing
Verification and Next Steps
Once your API key is configured:
✅ API Authentication - Your key is validated and ready for use
✅ AI Features Enabled - Blueprint generation and IDE AI tools are now active
✅ Project Creation Ready - You can now create projects with full AI assistance
✅ Development Unlocked - All Lenify development features are available
Your API key is configured and Lenify's AI-powered development tools are now fully activated. Let's create your first project with AI blueprint generation!
Step 6: Create Your First Project
Project Creation Process
Now that your API key is configured, you can create your first project and generate a comprehensive blueprint.
Starting a New Project
- Click "New Project" from the dashboard header
- Fill Project Details: Name, description, and project type
- Select Framework: Choose from supported frameworks
- Project Types Available:
- Website/Web App
- Mobile App
- API/Backend
 Create a new project with AI-powered blueprint generation
Project Setup Confirmation
Once you've filled in the project details:
- Review Information: Double-check your project name, type, and framework selection
- Create Project: Click "Create Project" to initialize your new project
- Automatic Redirect: You'll be automatically redirected to the Project Planning page
- Blueprint Generation Ready: Your project is now ready for AI blueprint generation
Your project has been created successfully and you're ready to generate your AI-powered blueprint!
Step 7: Generate Project Blueprint
Blueprint Planning Interface
After creating your project, you'll enter the Project Planning page where AI generates your comprehensive blueprint:
1. Describe Your Project Vision
Start by describing your project requirements in the comprehensive input form.
Form Components:
- Project Description: Large text area to describe your project vision
- Technology Preferences: Select preferred frameworks and tech stack
- Generate Project Plan Button: Initiates AI blueprint generation
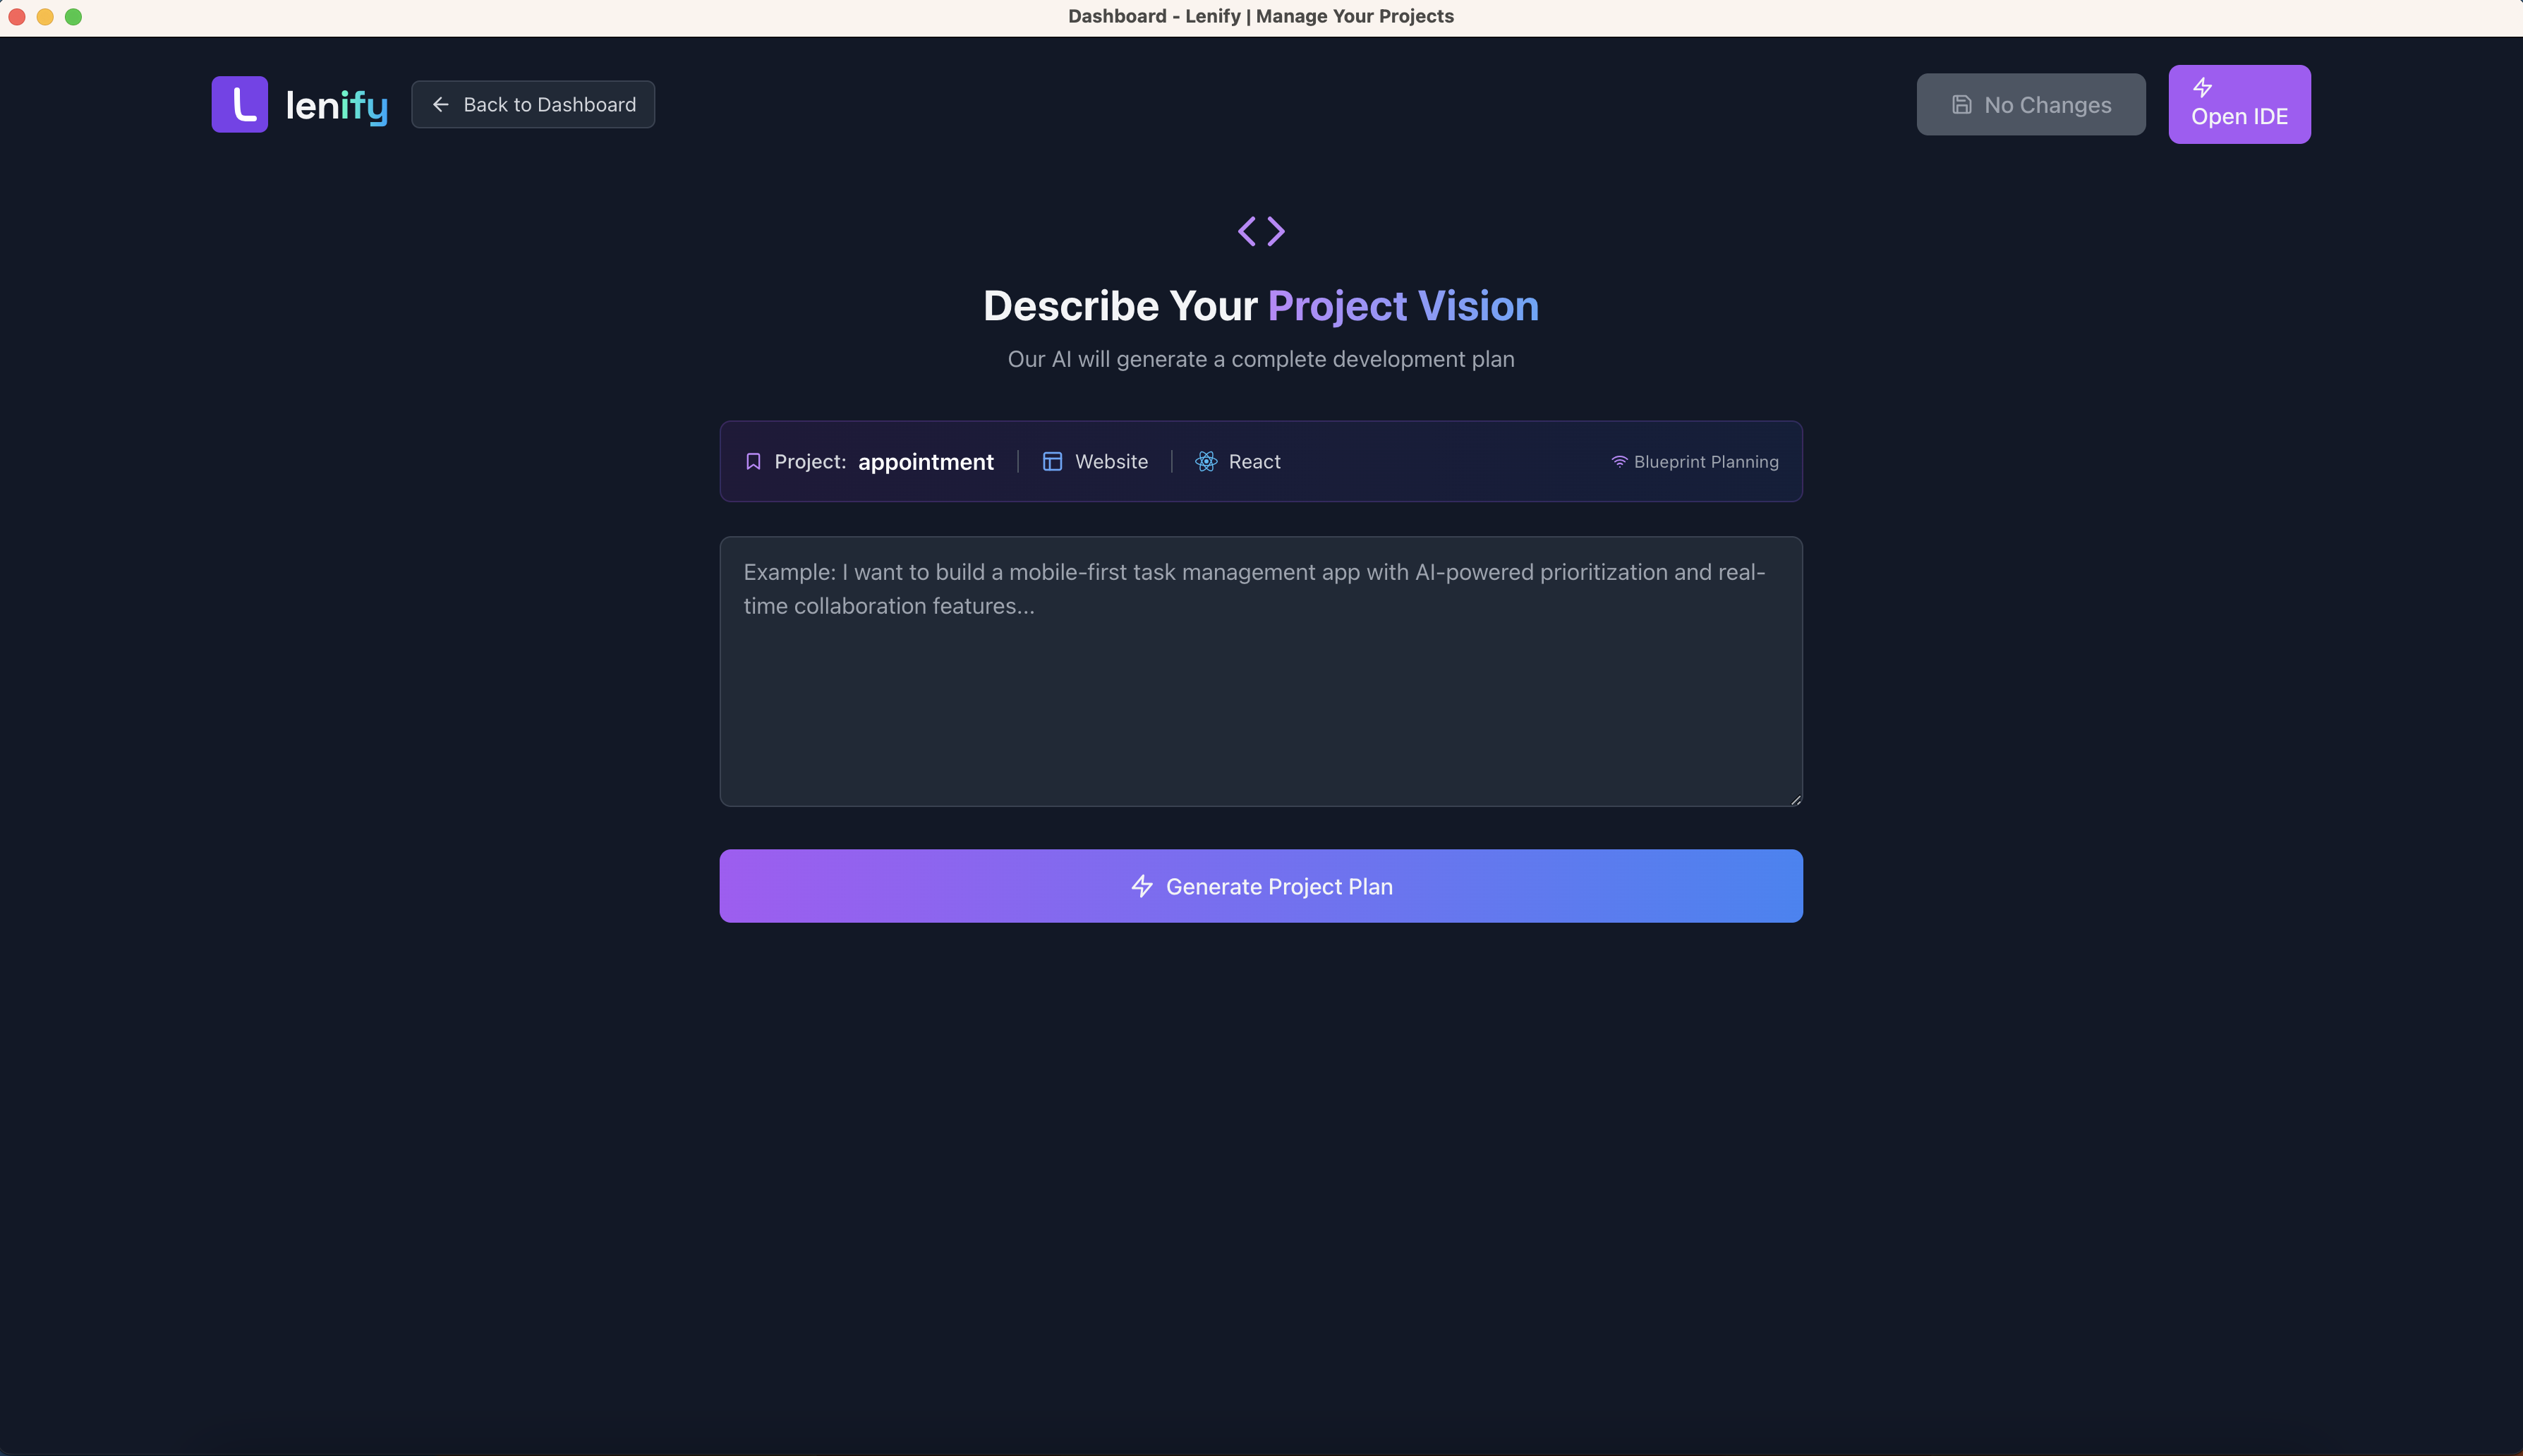 Describe your project requirements and let AI generate a comprehensive blueprint
2. Real-Time AI Blueprint Generation
When you click "Generate Project Plan", watch AI create your blueprint in real-time:
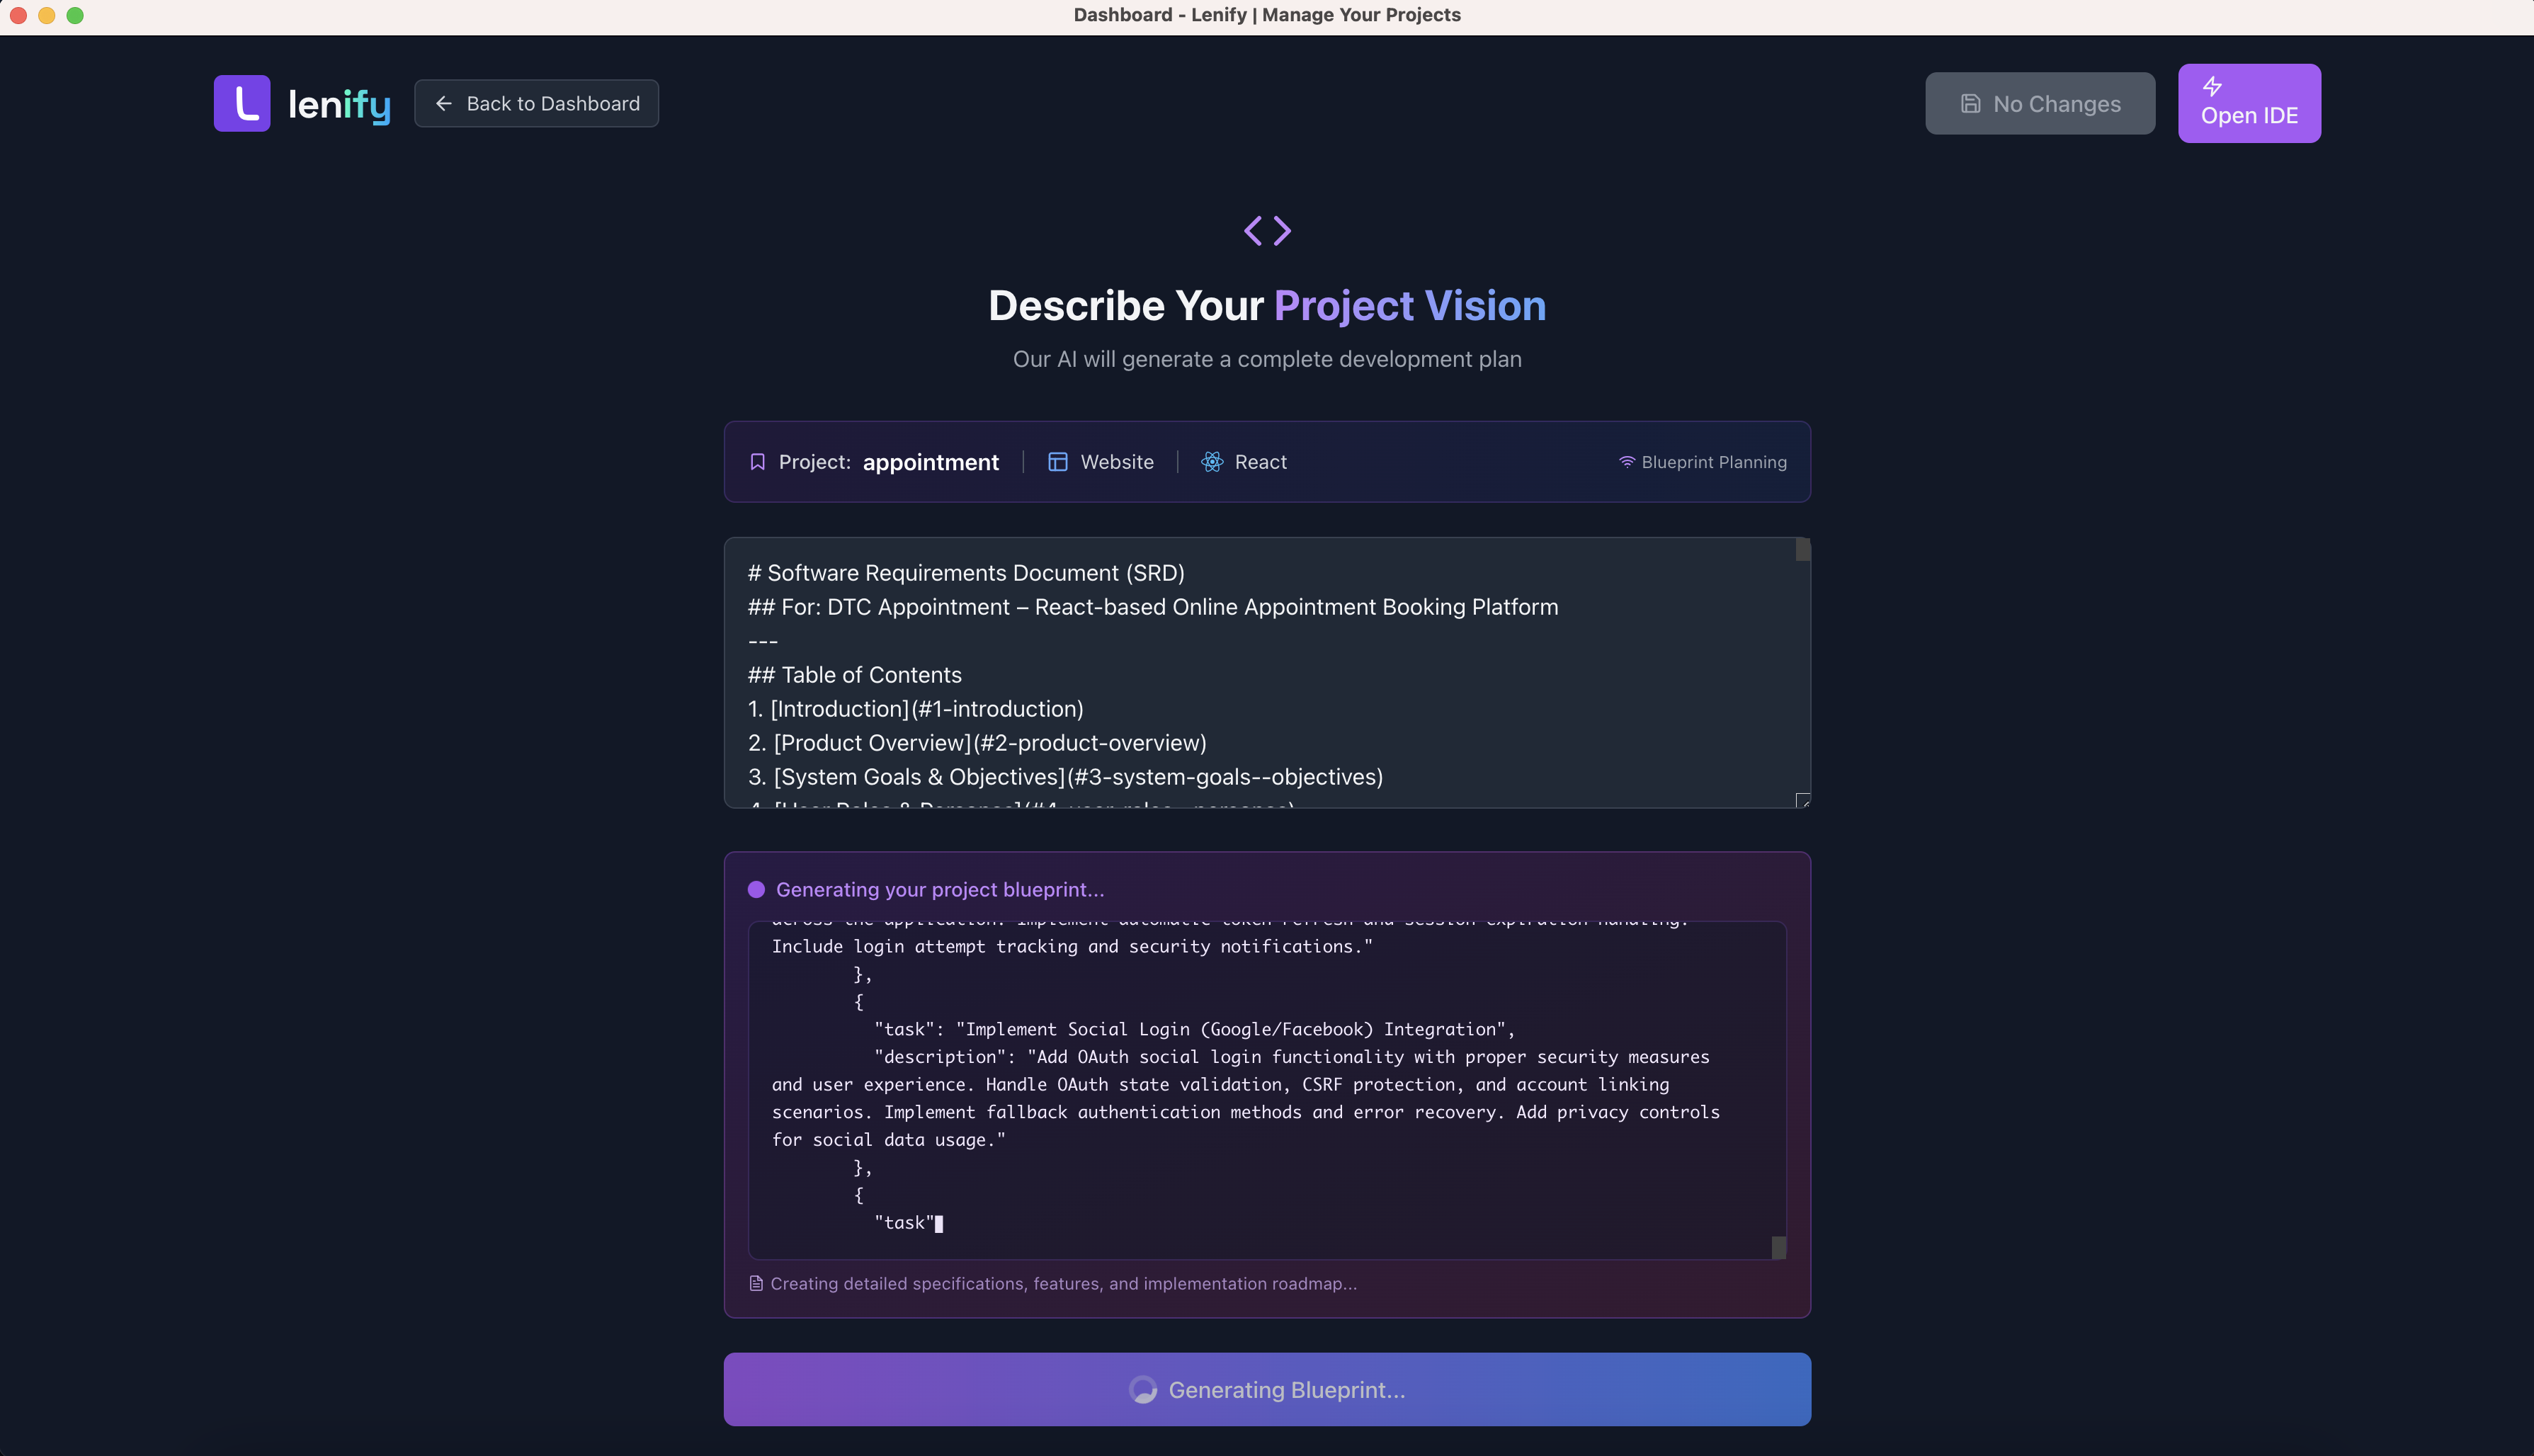 Watch AI analyze your requirements and generate a comprehensive project blueprint in real-time
Real-time Features:
- Thinking Phase: Watch AI analyze your requirements with typewriter effect
- Blueprint Phase: See features and structure generated live
- Progress Indicators: Visual progress of generation process
- Auto-reconnection: Seamless reconnection if connection is lost
- Streaming Updates: Real-time display of AI responses
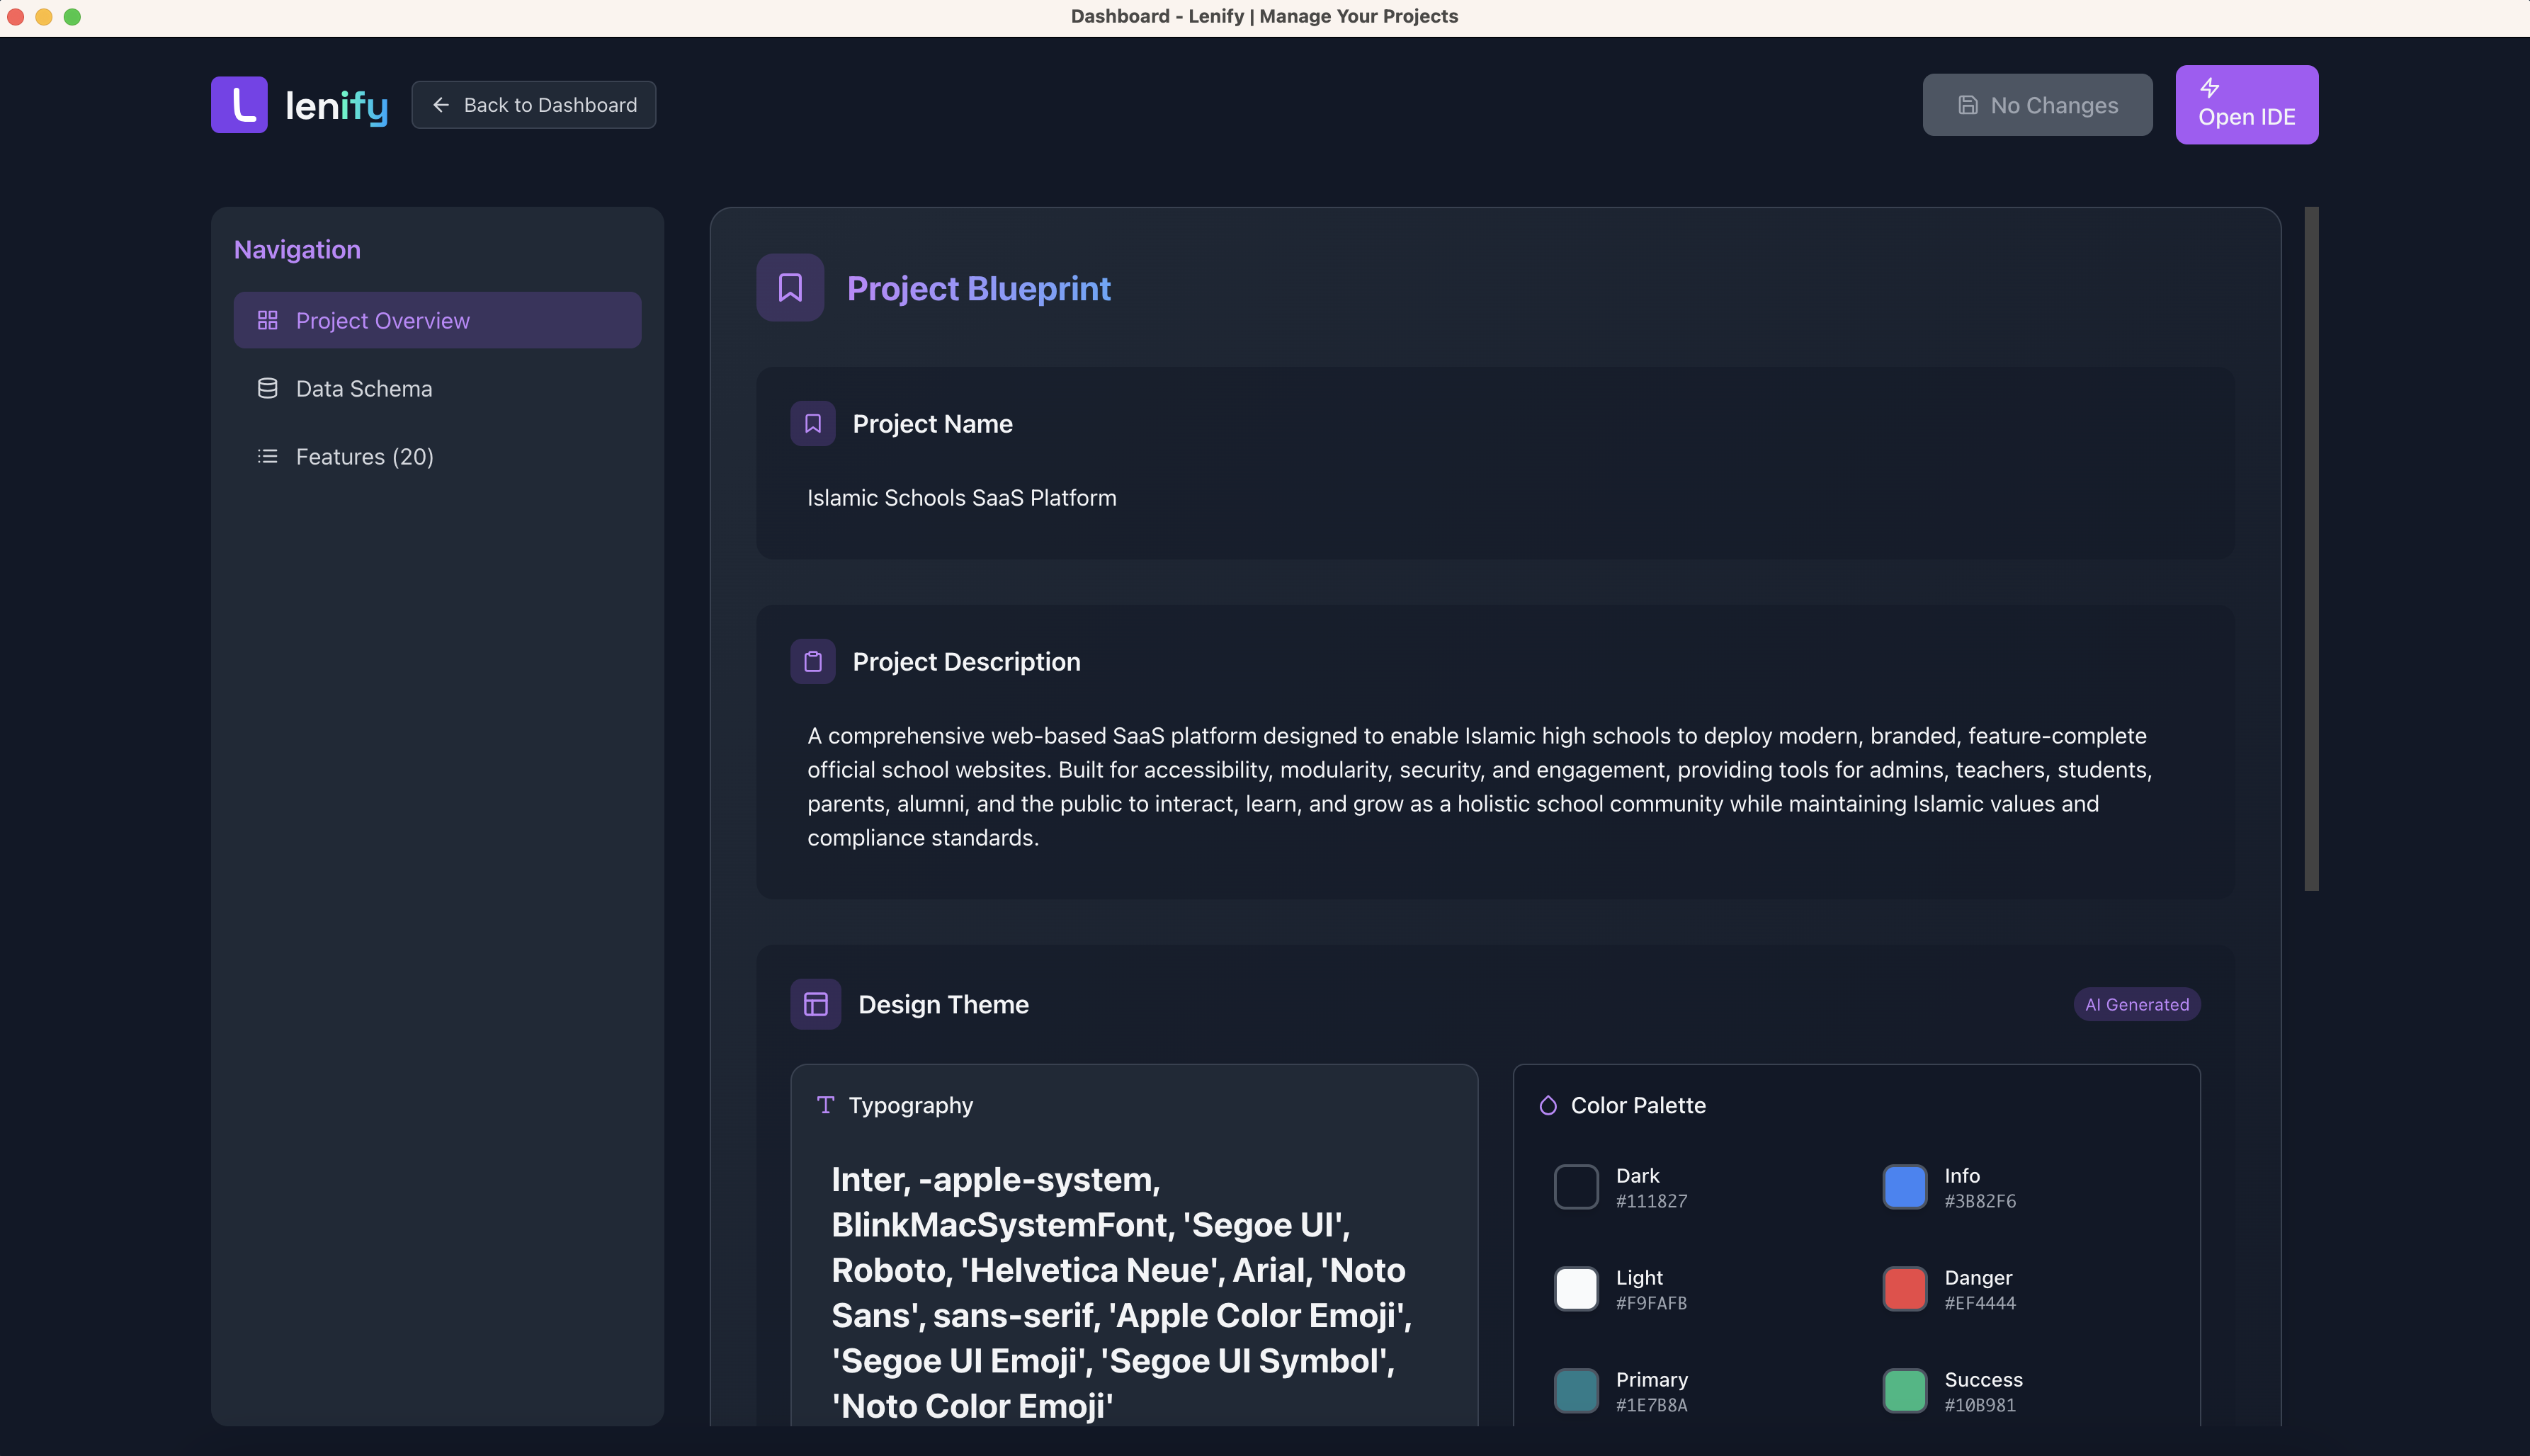
3. Generated Blueprint Structure
Once generation completes, you'll see a comprehensive blueprint with:
Project Overview Section:
- Project Metadata: Name, description, type, and framework information
- Development Timeline: Estimated completion timeframes for each feature
- Technology Stack: Detailed breakdown of selected frameworks and tools
- Architecture Summary: High-level system architecture and design patterns
Feature Management:
- Feature List: AI-generated features with detailed descriptions and user stories
- Task Breakdown: Granular tasks with priorities, status tracking, and progress indicators
- Status Control: Accept, reject, or mark features for review with visual indicators
- Drag & Drop: Reorder features by priority using intuitive drag-and-drop interface
Data Structure Schema:
- Database Design: Complete data models with field definitions and relationships
- Entity Relationships: Visual representation of how data entities connect
- API Endpoints: RESTful API structure with request/response schemas
- Service Requirements: Backend service specifications and integration details
Interactive Elements:
- Click-to-Edit: Inline editing for feature names, descriptions, and task details
- Expandable Sections: Collapse/expand features and tasks for better organization
- Progress Tracking: Visual progress indicators showing development completion
- Real-time Sync: Automatic saving of changes with unsaved changes indicator
 Interactive blueprint management with drag-and-drop features, status controls, and detailed task breakdown
4. Interactive Blueprint Management
Navigate and manage your blueprint with these features:
Navigation Panel:
- Project Overview: High-level project summary and metadata
- Data Schema: Database structure and relationships
- Features: Detailed feature list with task management
Feature Management:
- Drag & Drop Reordering: Prioritize features by dragging
- Status Control: Accept ✅, Reject ❌, or Mark for Review ⚠️ each feature
- Expandable Tasks: View and manage subtasks for each feature
- Add Features: Manually add new features with custom tasks
- Edit Inline: Click to edit feature names, descriptions, and tasks
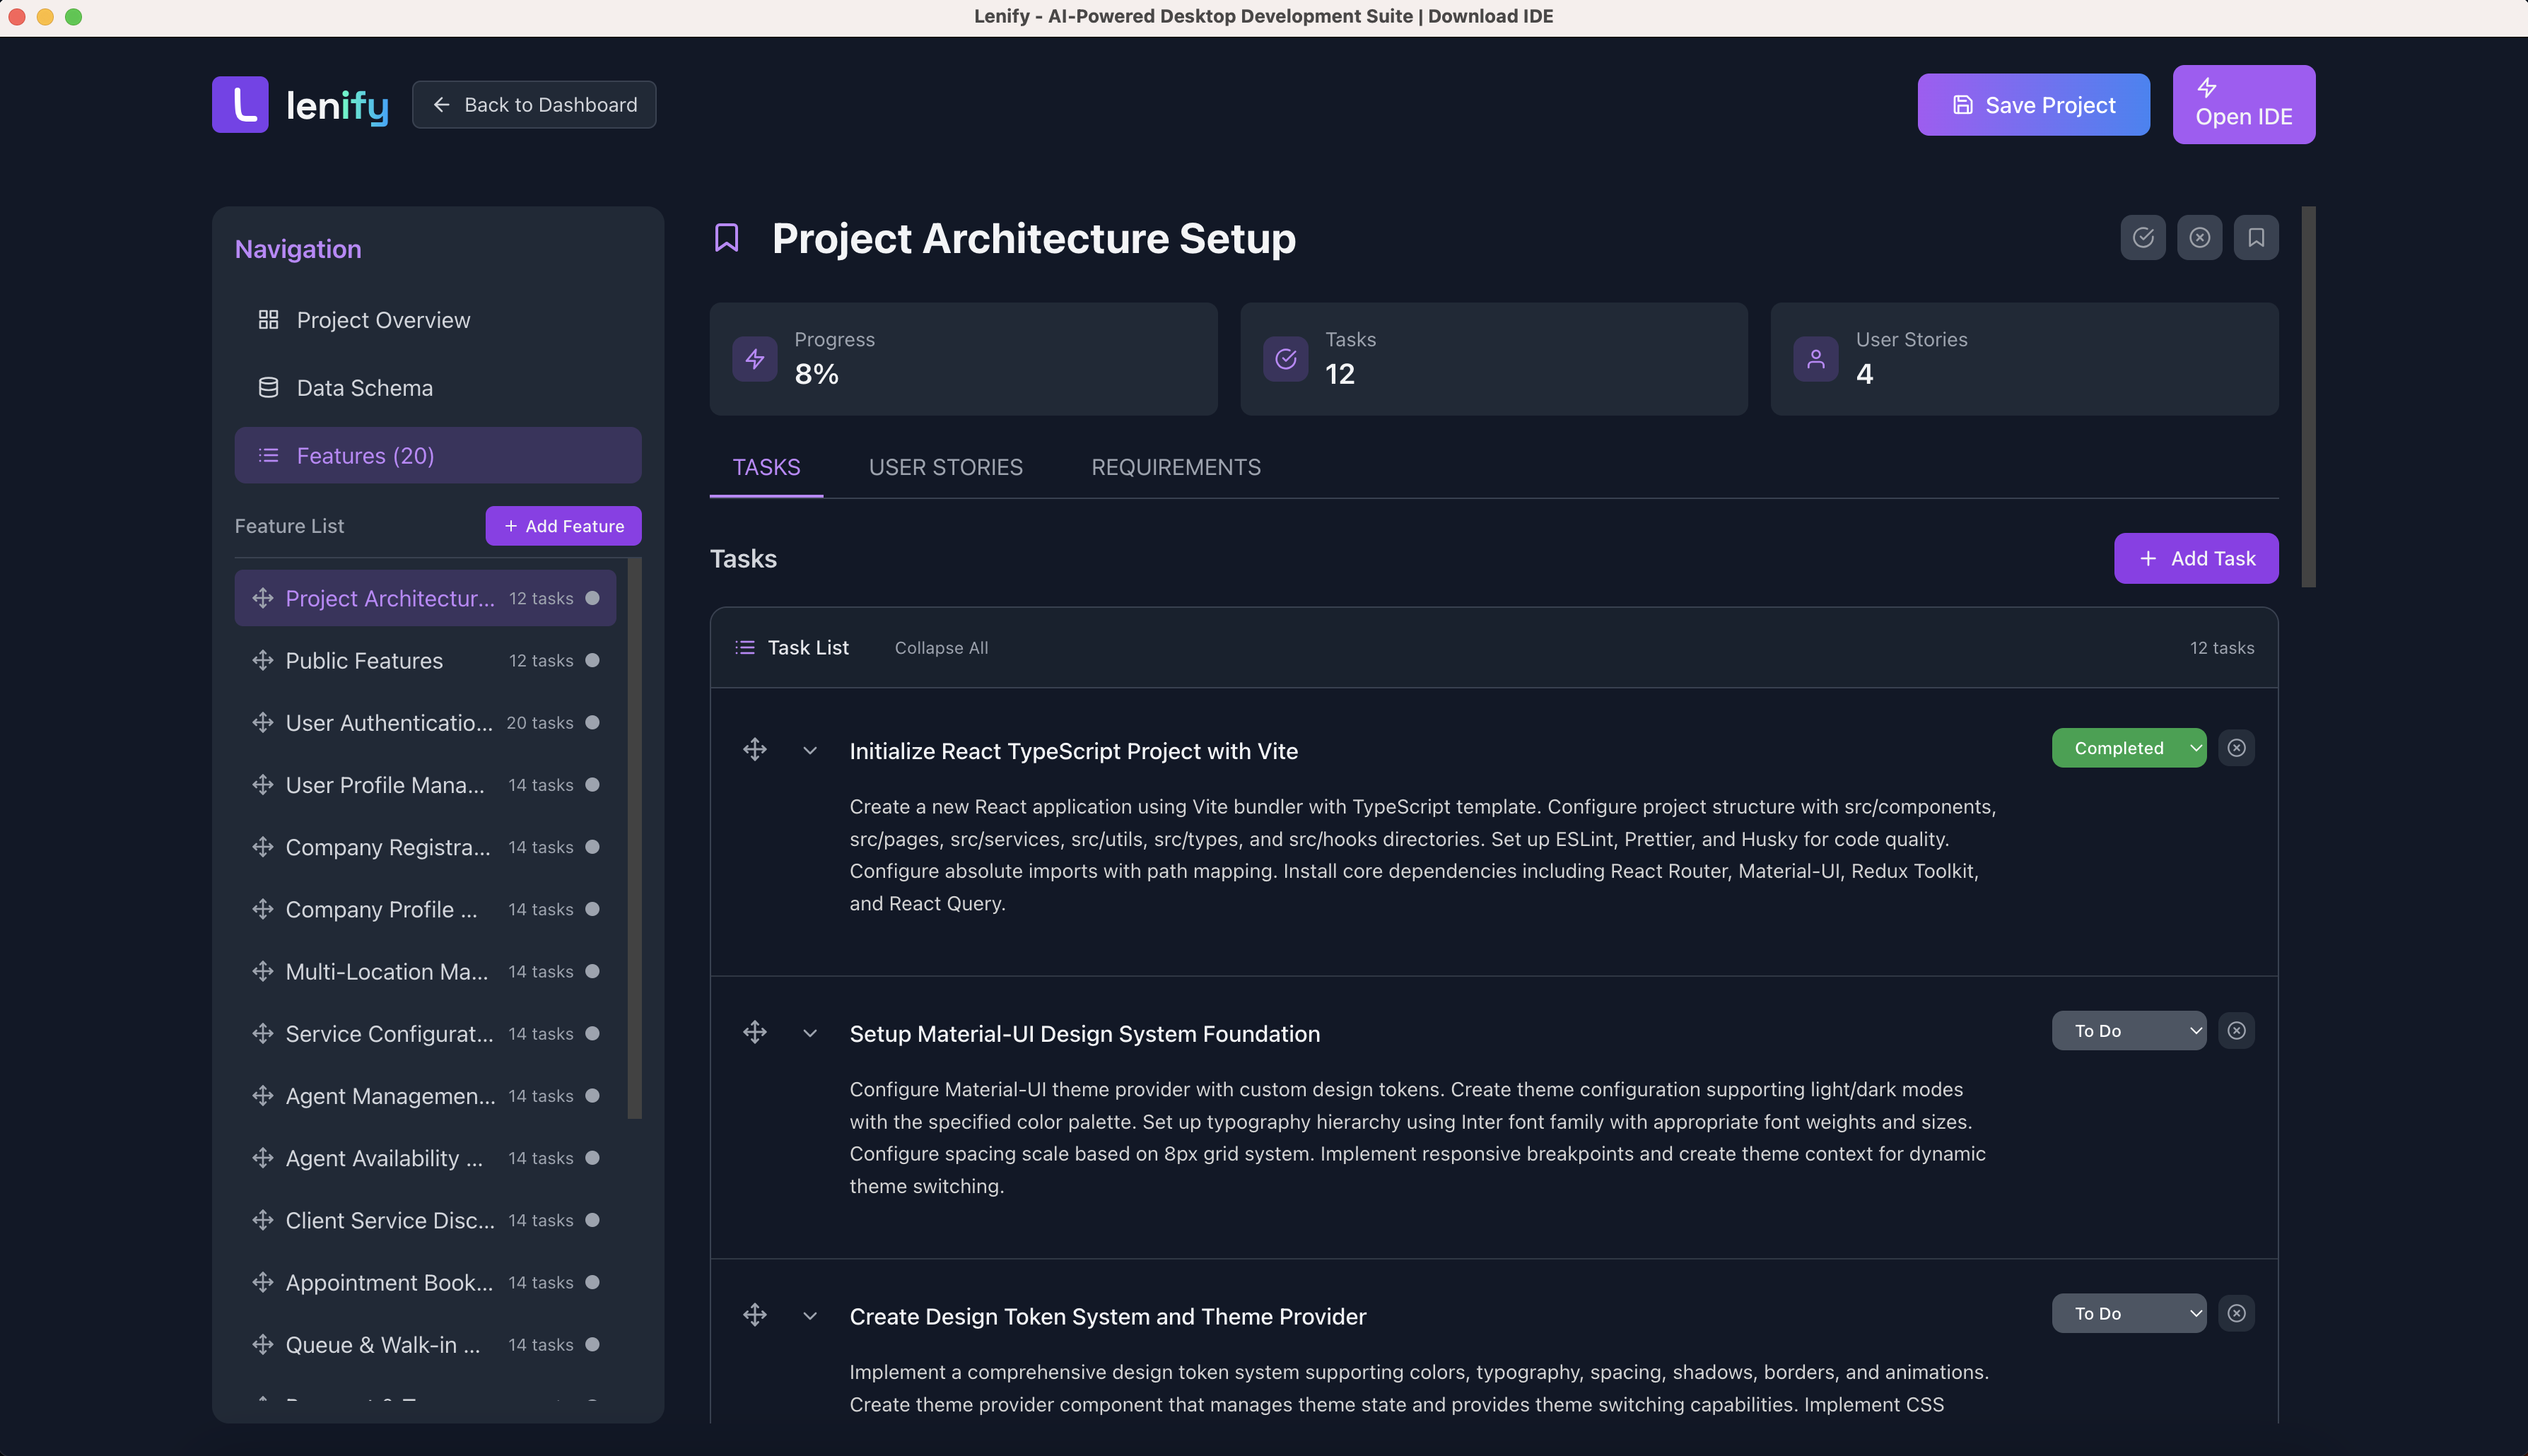 Interactive feature management with drag-and-drop reordering, status controls, and task management capabilities
5. Blueprint Completion & IDE Navigation
Once your blueprint is ready:
- Review Generated Features: Accept, reject, or modify AI-generated features
- Customize Tasks: Edit task descriptions, priorities, and timelines
- Save Blueprint: All changes auto-saved with manual save option
- Navigate to IDE: Click "Open IDE" to start development
The blueprint becomes your development roadmap, guiding task-driven development in the IDE!
Step 8: Explore the IDE Interface
Full-Featured Development Environment
Enter Lenify's professional IDE with Monaco Editor (VS Code engine) and comprehensive development tools:
1. Activity Bar (Left Side)
The activity bar provides quick access to all essential development panels:
- ⚡ Features & Tasks: View and manage blueprint features with task tracking, status updates, and priority management
- 📁 File Explorer: Navigate your project structure with file tree, search capabilities, and context menus
- 🧠 Code Context: Analyze codebase relationships and understand how components interact with each other
- 🔄 Generate Code Context: AI-powered context generation to understand project dependencies and structure
- 🤖 AI Assistant: Conversational AI development partner for code generation, debugging, and technical guidance
- 🔀 Source Control: Git integration with staging, commits, branch management, and diff viewing
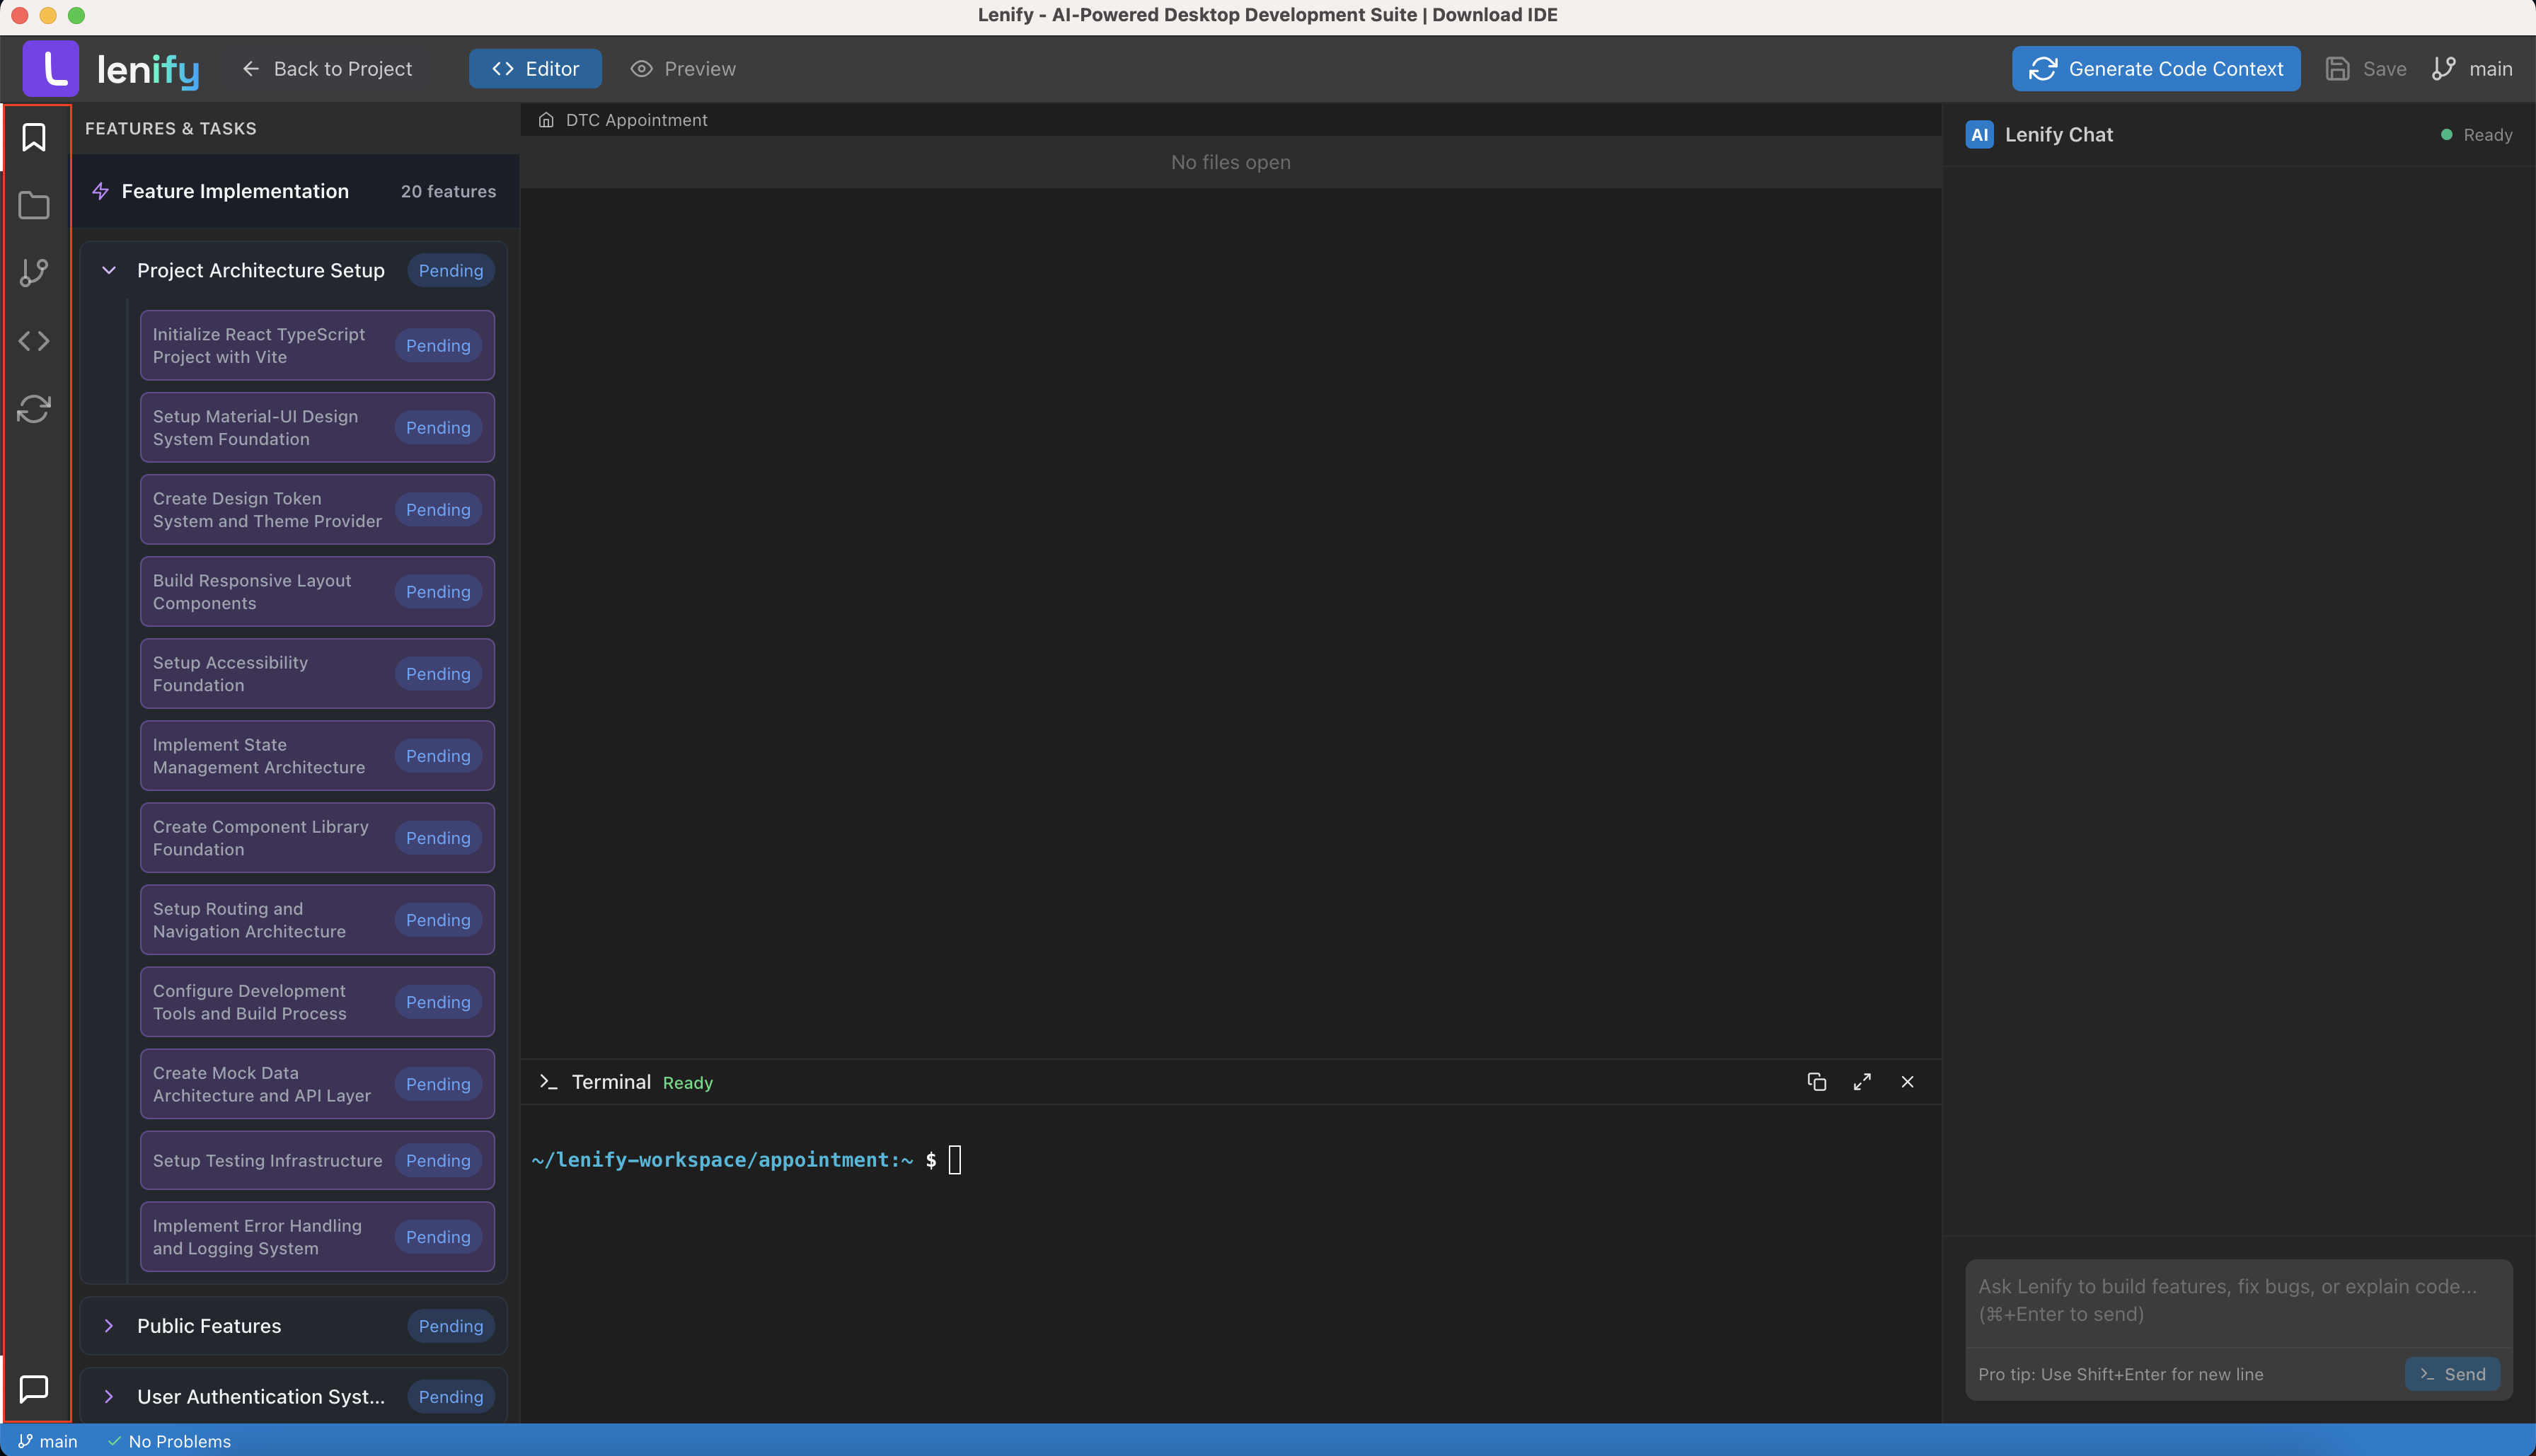 The IDE activity bar with Features & Tasks, File Explorer, Code Context, Generate Code Context, AI Assistant, and Source Control panels
2. Multi-Panel Layout with React Split
- Resizable Panels: Drag to resize editor, sidebar, and terminal
- Multi-View Support: Code editor, preview, terminal, chat in split view
- Keyboard Shortcuts: Full VS Code-style shortcuts support
- Command Palette:
Ctrl+Shift+Pfor quick command access
3. Monaco Code Editor (VS Code Engine)
 Professional code editor with VS Code engine, syntax highlighting, IntelliSense, and advanced editing features
4. Sidebar Content Areas
Features & Tasks Panel:
- Expandable Feature List: Features from your blueprint
- Task Status Tracking: Todo, In Progress, Completed
- Priority Indicators: High, Medium, Low priority tasks
- Real-time Updates: Sync with blueprint changes
File Explorer:
- Project File Tree: Complete project structure
- Context Menus: Right-click for file operations
- File Icons: Language-specific file icons
- Search & Filter: Find files quickly
Code Context:
- Component Relationships: Visualize how components interact and depend on each other
- Import/Export Analysis: Track file dependencies and usage patterns
- Code Usage Tracking: See where functions, classes, and variables are used across the project
- Interactive Dependency Graph: Navigate through code relationships with visual maps
Generate Code Context:
- AI-Powered Analysis: Automatically analyze your entire codebase for relationships
- Context Generation: Create comprehensive understanding of project structure and dependencies
- Smart Suggestions: Get AI recommendations for code improvements and refactoring
- Real-time Processing: Watch as AI builds context understanding of your project
AI Assistant:
- Conversational Development: Natural language interface for coding assistance
- Code Generation: Generate components, functions, and entire features from descriptions
- Real-time Streaming: Watch code being generated live with syntax highlighting
- Context-Aware Help: AI understands your project structure and provides relevant suggestions
- Copy & Insert: One-click code copying and direct insertion into your files
Git Integration:
- Source Control: View changes, stage, commit
- Branch Management: Switch branches, create new ones
- Git Lens: Inline blame and history
- Diff Viewer: Side-by-side change comparison
Step 9: Blueprint-Driven Development
Task-Driven Development Workflow
1. Feature-Based Development
Select a feature from your blueprint to start developing:
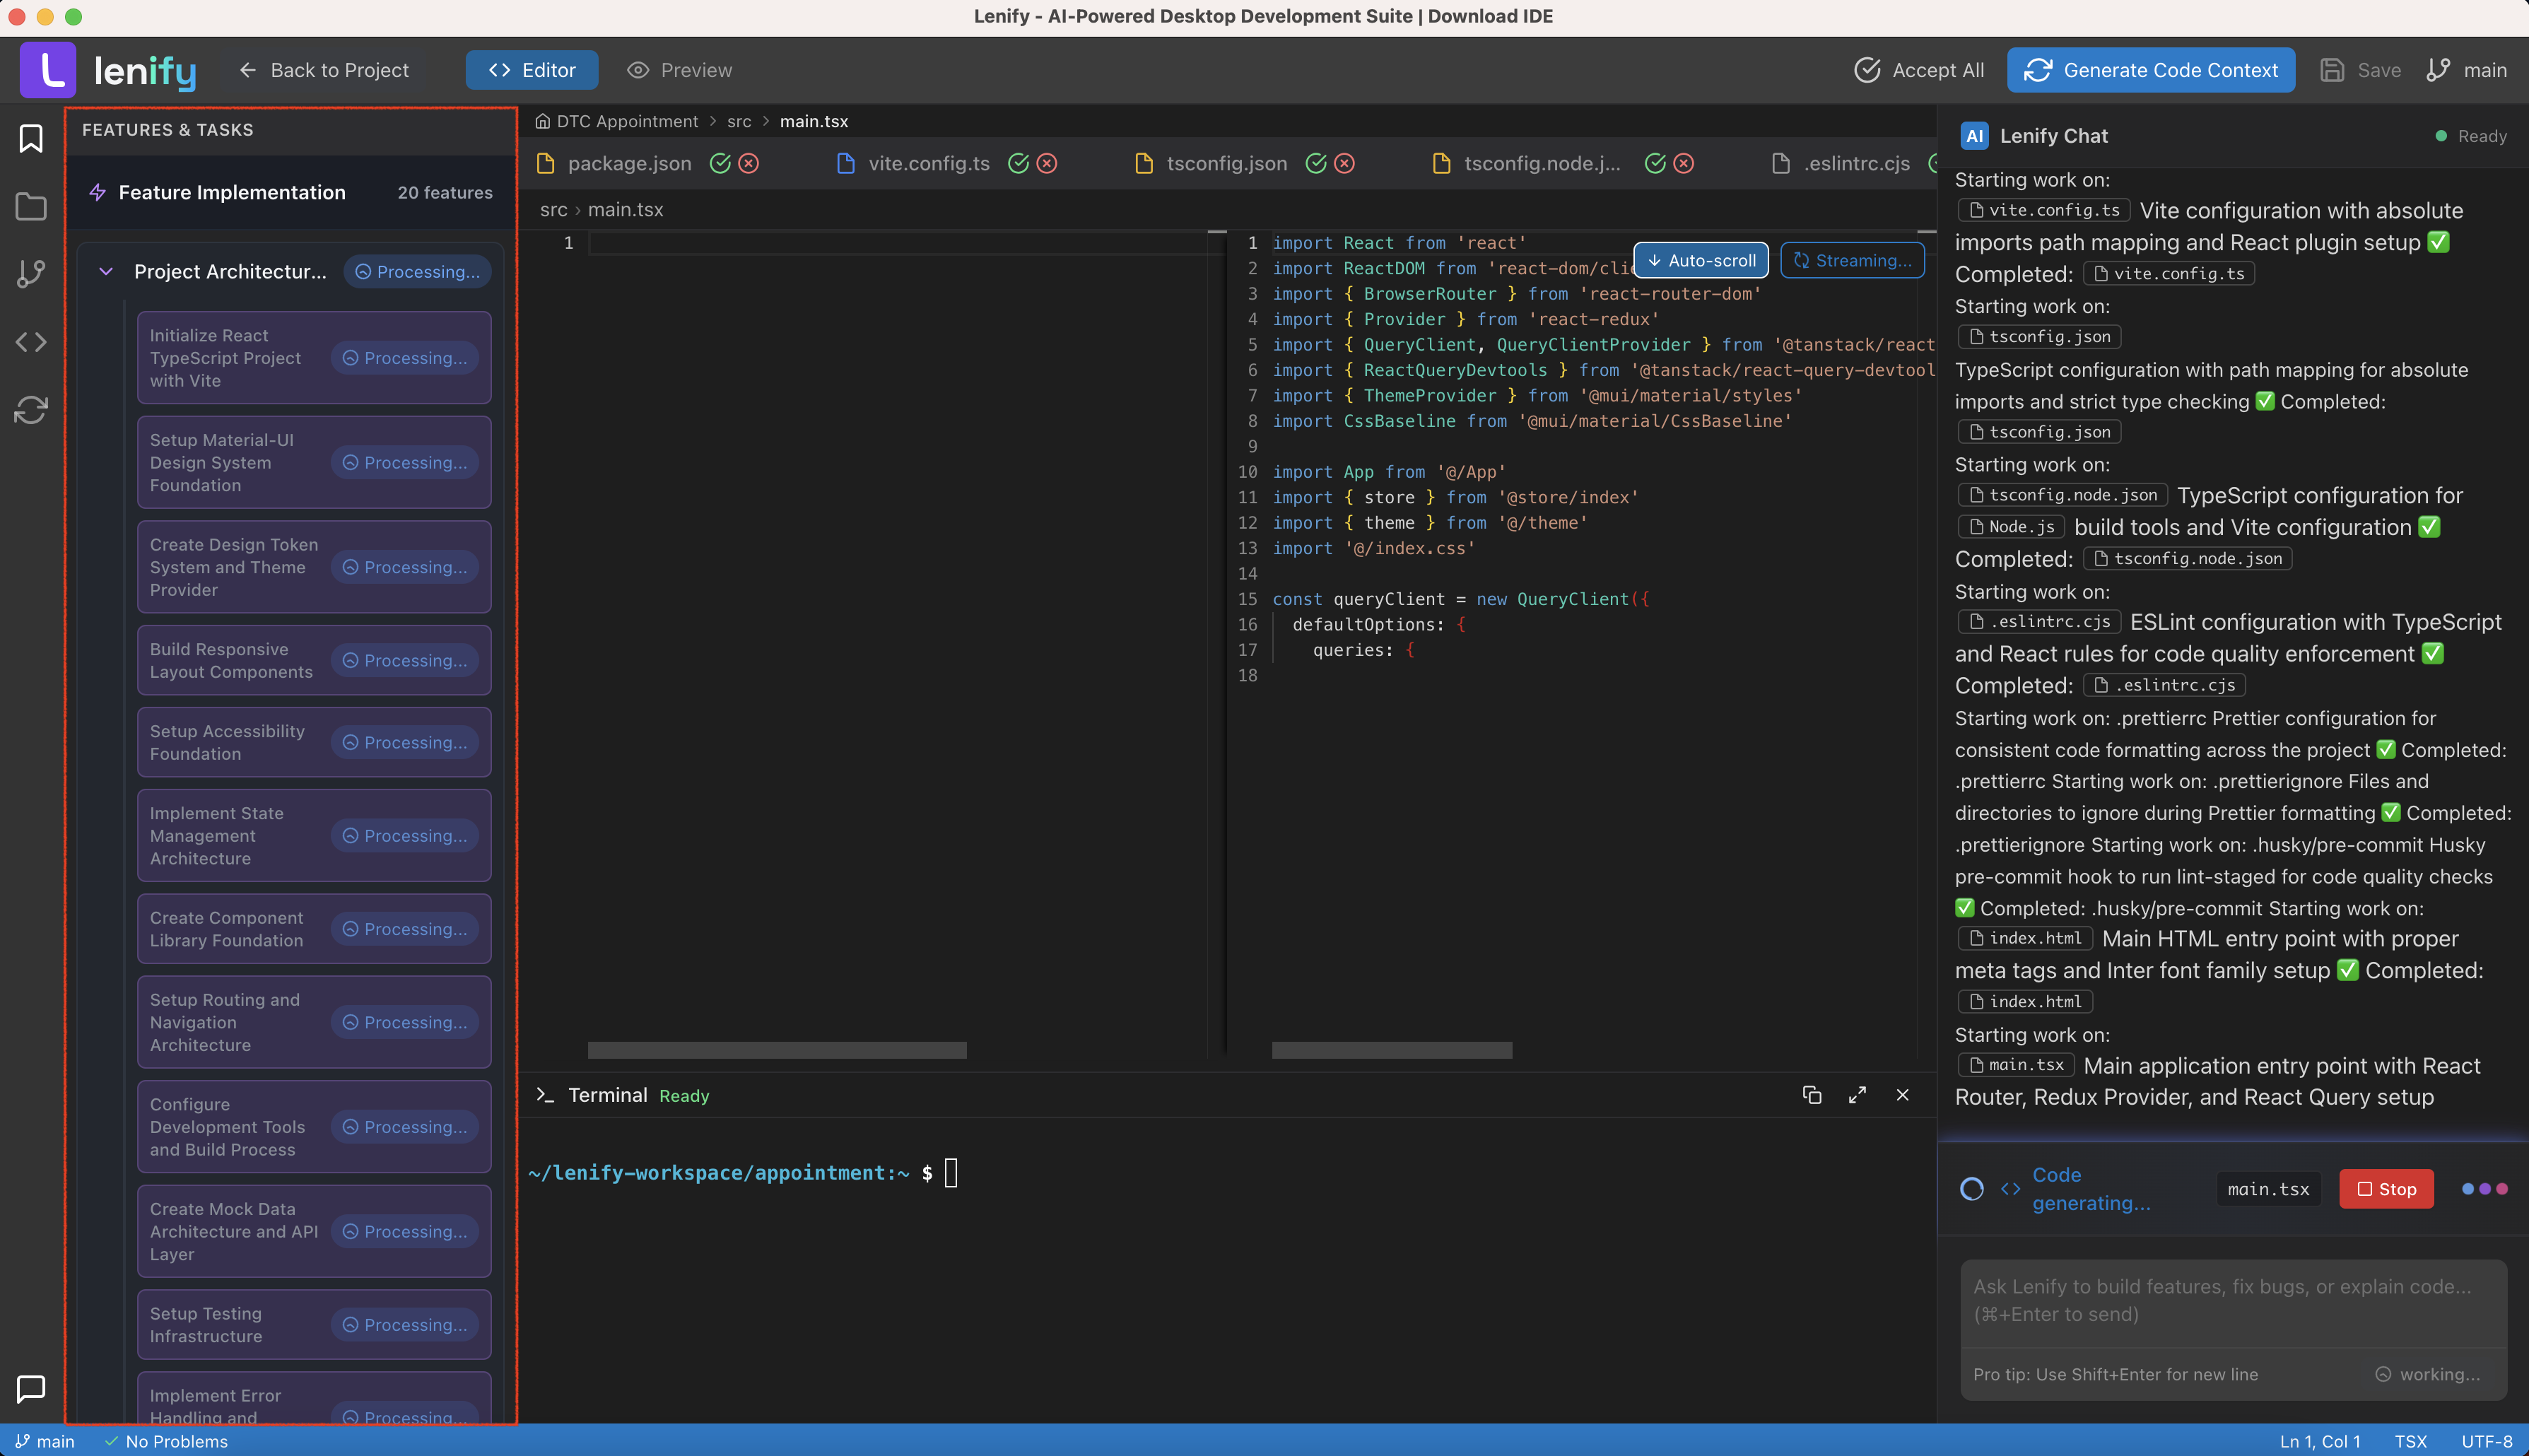 AI understands your blueprint context and generates complete implementation flows based on your selected features
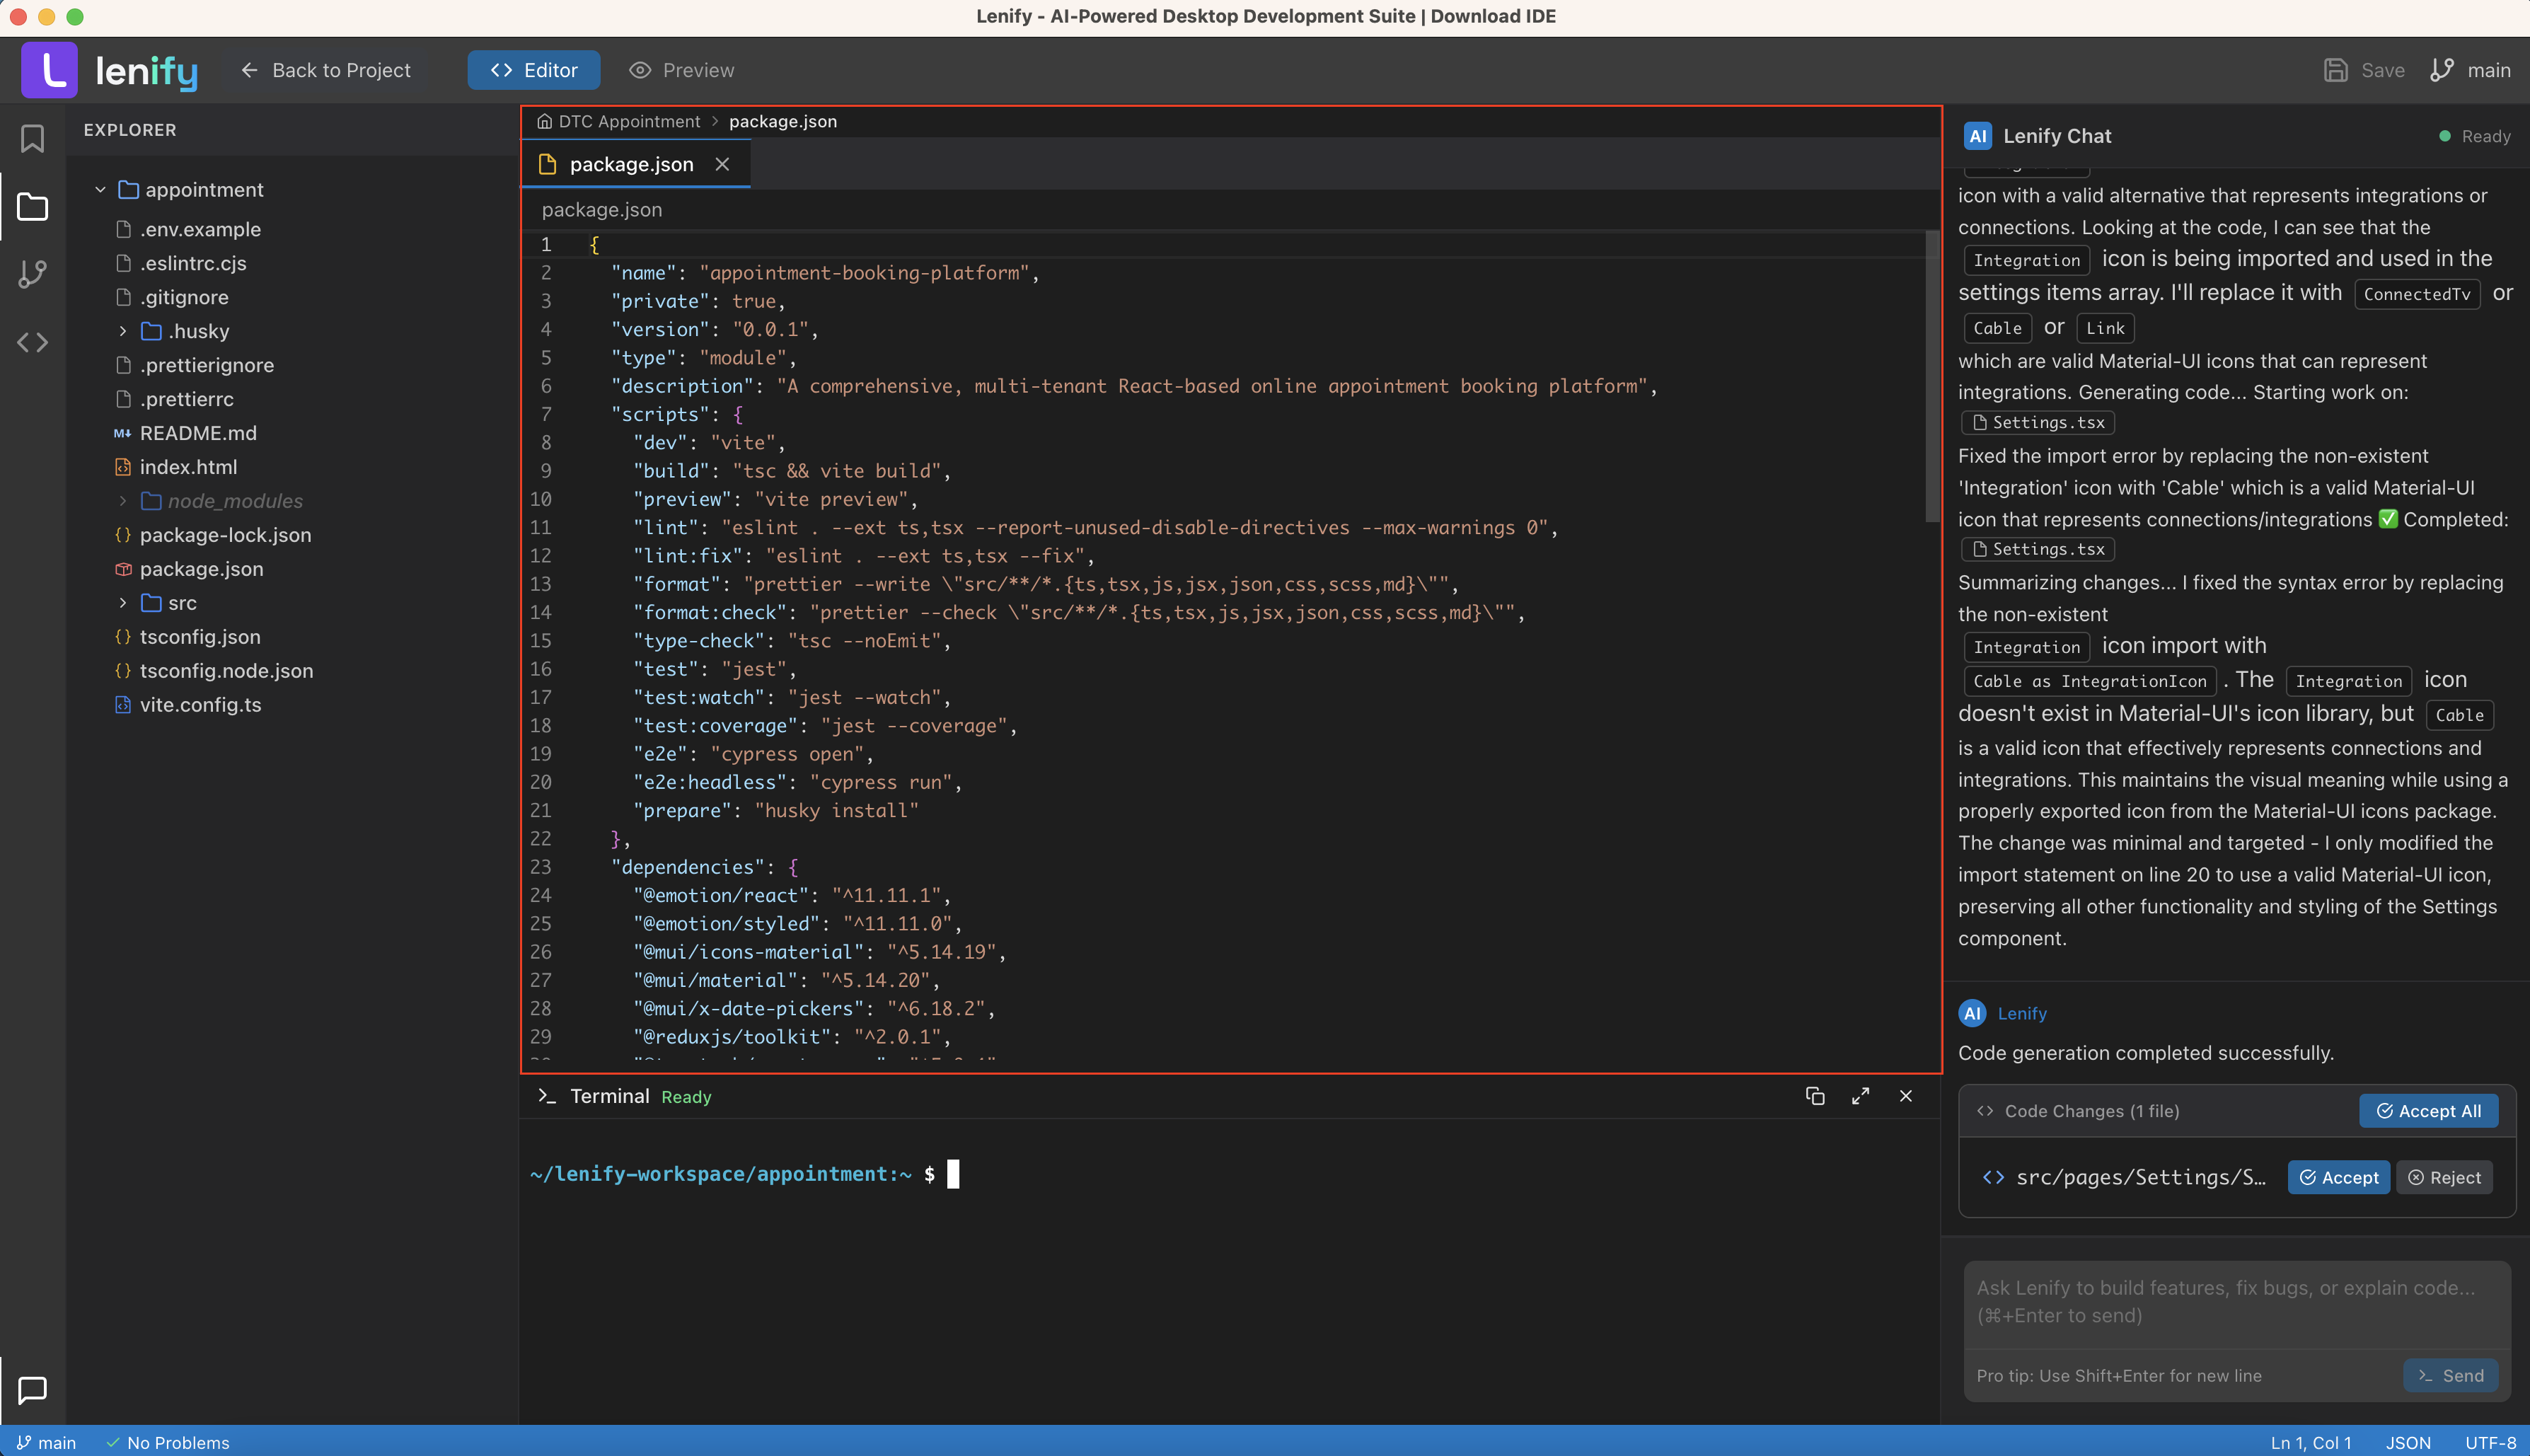
2. Automated Bug Detection & Fix
Lenify continuously monitors your code and automatically detects issues:
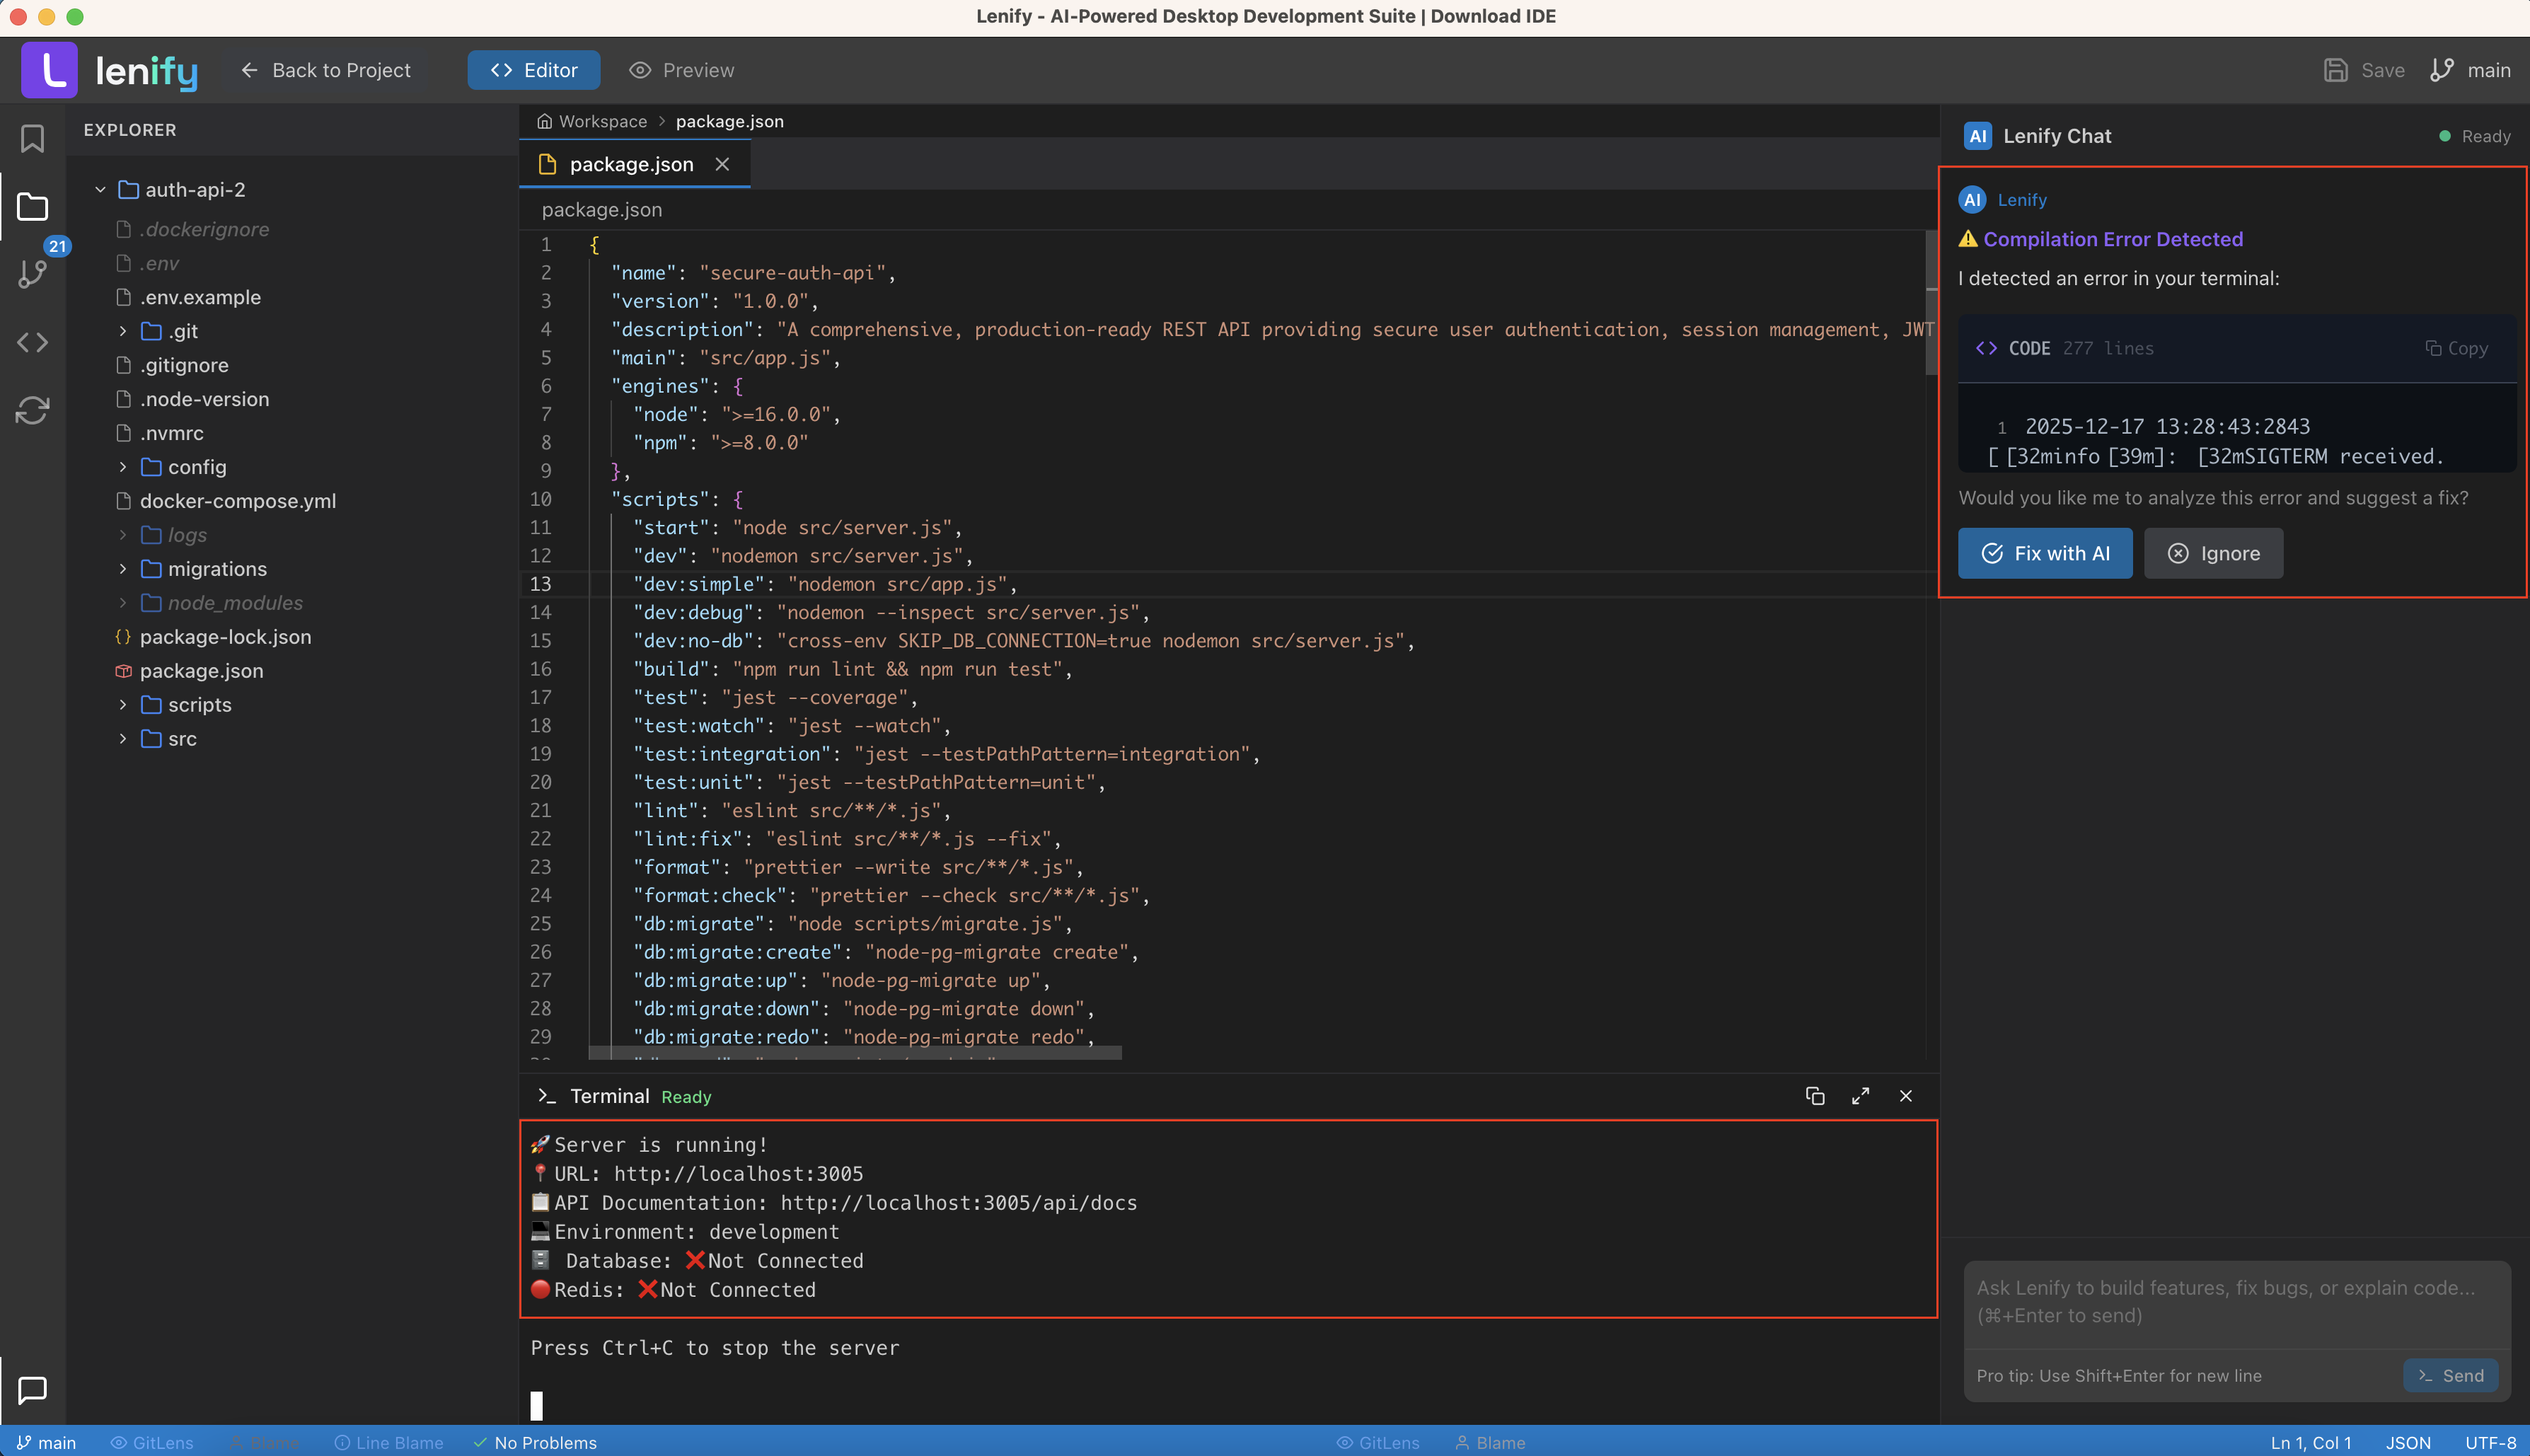 AI automatically detects potential issues in real-time and offers intelligent suggestions with auto-fix capabilities
3. Chat-Driven Development (AI Assistant)
Lenify includes a powerful chat interface for conversational development:
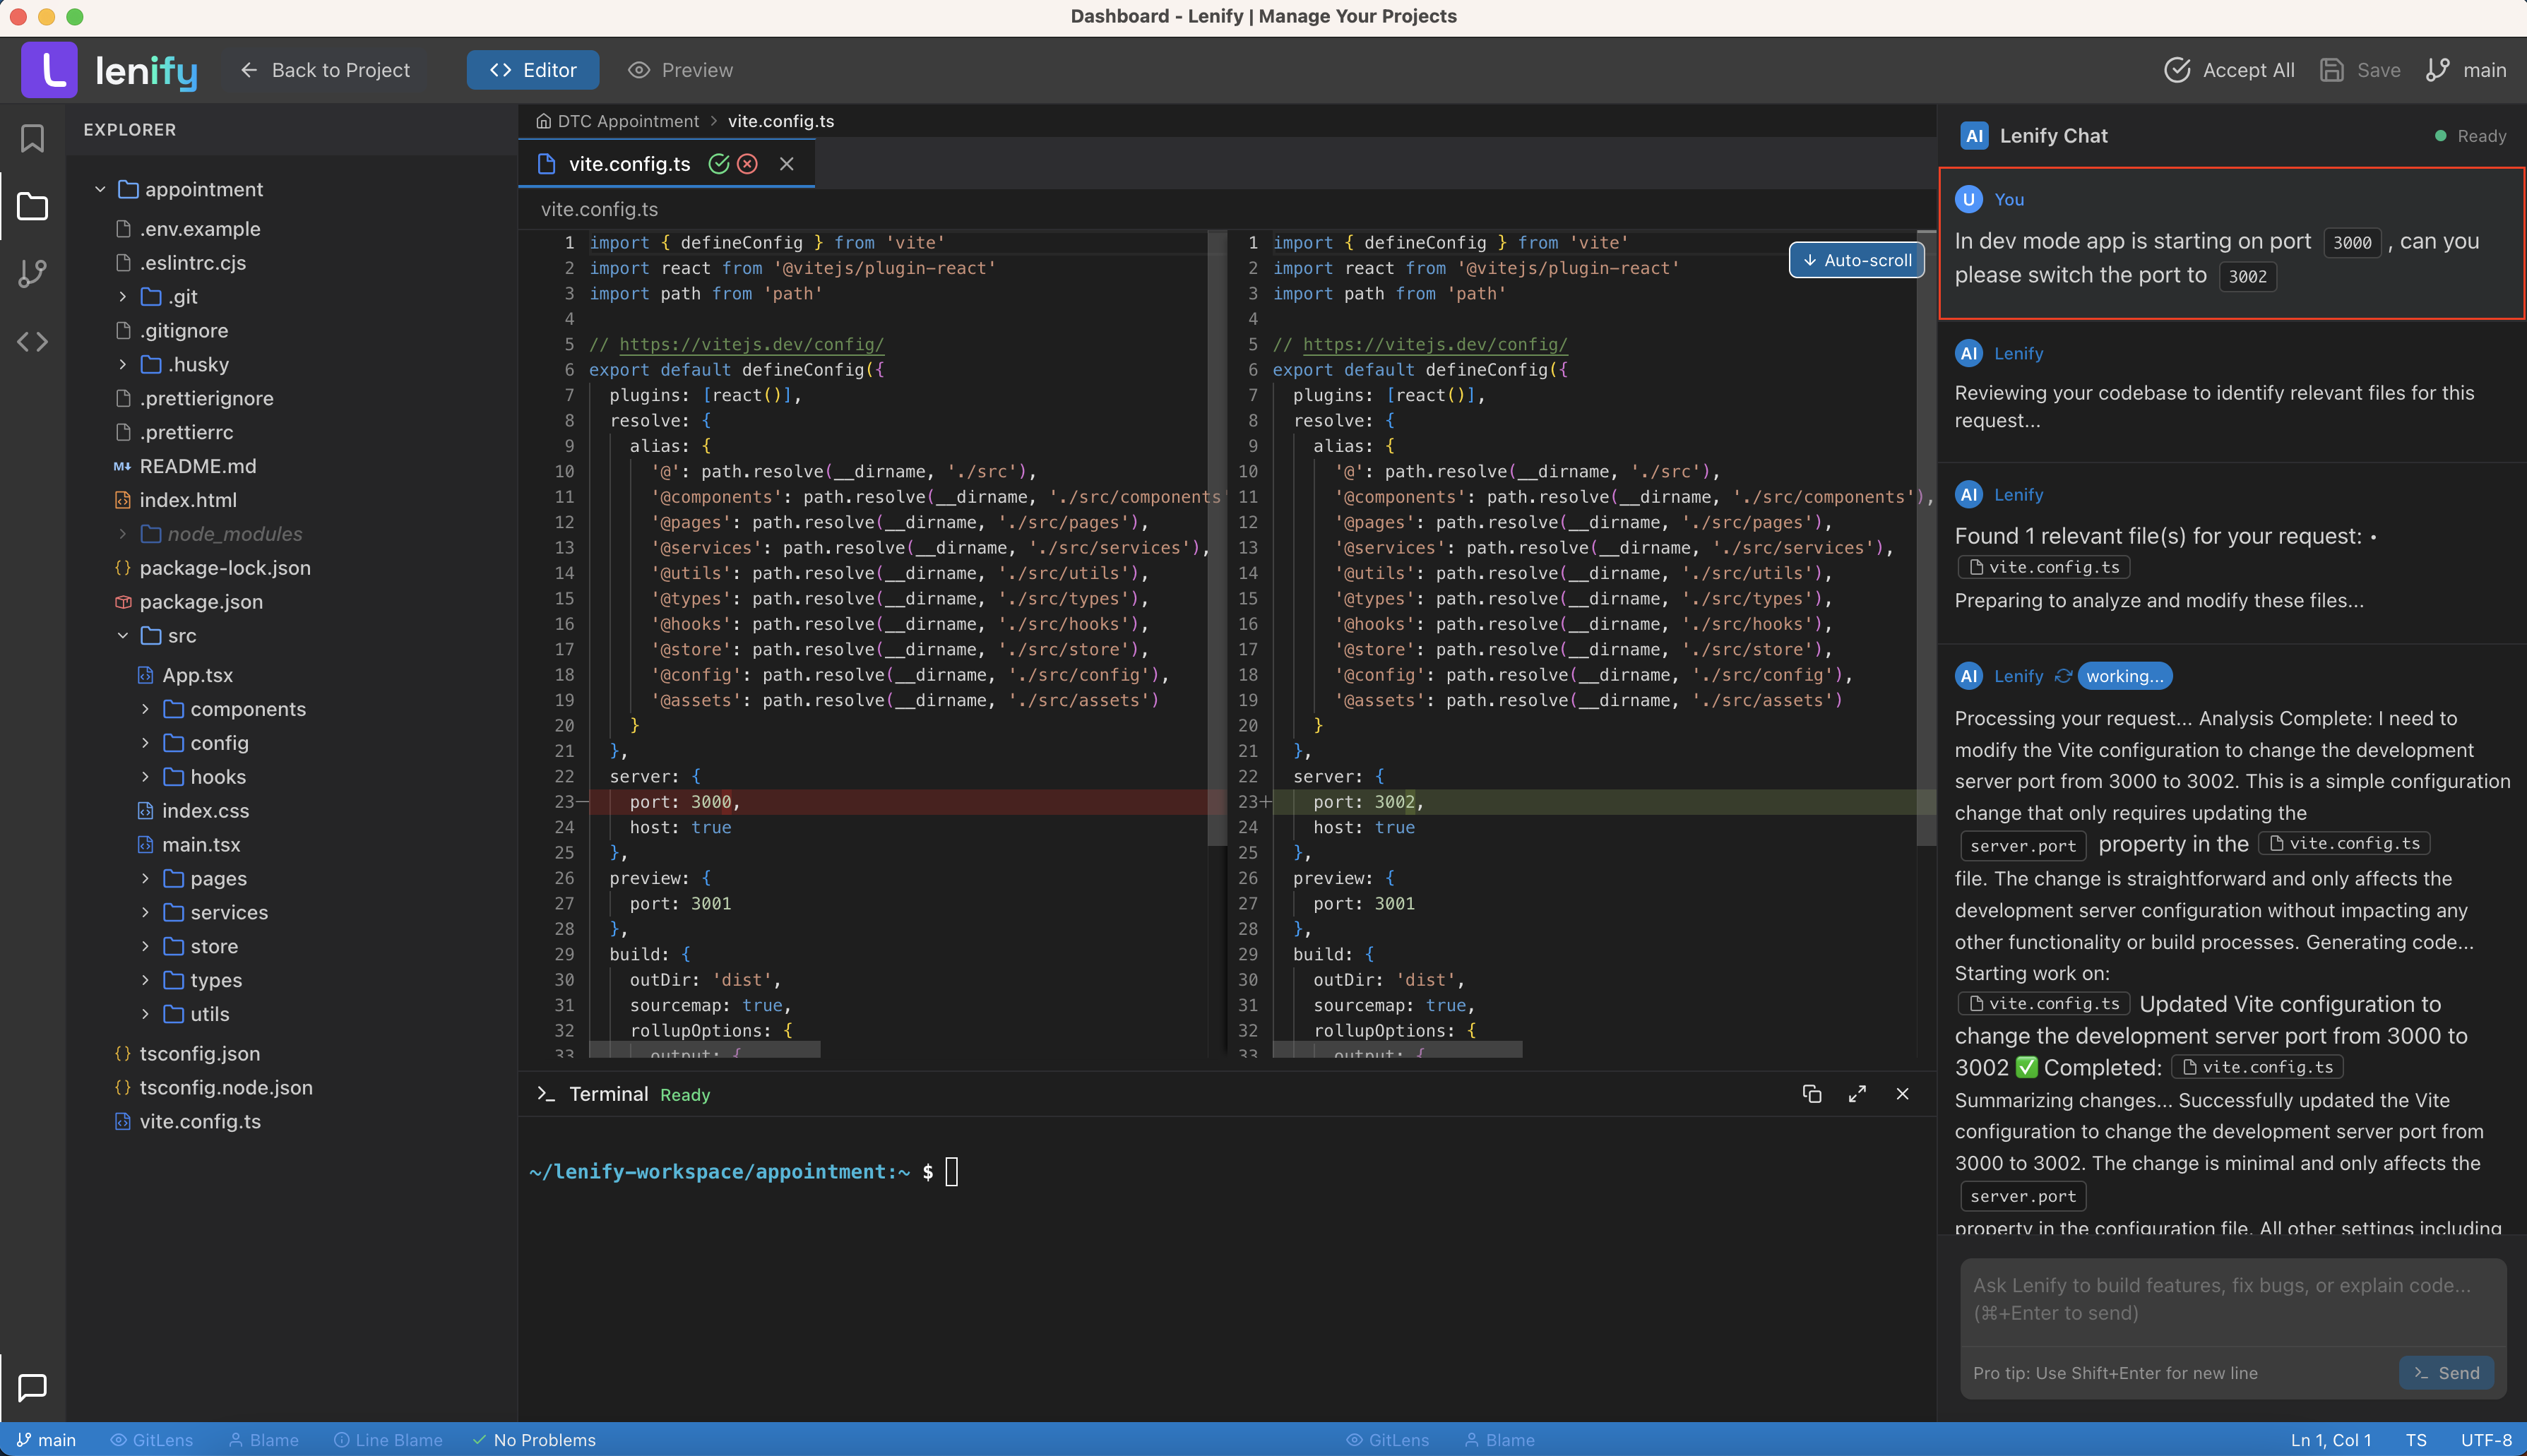 Powerful chat interface with real-time code generation, syntax highlighting, and context-aware assistance
Chat Interface Controls:
- Streaming Responses: Watch code generate in real-time
- Stop Generation: Cancel long-running code generation
- Copy Code: One-click copying of generated code
- Insert Code: Direct insertion into your files
- Message History: Full conversation persistence
4. Code Context Generation
AI analyzes your entire codebase to understand relationships and dependencies:
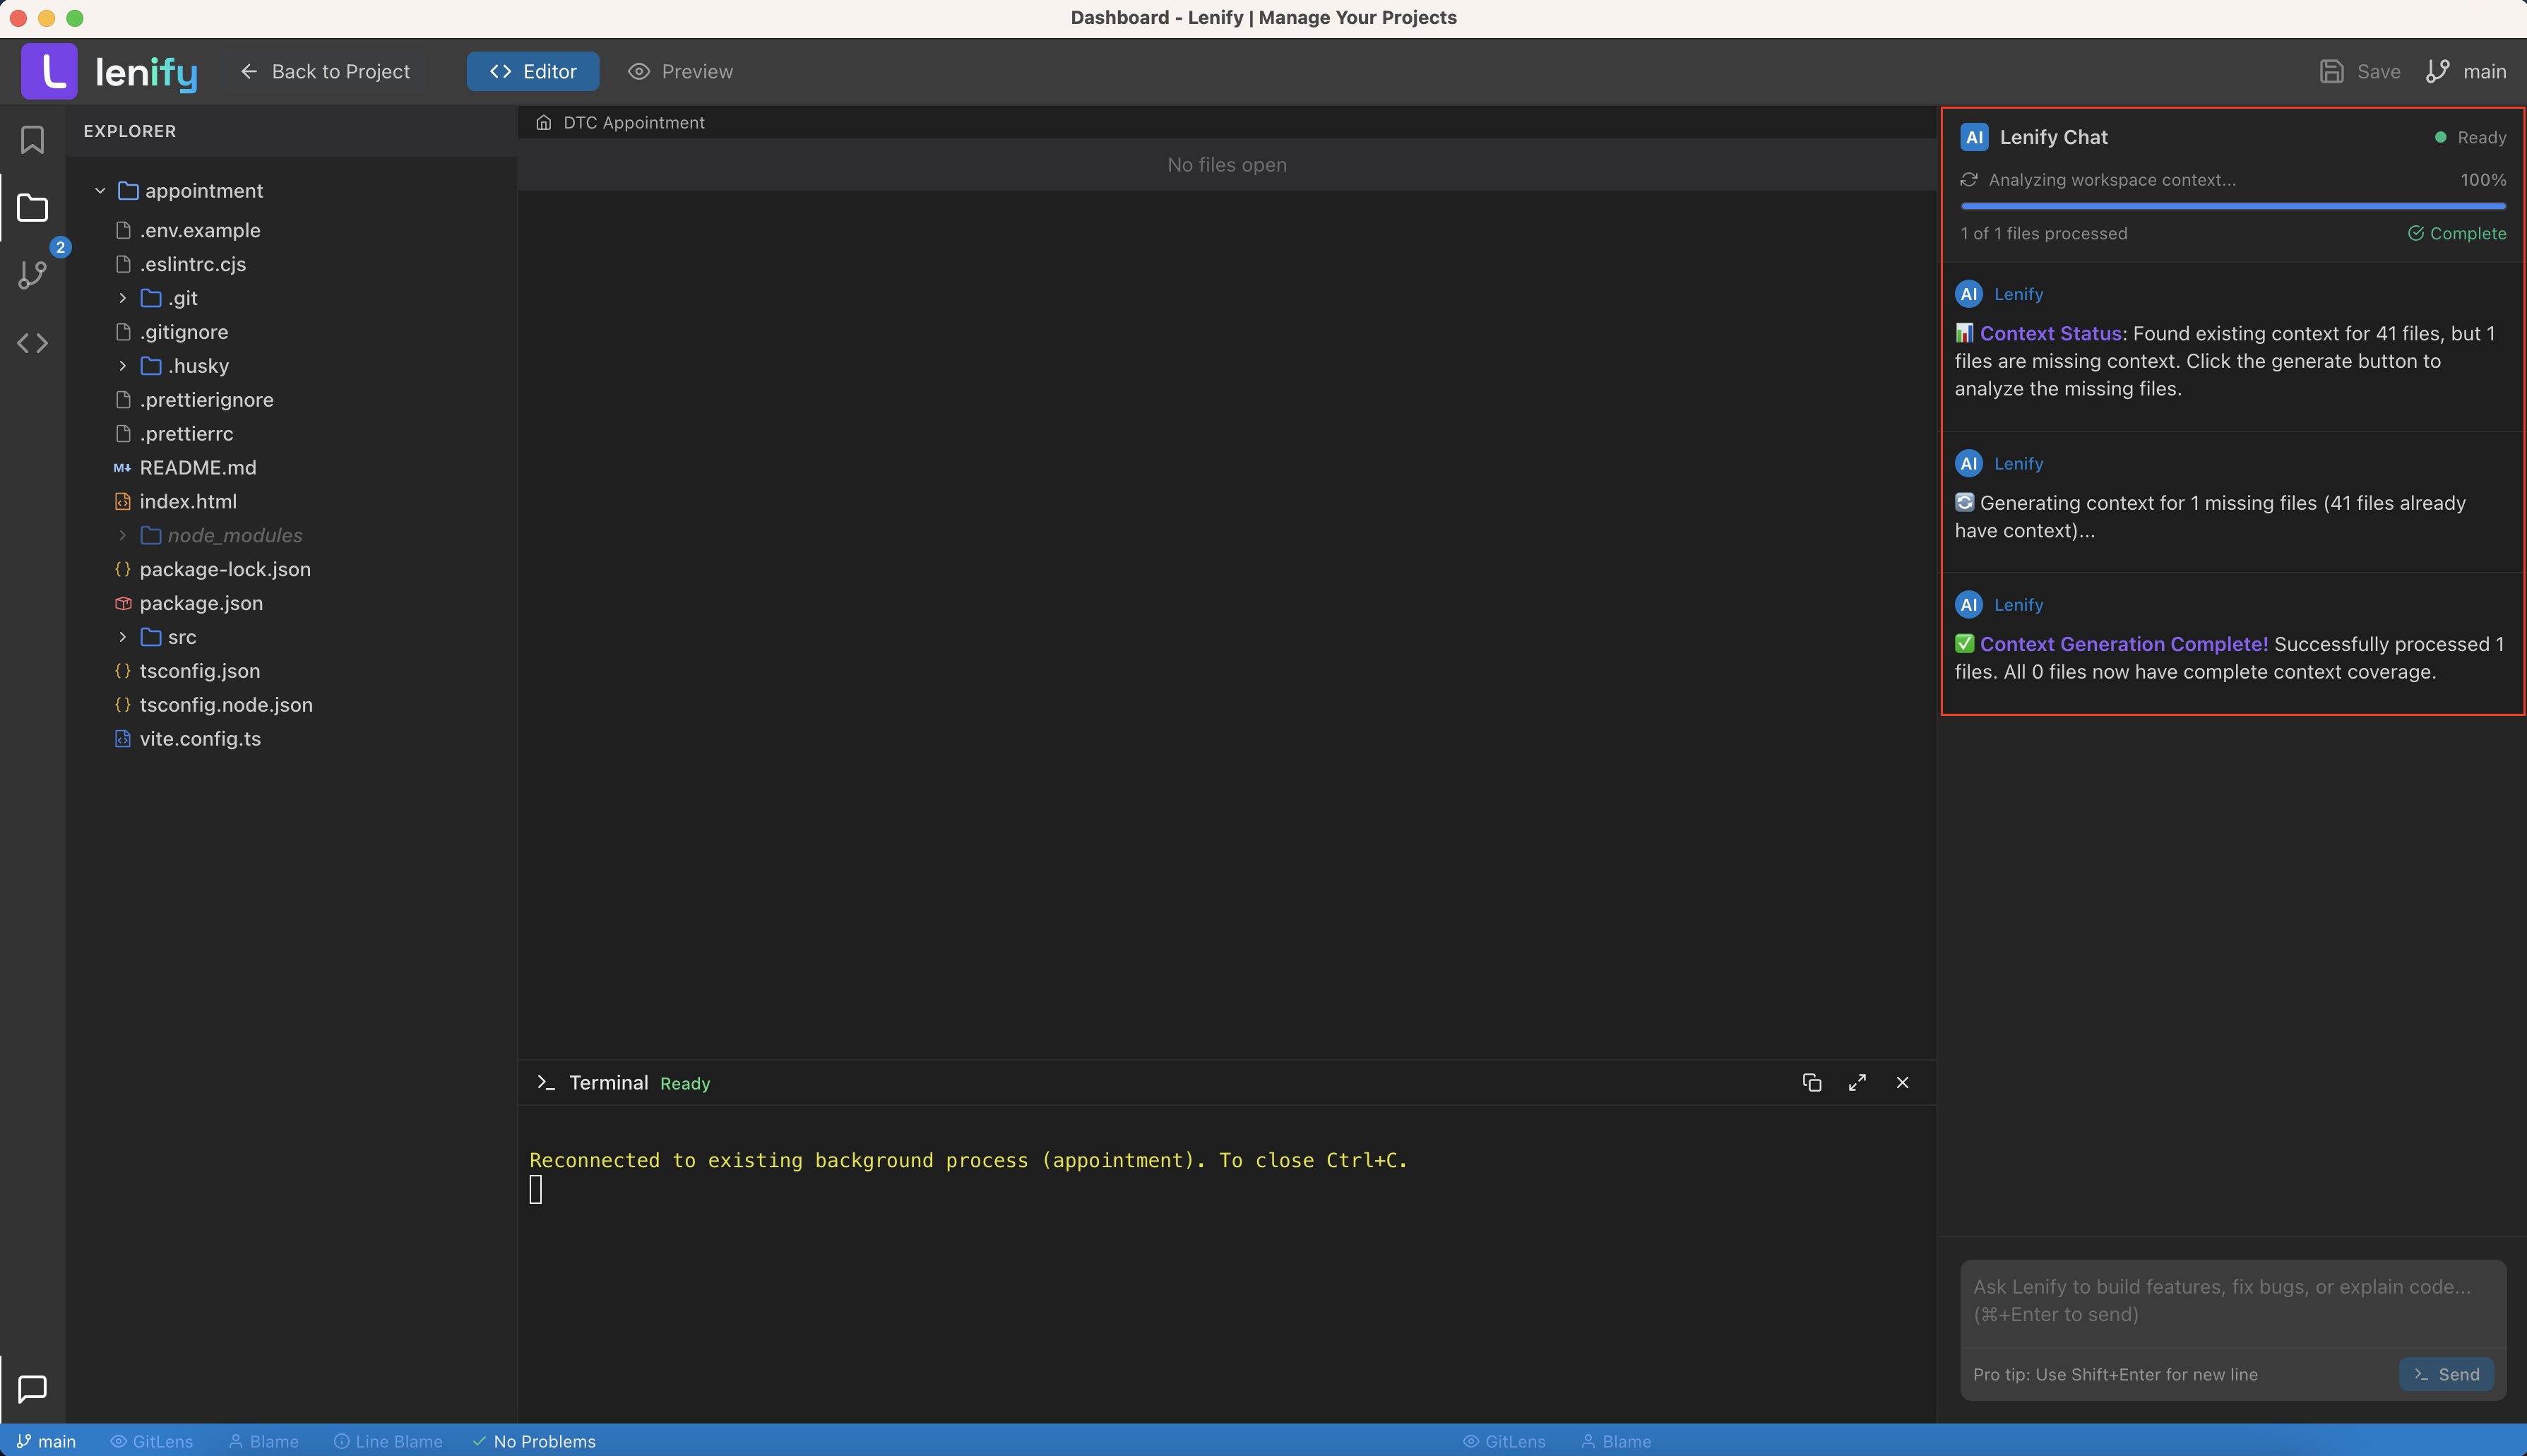 AI-powered analysis of your codebase relationships, dependencies, and suggested updates when making changes
Context Generation Process:
- Missing Context Detection: If any files lack context coverage, the UI displays a "Generate Code Context" button in the header toolbar
- One-Click Generation: Click the button to trigger context analysis for missing files
- Real-time Progress: Progress states are displayed in the chat interface with live updates
- Batch Processing: Files are processed in batches for optimal performance
- Completion Notification: Chat interface confirms when context generation is complete with coverage statistics
Context Generation Features:
- Smart Detection: Automatically identifies which files need context analysis
- Progress Tracking: Real-time progress bar showing processed files count and percentage
- Chat Integration: All progress updates and completion messages appear in the AI Assistant chat
- Incremental Updates: Only processes files missing context, not the entire project
- Error Handling: Graceful handling of any files that fail to process
Step 10: Source Control Integration
Professional Git Integration
Lenify provides comprehensive Git integration with VS Code-style source control interface, offering professional-grade version control capabilities:
Key Features:
- Visual Status Indicators: Color-coded file status with M (Modified), A (Added), D (Deleted), U (Untracked) badges
- Interactive File Management: Stage, unstage, and discard changes with one-click actions
- Smart Commit Interface: Expandable commit input with summary/description fields and character count guidance
- Branch Management: Create, switch, and manage branches with dropdown interface
- Recent Commits History: View commit history with author, timestamp, and commit messages
- Diff Viewer Integration: Side-by-side diff viewing for changed files
- Batch Operations: Stage all, unstage all, and discard all changes with single actions
- Auto-staging: Automatically stages unstaged files when committing if no files are staged
Professional Workflow:
- Real-time Status Updates: Git status refreshes automatically when files change
- VS Code Theming: Consistent with VS Code's source control styling and colors
- Error Handling: Comprehensive error messages and user confirmations for destructive operations
- Keyboard Shortcuts: Ctrl+Enter to commit from message input
- Repository Initialization: Auto-detects and initializes Git repositories for new projects
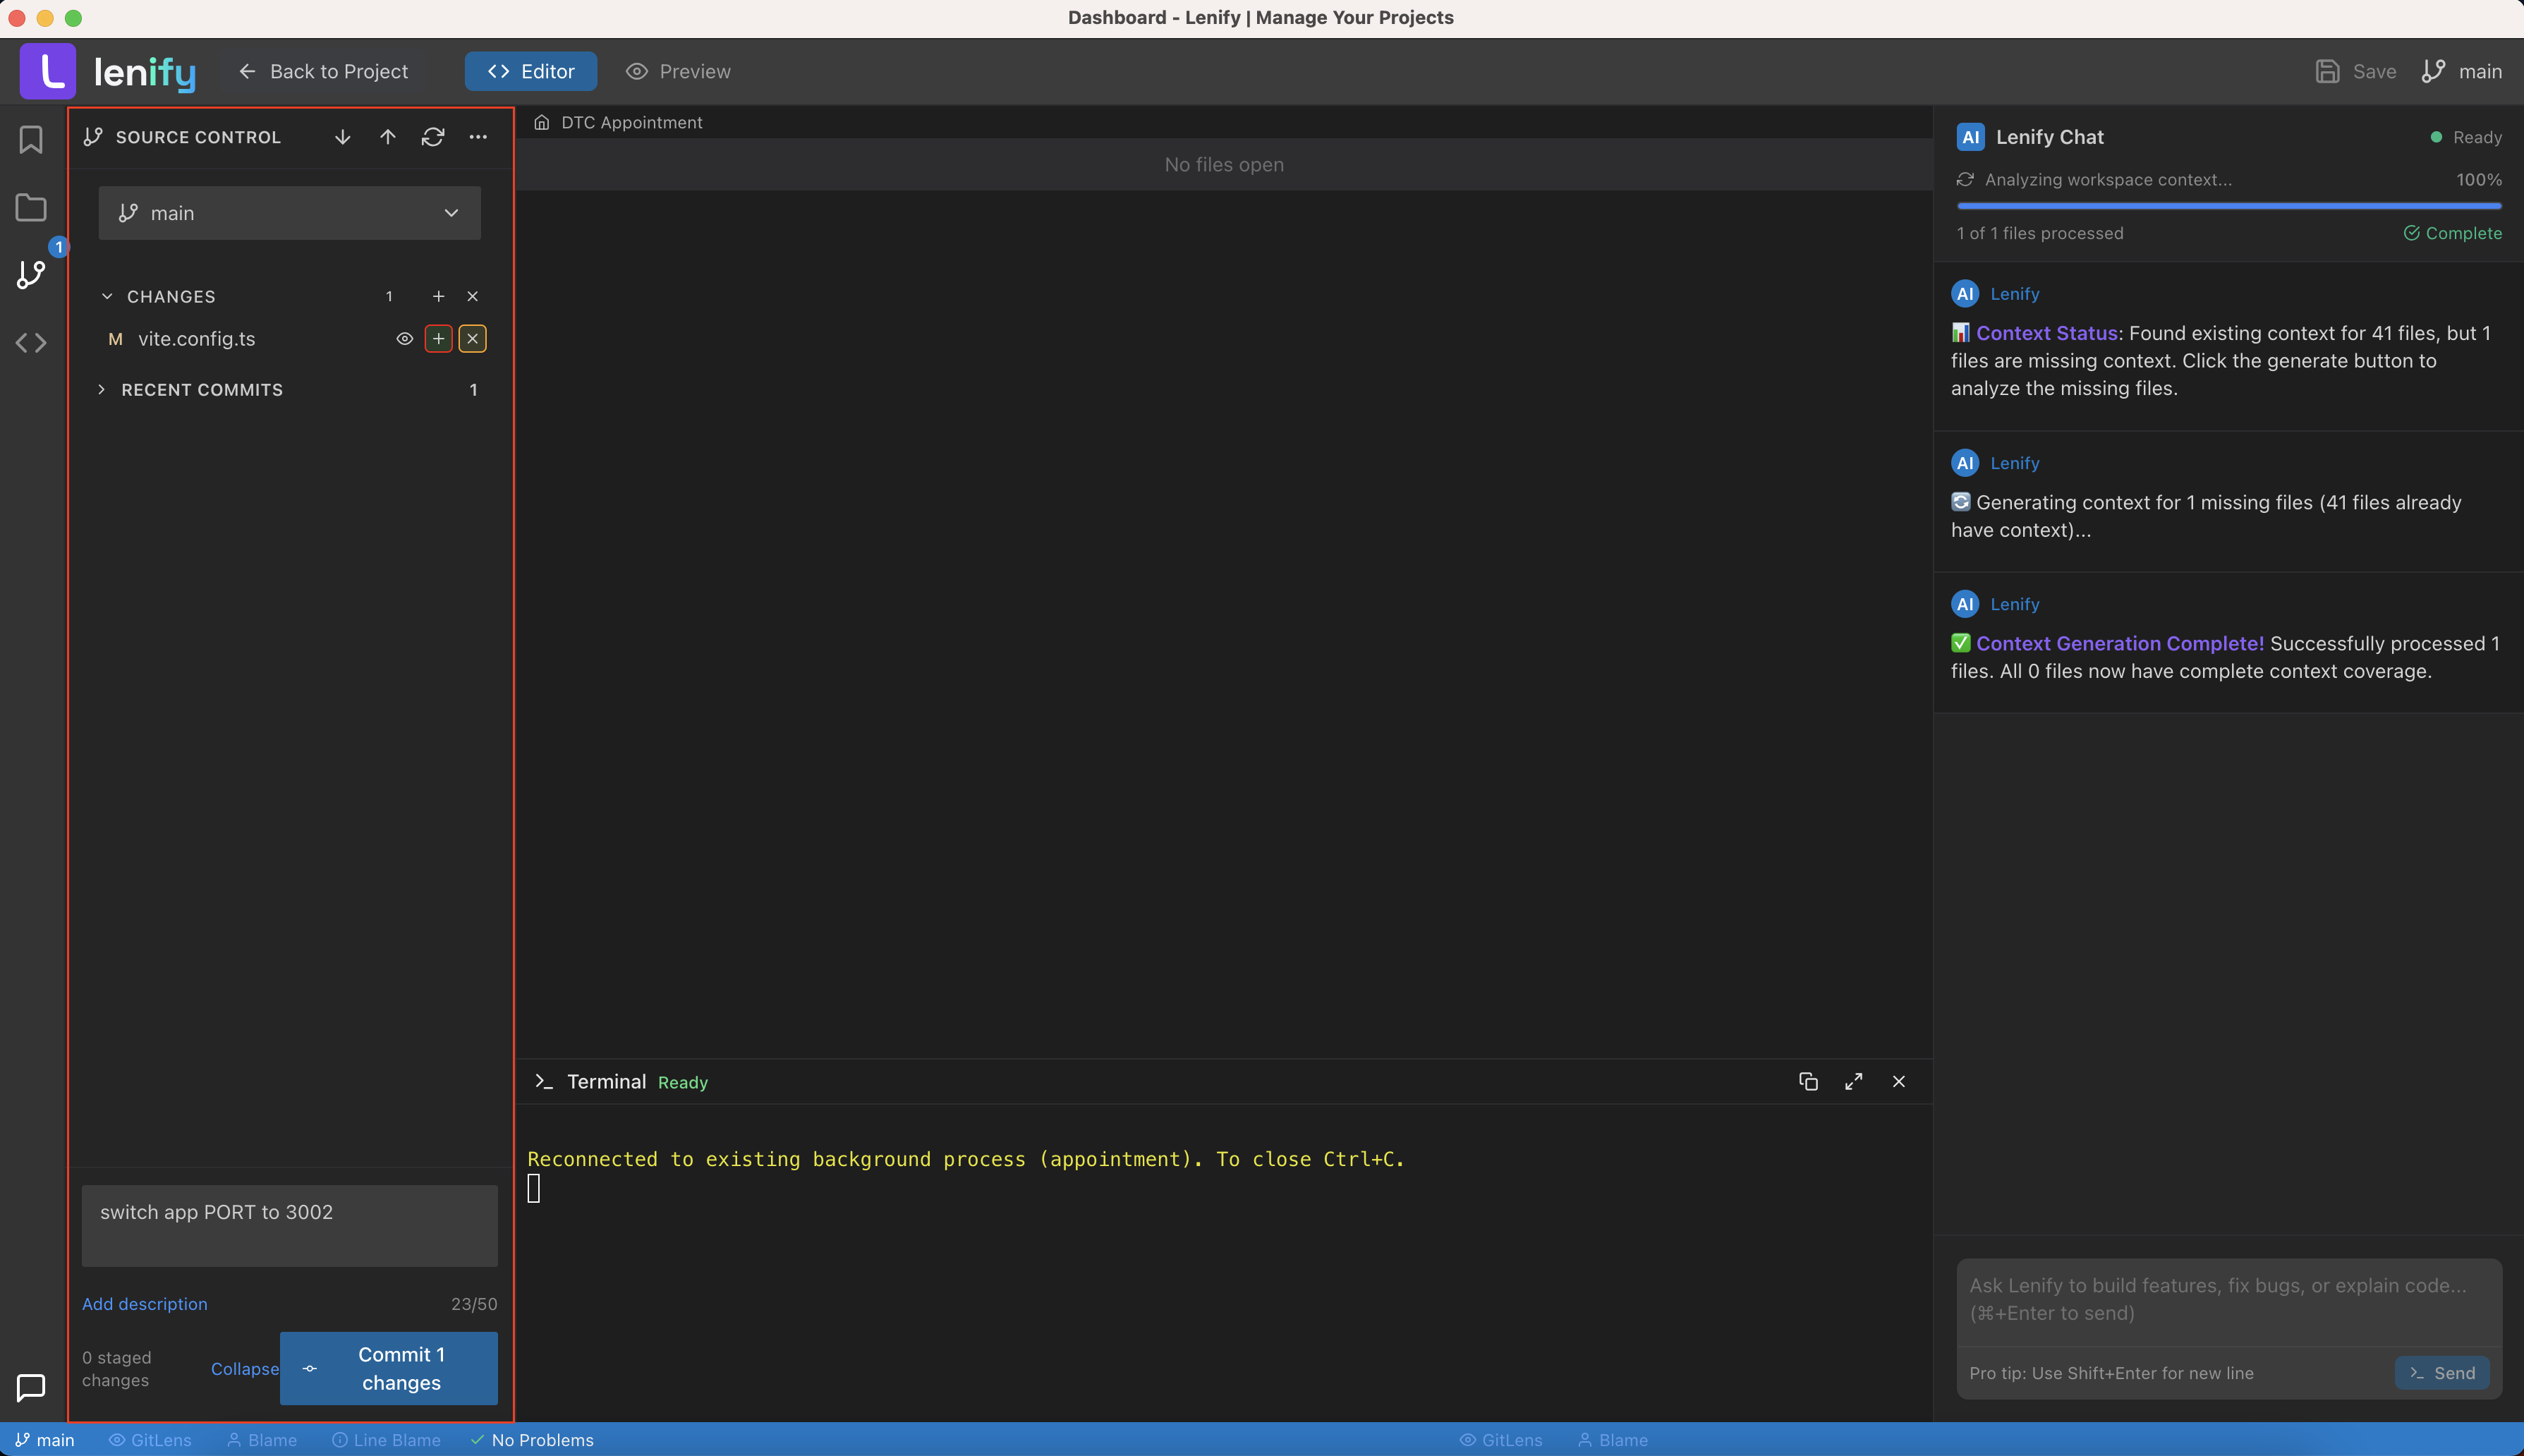 Professional Git integration with staging, commits, branch management, and comprehensive diff viewing capabilities
Step 11: Integrated Terminal & Preview
Terminal Component
Full-featured terminal integration for command execution:
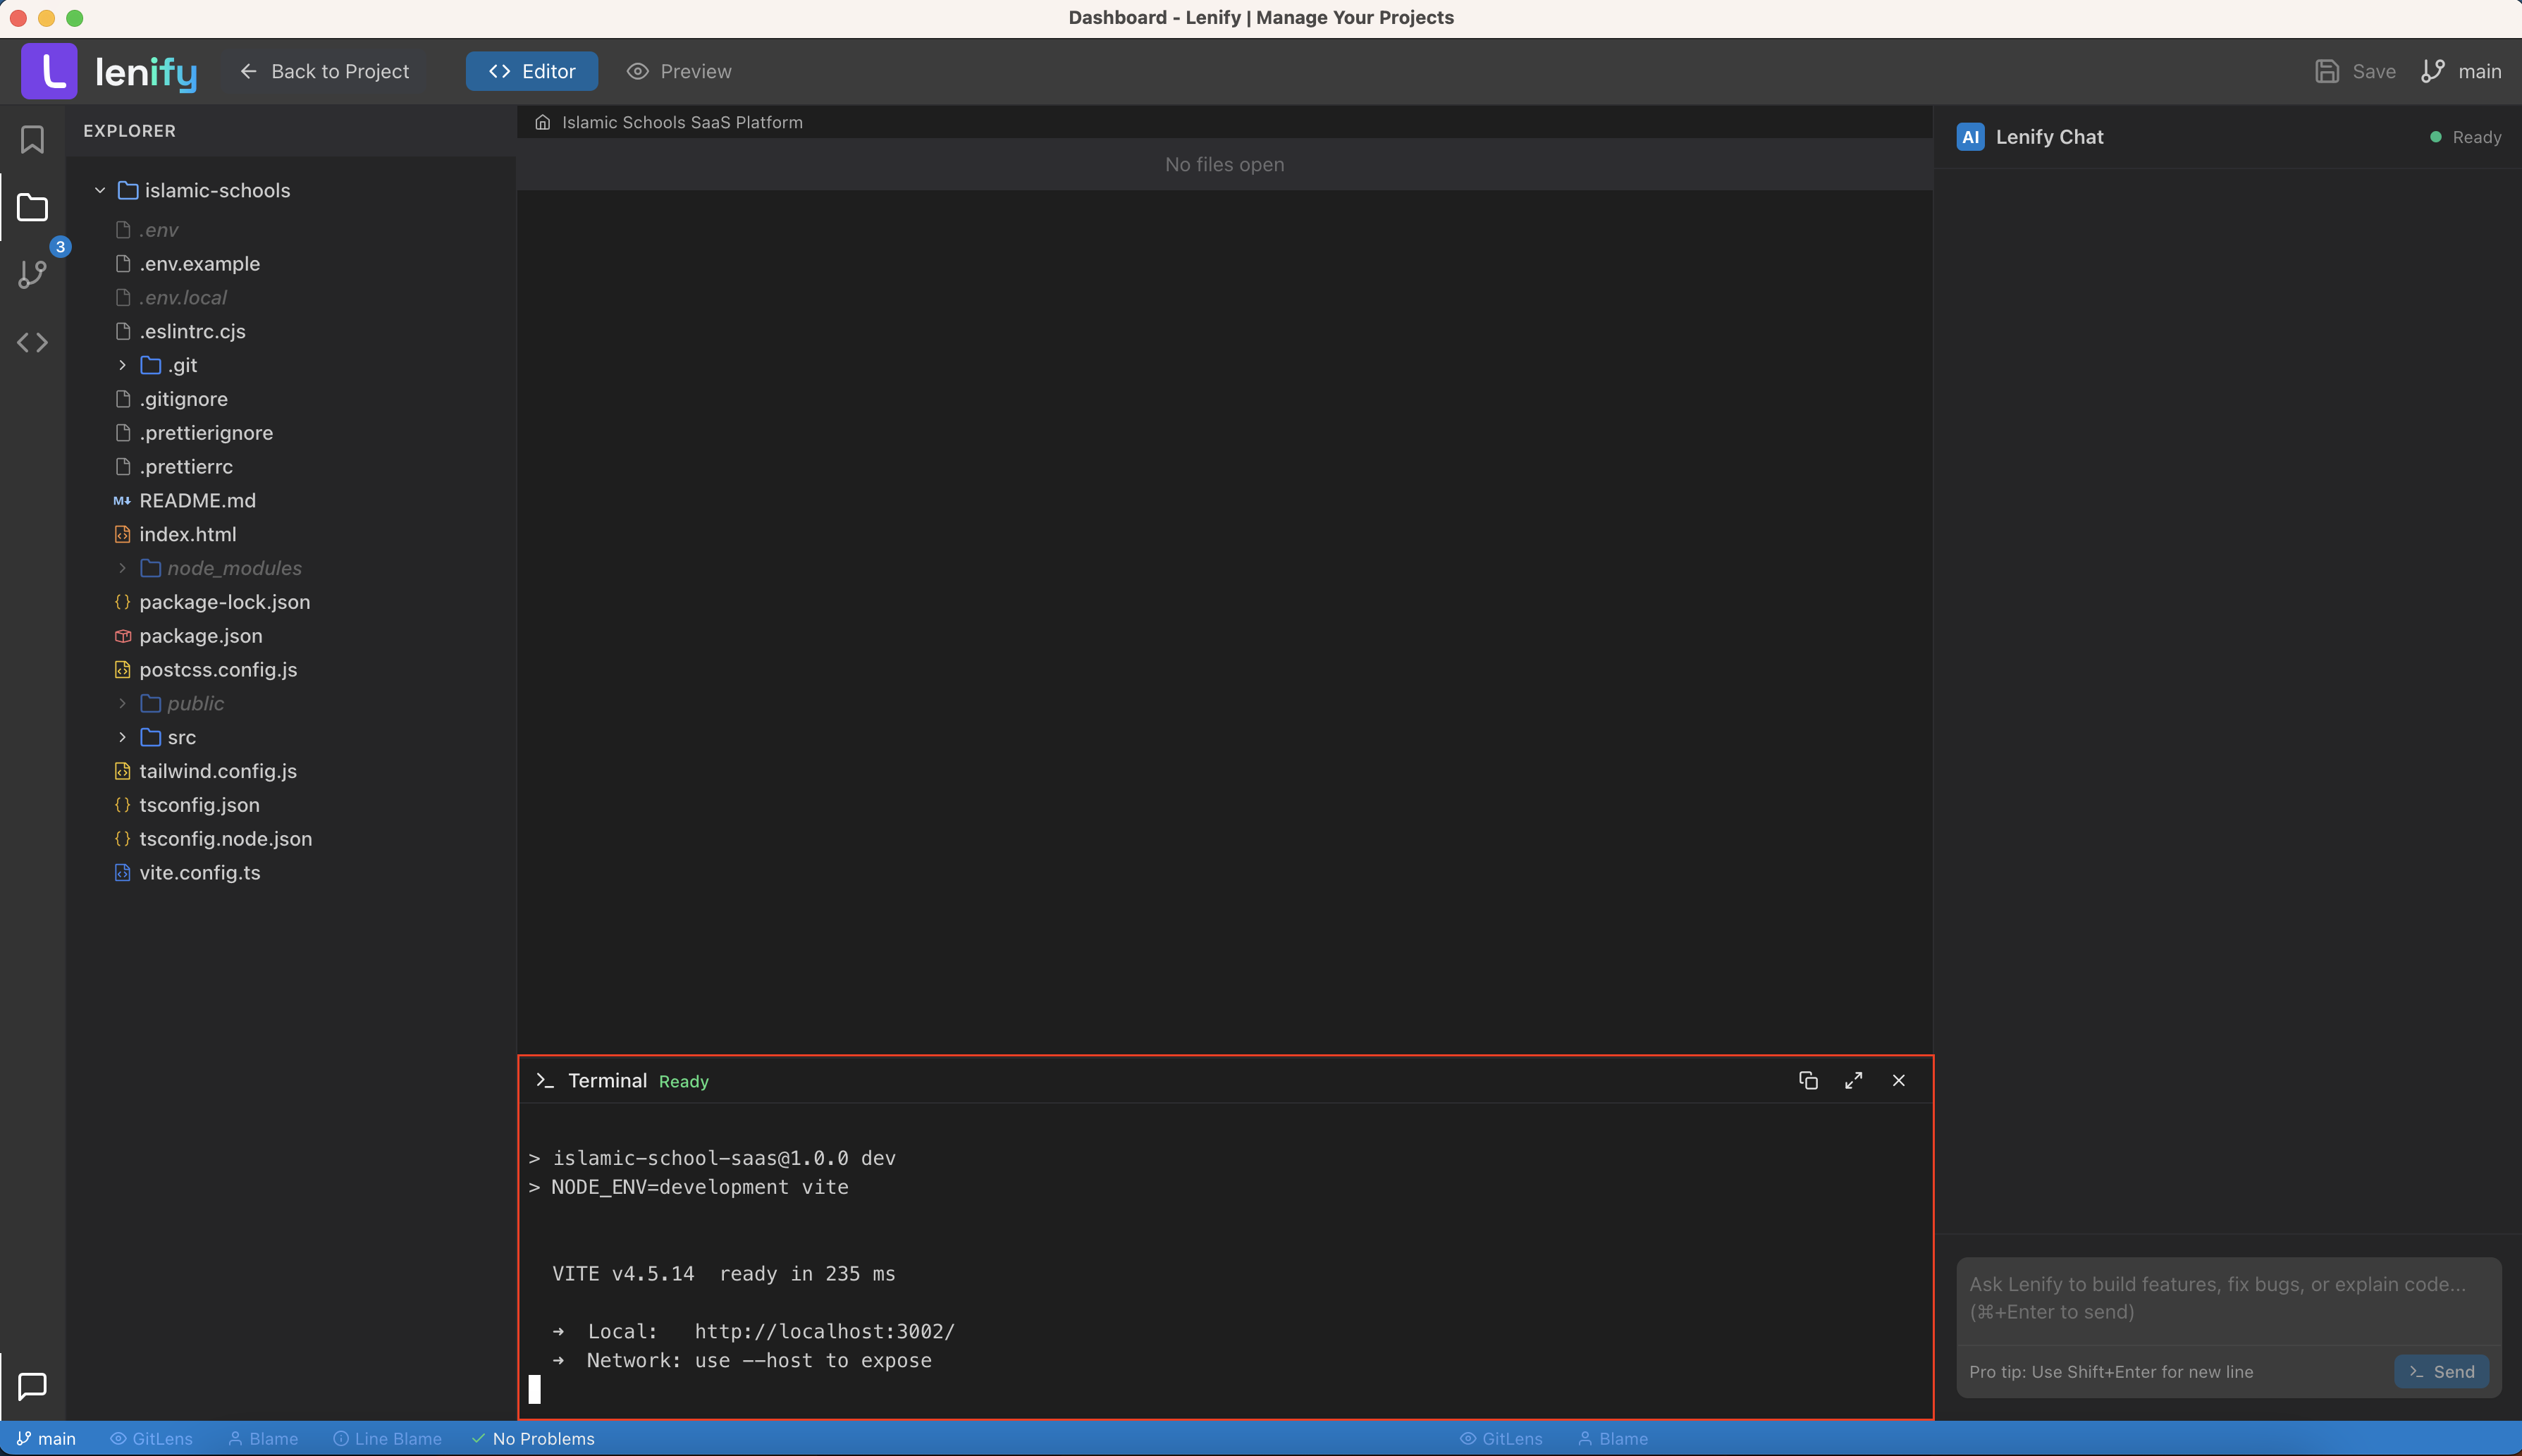 Professional terminal component with full shell support, command history, and seamless workspace integration
Browser Preview
Multiple preview modes for testing your application:
1. Modern Browser Preview
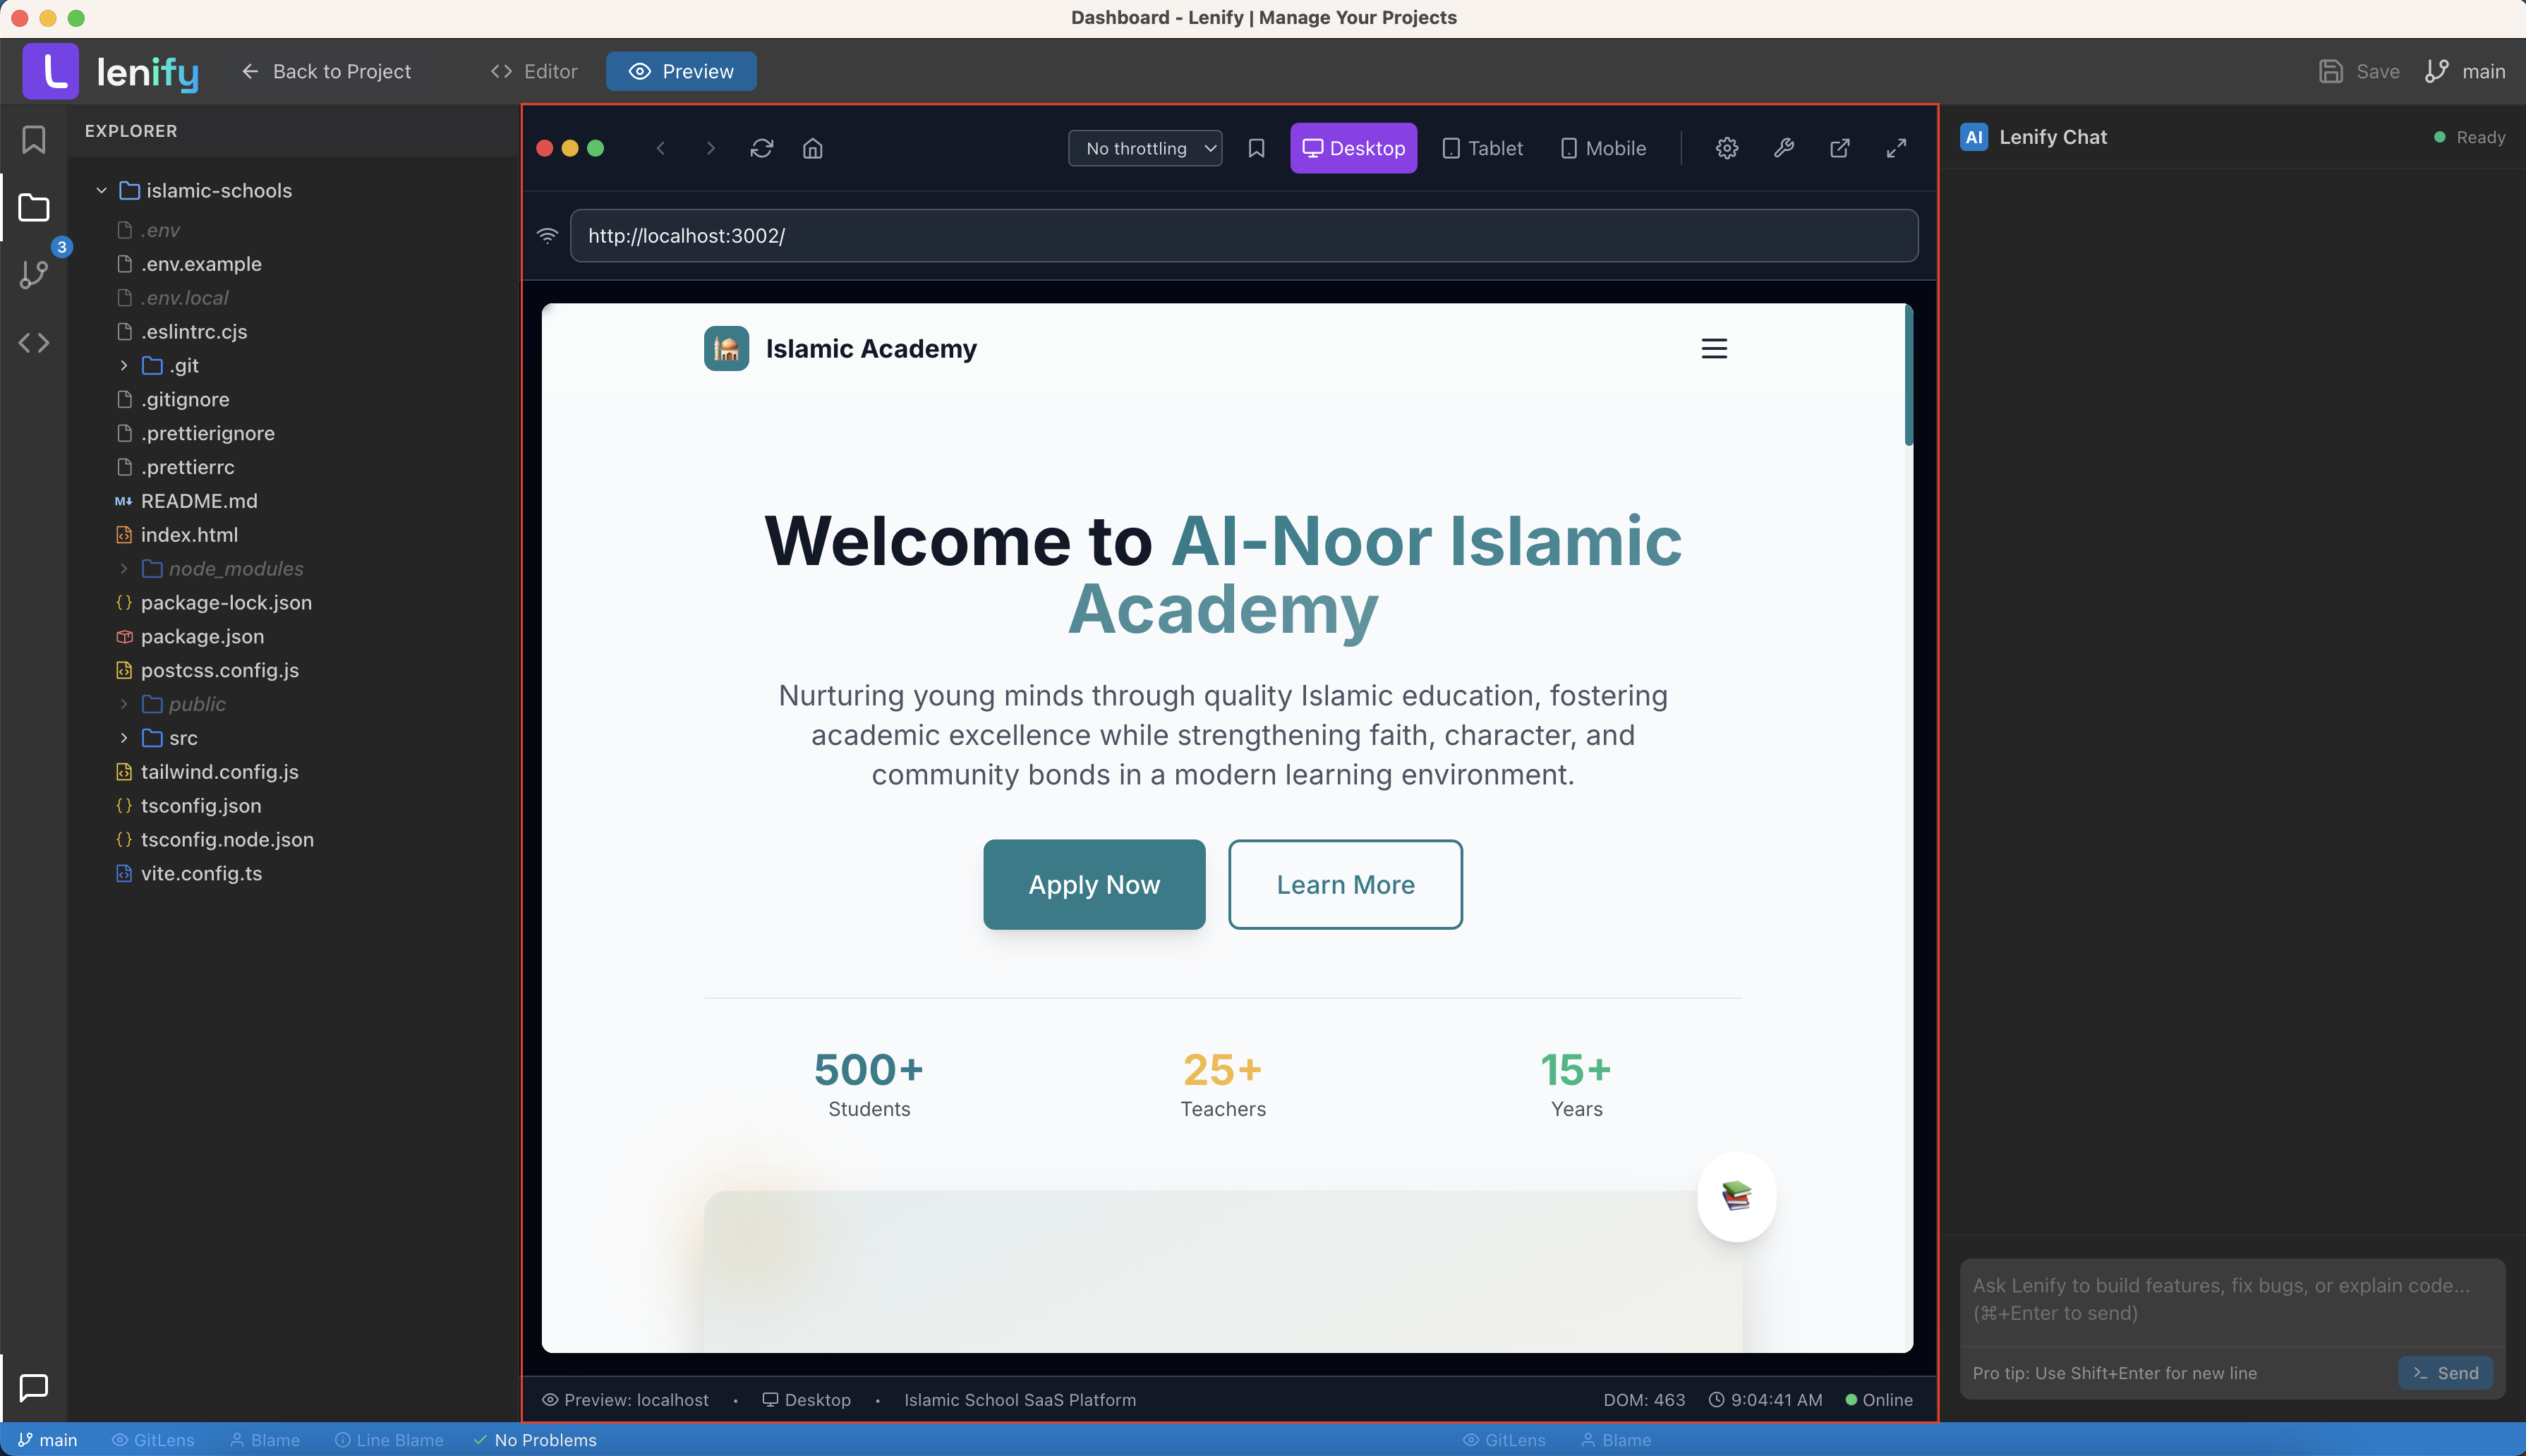 Responsive browser preview with device simulation, developer tools, and real-time updates
2. Preview Pane Integration
- Split View: Code and preview side-by-side
- Full Screen: Dedicated preview mode
- Multi-Device: Test multiple screen sizes simultaneously
- Real-time Sync: Instant updates on file changes
3. Development Tools
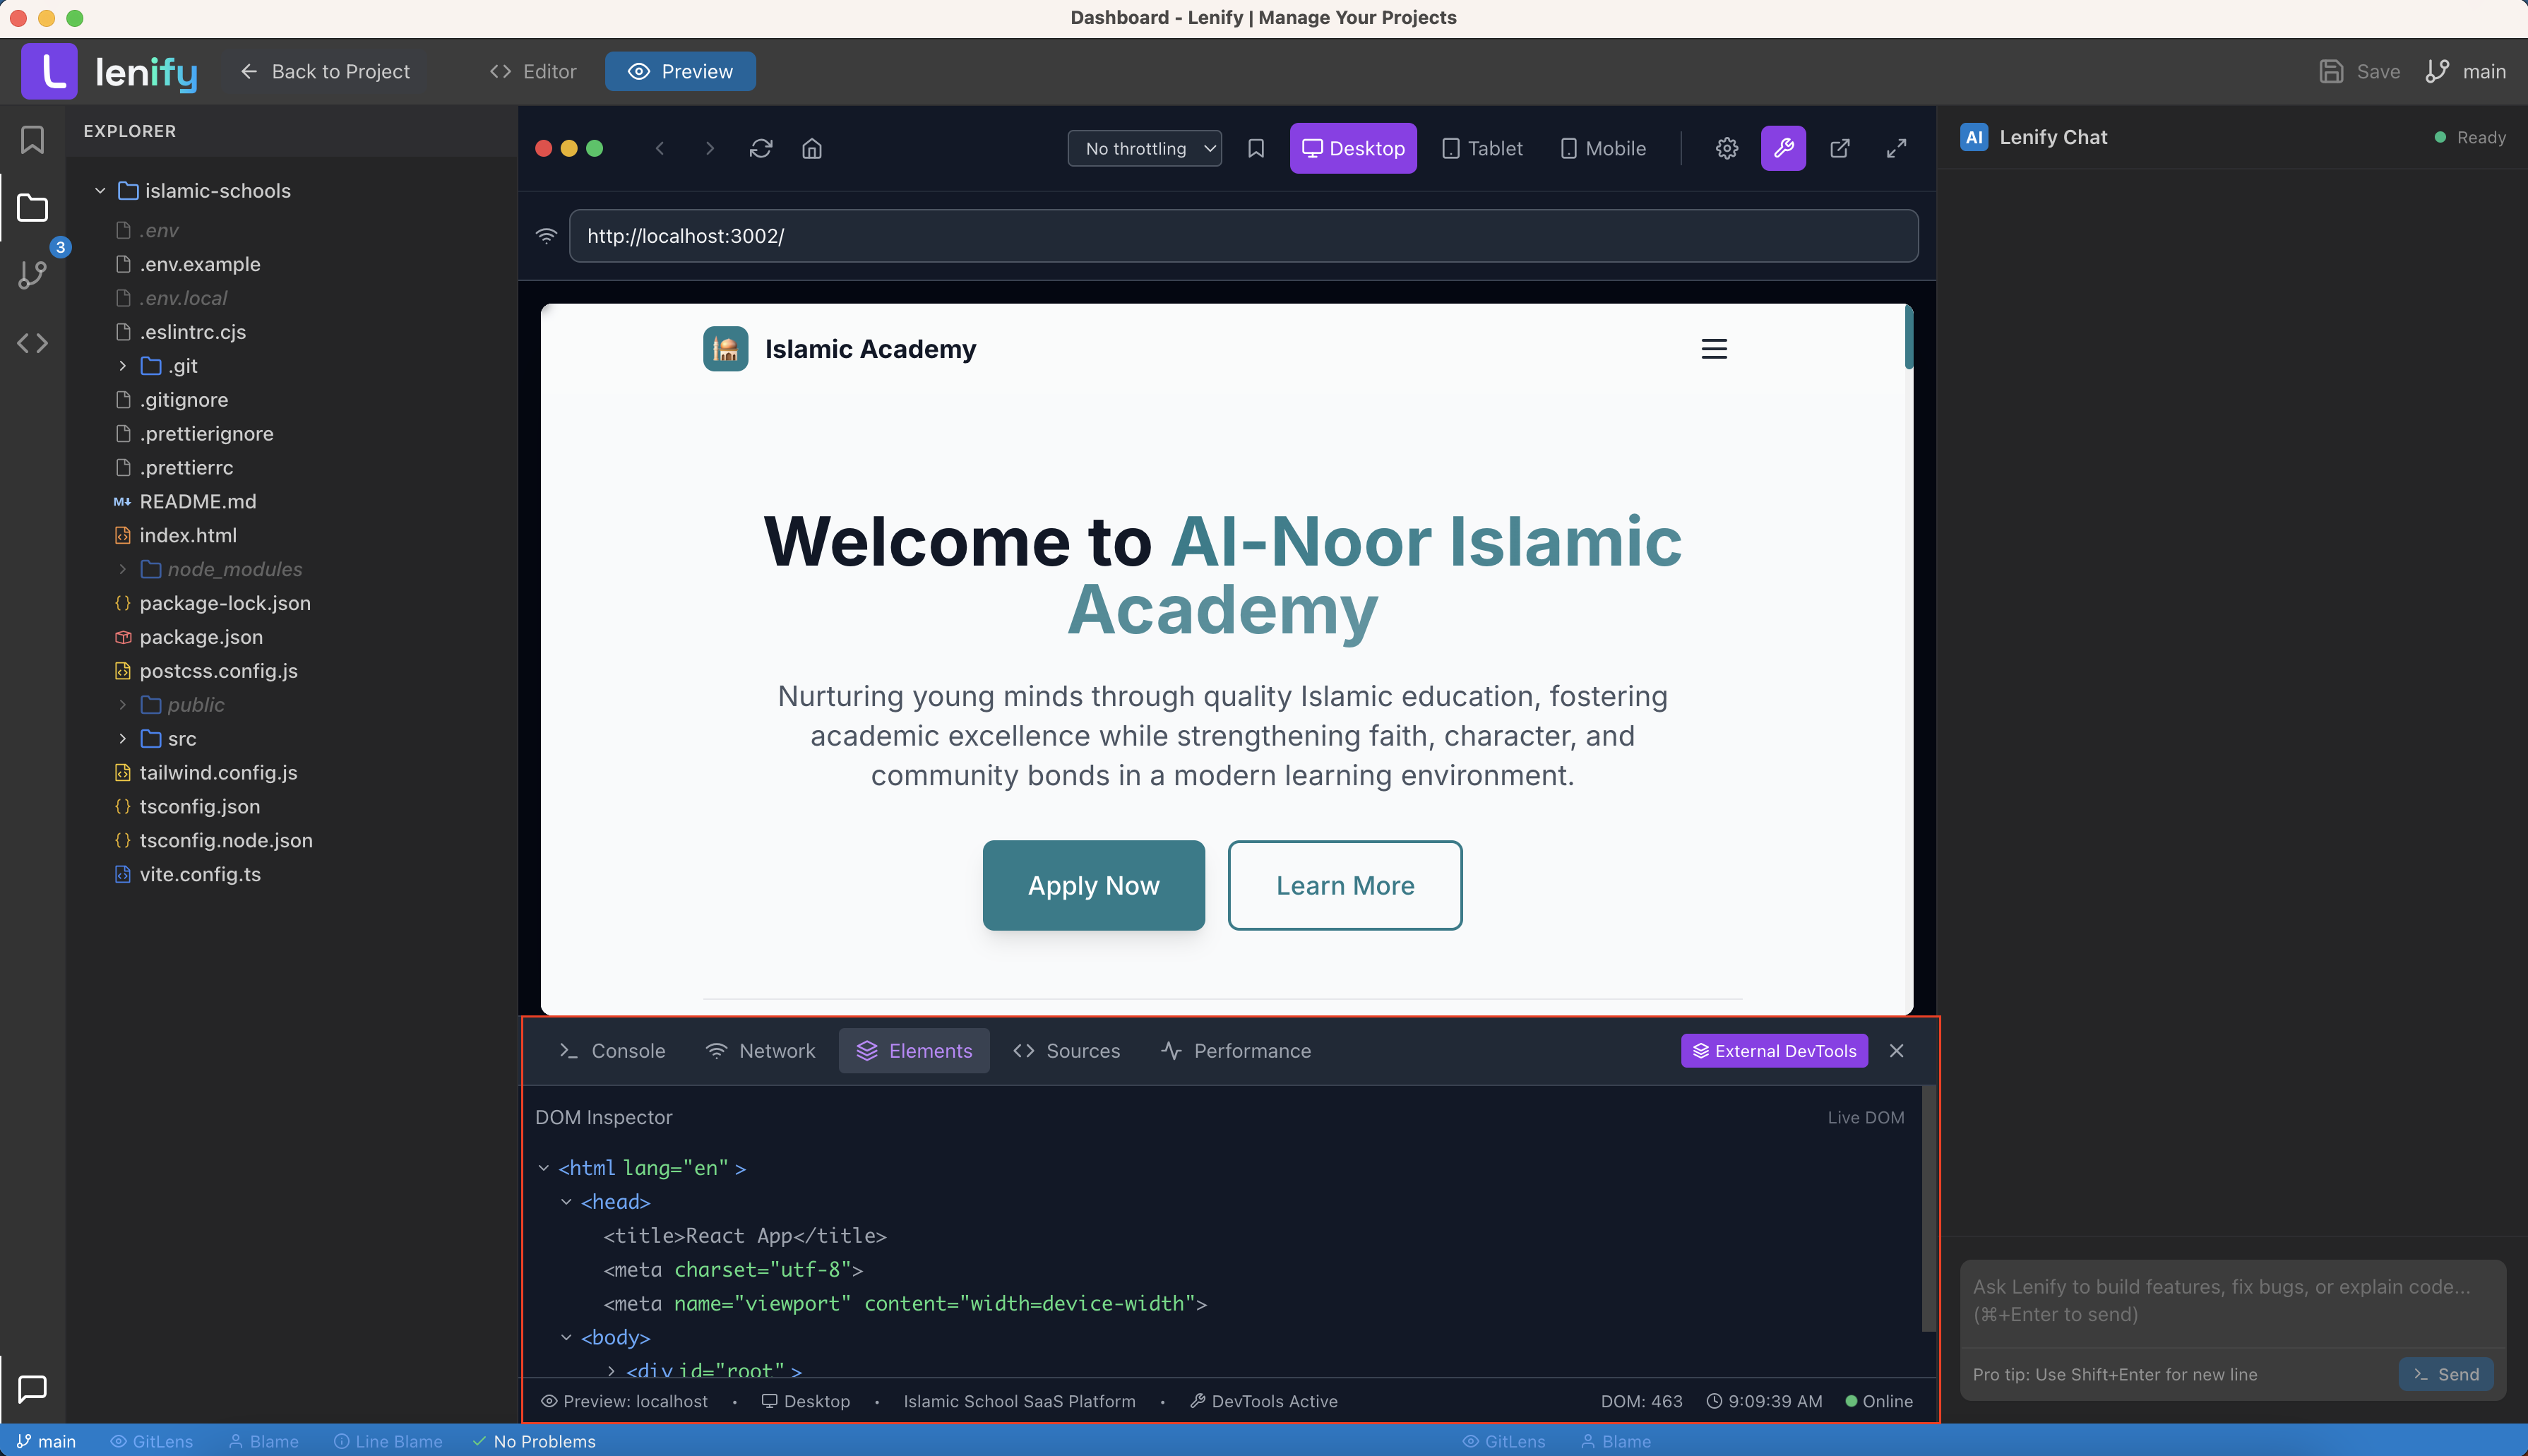 Integrated browser developer tools with console, network monitoring, performance analysis, and responsive testing
Troubleshooting
Common Issues
Blueprint Generation Failed:
- Check your project requirements are clear and complete
- Verify internet connection for AI processing
- Try regenerating with more specific technical details
AI Assistant Not Responding:
- Verify you're authenticated and have active subscription
- Check AI service status in the bottom status bar
- Restart the AI service from settings menu
Code Context Missing:
- Ensure project files are properly indexed
- Wait for initial codebase analysis to complete
- Refresh context from the AI panel menu
Preview Not Loading:
- Check that your development server is running
- Verify port configuration in preview settings
- Review browser console for error messages
Our AI assistant is always available to help! Just press Ctrl+K and ask any question about blueprint development, coding, or troubleshooting.
Congratulations! 🎉
You've completed the Lenify quick-start guide and experienced the power of 100% Software Blueprint-driven AI development!
What You've Accomplished
✅ Created Your Account - Joined the Lenify AI development platform
✅ Installed Desktop App - Set up the native development environment
✅ Configured Subscription - Selected and activated your development plan
✅ Set Up LLM API Key - Configured Anthropic API for AI-powered features
✅ Created Your First Project - Initialized a new development project
✅ Generated Project Blueprint - AI-created complete project architecture
✅ Explored Blueprint-Driven IDE - Experienced intelligent development environment
✅ Learned Task-Driven Development - Built features following blueprint guidance
✅ Used AI-Powered Debugging - Automated error detection and resolution
✅ Mastered Code Context - Intelligent codebase relationship analysis
✅ Integrated Git Workflow - Blueprint-aware source control
✅ Previewed Live Applications - Real-time development preview
Your Blueprint-Driven Development Journey Starts Now
🚀 Next Steps:
-
Explore Advanced Features
- Custom blueprint templates
- AI-powered code reviews
- Advanced debugging tools
- Performance optimization
-
Join the Community
- Share your blueprints with the community
- Learn from other developers
- Contribute to blueprint templates
- Get help from AI development experts
-
Build Something Amazing
- Use your new blueprint to create your dream project
- Leverage AI assistance for complex features
- Share your creation with the world
📚 Continue Learning:
- Blueprint-Driven Development - Deep dive into blueprint-driven development workflow
- AI Development Assistant - Master Lenify's AI-powered development capabilities
- IDE Interface Overview - Complete guide to the development environment
- Git Source Control - Professional version control integration
- Project Blueprint Generation - Advanced blueprint creation techniques
💬 Get Help & Support:
- Community Forum - Connect with other developers
- Discord - Real-time chat and support
- Documentation - Comprehensive guides and tutorials
Ready to Transform Your Development?
Start your next project with Lenify's blueprint-driven approach and experience the future of AI-powered development!
"Lenify transformed how I think about development. The blueprint approach helped me build a complete e-commerce platform in just two weeks!"
- Sarah Chen, Full-Stack Developer
"The AI assistance is incredible. It's like having a senior developer pair programming with you 24/7."
- Marcus Rodriguez, Startup Founder